16.7 Client
A client in E-Marketing Manager is an organizationally independent unit of the system.
Several clients can be used to represent different companies in a legally compliant manner. The master client has access to all sub-clients, but not vice versa. A master-subclient solution is suitable for groups or agencies with different customers, but can also be used for independent organizational units.
Even if you only use and need one client, you will find important configuration options here. Under the menu item Clients, you can also make cross-user settings for the system for each client, e.g. retention periods for data, password requirements and validity or from when a login lock occurs.
Please note: If you need additional clients, please contact your account manager.
16.7.1 Configure clients
First call up the Clients submenu via Administration. The overview shows you all previously created clients to which you have access. The table shows the customer ID of the respective client, name of the client, optionally a short description, as well as an info about the system status (only if this is locked). If you want to edit a client or view the previous configurations, just click on the corresponding entry. This is part of the Automation Package and enables numerous additional features.
You will first see the Edit Clients section, as well as the Security, Data Management and Advanced submenus. Here you will find some information about your client that is fixed in the database, on the other hand you can also configure settings there that apply across users. In the following the contents and possibilities are presented individually.
In the Edit client area you have the following options:
-
In the Name field, you define the name of the client.
-
Under Description you can write an optional description for the client.
-
In the drop-down menu Sector you select the business area of the client. This setting causes that in the benchmark statistics your mailing is first compared with the selected sector. You can choose from: none, agencies, communities/clubs, tourism, financial services, IT/telecom, retail/e-commerce, industry, consumer goods, publishing/media, administration & non-profit organizations and education.
-
Business: In this field you select the client's core business (B2B or B2C).
With the fields Default language as well as Default timezone you define which configuration is valid for this client. These fields give you the option of not being populated. Should you select None, the E-Marketing Manager will use the data stored in your browser. Of course, you can also select one of the offered options. This has the consequence that no matter from where a client acts, the time zone and also the language remain unchanged.
-
In the executive administrator * drop-down menu, you define who is the main contact for AGNITAS in case of contract details or other important decisions. This field is a mandatory field and must be filled with a user from your client. Make sure that a valid email address has been created for the user in the email address field. If the responsible administrator leaves the company and his user is deleted accordingly, you will be prompted to define a new responsible person.
-
In the Technical contact * drop-down menu, you define who is the main contact for AGNITAS on IT and administrative issues. Among other things, the technical contact will be contacted when certificate changes become necessary or maintenance work is due. This field is mandatory and can be filled with any email address. The technical contact does not necessarily have to have user access, although this is certainly helpful. Additional persons can also be added via the plus sign. If more than one contact person is defined, a trash can icon also appears at the end of the line, which can be used to remove individual addresses. However, at least one contact person must remain.
First, you will find the following options under Security:
-
Activate access authorization allows you to give your users the right to grant login permissions to AGNITAS employees for support purposes. If this slider is disabled,AGNITAS will have no ability to log into your client. In addition, the individual user must still grant temporary or permanent login permissions. More about this in chapter Approval for login permissions.
-
If you activate 2 factor authentication, all users require a security code for login in addition to their password.
-
In the Login lock * drop-down menu, select how many failed login attempts a user can make before the lockout kicks in, the choices are 3, 5 and 10. You also specify how long the lockout period lasts, here there is a choice between 1 and 5 minutes. This field is also mandatory.
-
In the Password policy drop-down menu, you define which criteria your users' passwords must meet. You can choose between: At least 8 characters, consisting of upper and lower case letters, numbers and special characters, and At least 12 characters.
-
The Password expires after drop-down menu allows you to configure how often the password must be changed. You can choose between --, 90 days and 180 days.
-
In the drop-down menu Host authentication cookie expires after: you can determine how long the browser saves the 2 factor authentication as valid.
Use the Send notifications on password changes slider to specify whether users should be informed of password changes for their account by email.
-
If you activate the Send mailing encrypted slider, all mailings from this client are always sent in encrypted form.
-
With the Show bot intermediate page option, you can activate an intermediate page for link clicks that protects you from automatic clicks by bots on your links. The corresponding help balloon provides you with further information.
Under Data management you can determine the following:
-
The Maximum number of profilefields value tells you how many custom fields you can create. By default, 50 profile fields are included. If you need more fields, contact your account manager.
-
In the field hold-back time mailings (max. 1460) you can see after how many days the mailings will be deleted from your client.
-
The field Deletion of recipient without confirmation indicates after how many days recipients are deleted from the database who have not confirmed the double opt-in. For data minimization reasons, this personal data must not continue to be stored without reason.
-
The Delete recipients without a mailing list lets you enable an automated purge that will run nightly. The automated cleanup of your database will remove recipients that are not assigned to any mailing list. This only affects recipients that have never had a binding to a mailing list and ended up in the database due to import errors, for example. We recommend the cleanup, as this improves the performance of the database and the cleanup fulfills the principle of data minimization. (GDPR §17)
-
The Anonymize tracking data for all recipients slider allows you to completely disable personal tracking for your client. However, this setting also has the effect that numerous other functions, e.g. follow-up mailings, are not available.
-
Activating the slider Anonymisation of old tracking data in case of tracking objection will also remove old tracking data that was collected about the recipient before they objected to tracking. This way you are on the absolutely safe side in case of an information request.
-
Use the Allow HTML in profile fields slider to specify whether it is generally possible to save HTML in profile fields. By default, the switch is disabled for security reasons, as the function could also be abused and scripts with malicious intent could be infiltrated, e.g. for newsletter signup. Note: This setting also affects imports. If your import file contains HTML code and the switch is disabled, the file cannot be imported.
-
The Recipients pseudonymisation slider causes the contents of profile fields that do not need to be kept for tracking purposes to be purged after 7, 14, or 30 days for recipients without an active connection on a mailing list. This purge cannot be undone. We recommend the purge because it improves the performance of the database and the purge fulfills the principle of data minimization. (GDPR §17).
The slider Track recipients for non-advertising mailings is activated by default and has the effect that in the case of e-mails without promotional intent, such as the double opt-in mailing, the click is measured on a personal basis even if the recipient has generally objected to tracking. Corresponding mailings must be marked as nonadvertising in the settings.
- By selecting Deletion of recipients, you specify whether recipients who are no longer active on any mailing list should be deleted after a certain period of time.
The Extended section offers the following options:
-
If the option Convert email addresses to lowercase is activated, all e-mail addresses are stored in lower case in the database. If the option is not active, support@agnitas.de, Support@agnitas.de and SUPPORT@agnitas.de are 3 different addresses.
-
The extended salutation enables three additional genders for the salutation client-wide. You can freely define these genders, e.g. gender 3 = COMPANY.
-
The switch Show warning on email duplicates controls whether a warning is displayed when manually creating and editing an email address if the address entered already exists in the database.
-
Force sending, only affects action-based mailings. If the field is active, a recipient can be written to regardless of their status on the mailing lists. This way, non-active recipients can also be written to.
-
With the slider Set target group favourites per user you can control whether target groups are marked as favorites for the whole client or whether each user can mark his favorites for himself.
-
If the Filter recipient overview for active recipients slider is activated, the recipient overview shows active recipients by default. You can also use the Recipient status dropdown to call up any other status.
-
The Activate cookie tracking for links by default slider causes a cookie to be set automatically for all sent mailings when a click occurs. It does not need to be set manually for each mailing and for each link, in the Links tab all links are automatically marked for tracking. Note: This option is only available in the Retargeting Package.
-
If you activate the Cleanup admin and test activities slider, the existing data on admin and test recipients is removed before each final dispatch. This prevents statistics from being falsified.
-
The Activate individual link tracking for all mailings option allows you to set the tracking of the same link at each position individually as the default setting for the entire client.
-
To ensure secure delivery of voucher codes, you can optionally Abort mailing sending, if voucher codes are insufficient. To do this, the number of voucher codes is automatically checked before a mailing is sent. If there are not enough codes available for all recipients, unscheduled emails with the type “normal mailing” will not be sent at all.
The sending of scheduled or date- and action-based mailings will be canceled as soon as there are no more voucher codes available. If you would like to receive information about this process, you can activate the Send report emails option that appears below after enabling the function so that a message is sent to your client's administrator when the sending process is canceled. You can also specify CC and BCC recipients.
-
Additionally, you can define email addresses to receive an email notification after each import and export.
-
In the static BCC address (premium right) field, you enter one or more BCC addresses (comma separated) to which each sent e-mail should additionally be sent in blind copy. This feature allows you to archive all emails sent to your recipients, regardless of the mailing type.
-
Under Maximum number for test mailings, configure the maximum number of possible admin recipients for your mailings. Default setting here is 100.
-
You can use the Default link tracking mode selection to specify whether the default link tracking setting should be active or inactive. If a new link is inserted in the content, the default link tracking setting automatically applies. However, regardless of the default setting, you have the option to make different settings for each link.
-
With Max. sending mails/hour you can define a flat rate throttling of the dispatch speed for your client. By default, the selection is set to unlimited (Default). If this setting is changed, it becomes the new default for all your mailings. In the mailing itself, you then have the option to further reduce the dispatch speed individually. If you are interested, please contact your account manager.
-
You can use the Default setting for Testrun drop-down menu to specify which option should be preselected for the test run.
-
You can define a minimum number of mailing approvals for your client. As soon as you send test mailings with an approval link, an info box in the Send Mailing tab shows you how many approvals have already been granted. The mailing cannot be sent until the minimum number of approvals has been reached.
-
If you deactivate Show all mailings in the dashboard calendar, only your last five mailings will be listed in the dashboard. If you activate the switch, all your mailings will be listed straight away.
-
Marking of admin and test sendings makes it easier to distinguish them from a real mailing. Once you have selected where in the mailing this marking should be applied, you can also specify how exactly it should look.
-
To be able to use the Inbox menu item, activate Enable Inbox for response processing.
Confirm your settings with Save.
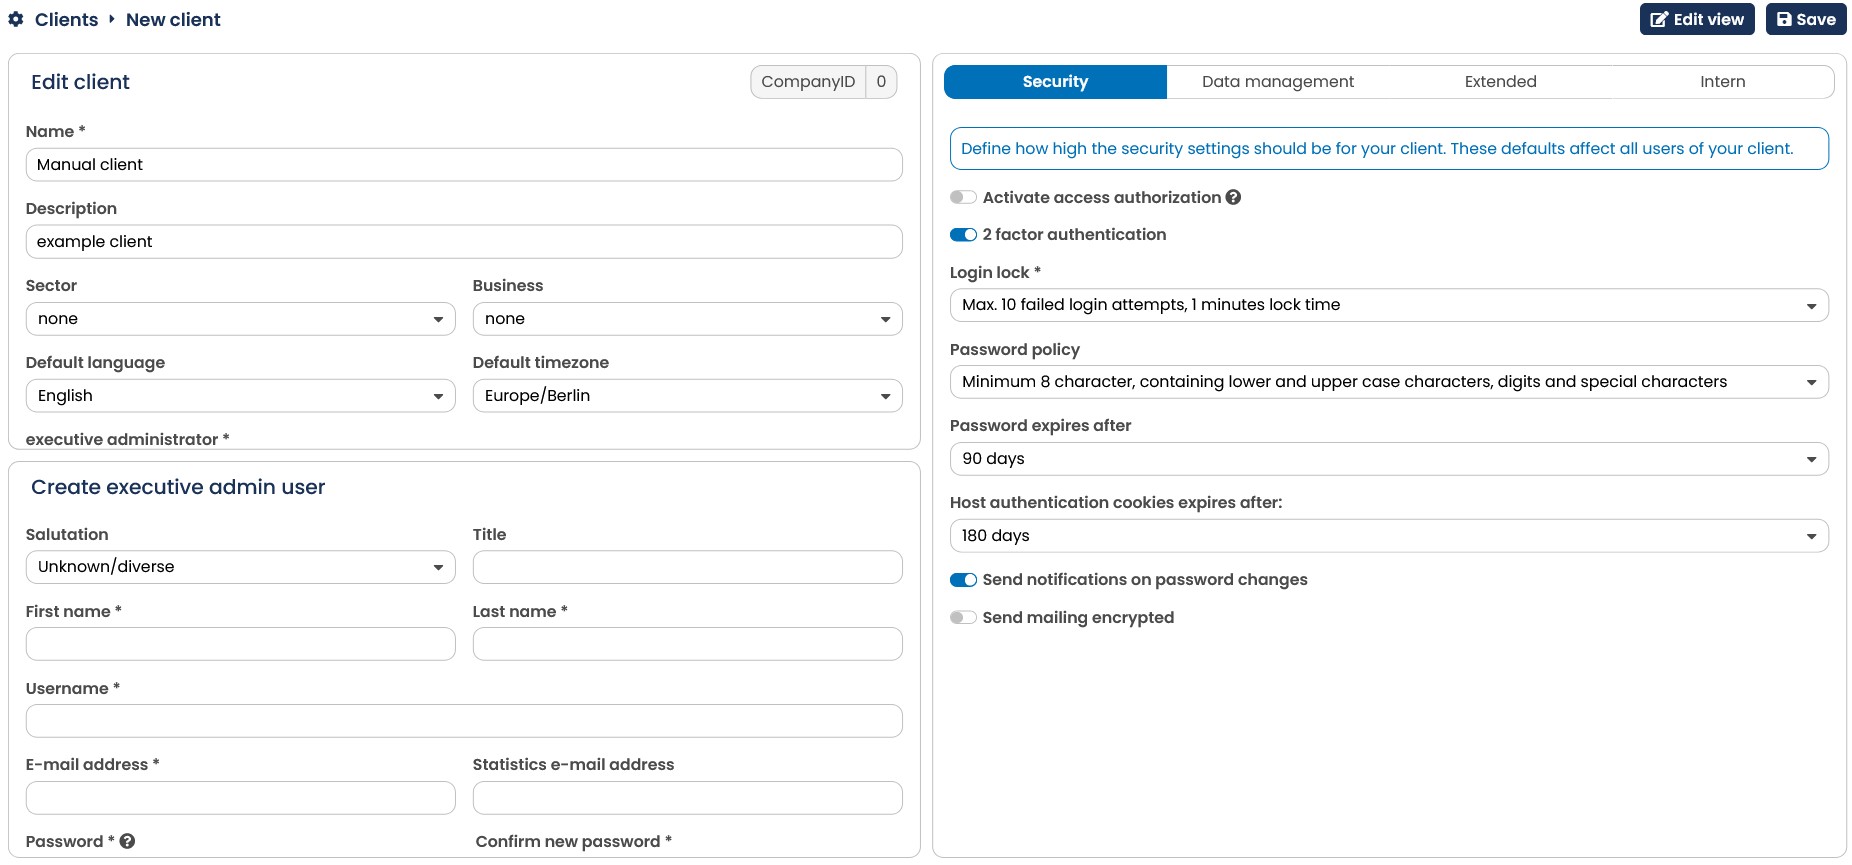
Fig. 15.17: The first step: Enter a name and a description for the new client.
After saving the new client you can see which users have been created for this client in the detail view. These can also be edited or removed directly.
Note: Via Action you have the possibility to delete default content provided by AGNITAS AG. This has the consequence that all templates, grids and blocks with "sample", "example" are deleted. If any affected elements are in use, they will be excluded.
Note: The CompanyID is a unique ID with which your client is stored in the database. The CompanyID is required for forms, for example, in order to be able to assign the data to the correct client.
16.7.2 Landingpages
The landing page in the E-Marketing Manager is the page that the browser displays when you call the redirect domain (e.g. https://rdir.de) of the mailing links without any parameters.
This is used to show a recipient who wants to check the link address which service provider or website is behind the redirect domain.
The landing page can be defined via the database.
Note for in-house customers: Enter the landing page in the landingpage_tbl table or create the entry via the EMT tool.
To do this, enter the URL of the redirect server in the domain column and the URL of the store website in the landingpage column.
If the store website does not contain a protocol specification (http/https), http is assumed as the default.