4.6 Archives - Grouping mailings
Content of this chapter
-
You will define new archives.
-
You will manage existing archives.
-
You will group mailings to create an archive.
-
You will optimize mailings with the Auto-Optimize feature.
4.6.1 What are archives?
Archives help you to structure your mailings if there are a lot of them. In an archive, you group all mailings relating to the same subject in a file. An archive may, for instance, consist of all mailings sent over several weeks to customers in the context of a promotion campaign. The archive may group date- or action-based mailings (see chapter Create or change actions ) or all mailings sent out in the context of a weekly newsletter feature.
You decide how to group mailings into archives. Whenever you create a new mailing, you decide which archive it should belong to. It is, of course, still possible to create mailings without assigning them to an archive, or to decide which existing mailings should be grouped together. Archives assignments may be amended at any time.
There are no rules in E-Marketing Manager on how to assign mailings to archives. It is possible to create an archive called „Miscellaneous“ grouping single mailings for which there is no special category. The list of mailings in the Mailings section will not change by using archive assignments and will still show all mailings created so far and sorted by date.
Please note: archives work only for sent emails.
4.6.2 Creating customized archive for recipients
You have the option of providing a customized newsletter archive (= online archive) for each recipient, in which they only see the emails and content that you have previously sent them. It is a good idea to separate advertising emails and service emails and, if necessary, only offer the archive for newsletters for the time being.
To create a customized archive, proceed as follows:
-
Create an action for archive.
-
Create an archive form.
-
Create a link to the archive form.
-
Enable mailings for archive view.
Note: An online archive and the associated form are already stored in newly installed clients. If your client is older, this archive can still be set up for you on request.
Step-by-step creation of an archive Create an action for archive.
In order to be able to offer subscribers a way of viewing archived mailings over the web browser, you must start by creating an action telling the system that the archive function should display the archived mailings. To do this, proceed as follows:
-
Click on the Webforms button in the menu, then on Actions. With the button New action in the upper right corner to create a new action.
-
Name the action Display archived mailings and enter a short description for your action.
-
In the drop-down list, select Only for forms.
-
In the Add step option, select Archive list from the drop-down list.
-
To conclude this step, click on the Add button and choose the desired archive in the Archive drop-down list.
All mailings, which should be displayed in the archive, have to be part of one archive. So, add a new archive and assign concerning mailings to that archive.
Create an archive form.
In order to be able to call up the action you have just created, you will create a form followed up by the action Display archived mailings.
-
Click on the Webforms button in the menu, then on Forms and New form.
-
Name the form archive and enter a short description for your form.
-
From the introductory Action drop-down list (previous of the form filed), select the action you have just created, namely Display archived mailings.
-
Create the code for the listing:
\<dl>
#foreach( \$mailing in \$archiveListMailingIDs ) \<dt>\<a href="https://rdir.de/form.action?
agnCTOKEN=xxxxxx&agnFN=Fullview&agnUID=\$archiveListUids.get(\$mailing)">\$ archiveListNames.get(\$mailing)\</a>
\<dd>\$archiveListSubjects.get(\$mailing) #end
xxxxxx is just a shortened placeholder and must be replaced by the CTOKEN of your client. This can be found in the URL line of every form - it is an encoded value that stands for the CompanyID.
See Pages & Forms for information about the fullview form.
If you use your own domain for redirect links, or if you have saved your fullview form under a different name, use the link displayed in the form above and add
&agnUID=\$archiveListUids.get(\$mailing). This code already provides a working, personalized archive in a simple design. Of course, you can embed the code in an individual code and add your logo to the form as well as layout it according to your CD.
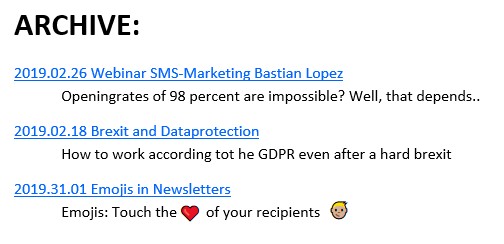
Fig. 3.\<%ABB_MAI%>: Personalized archive
5. After having assigned an HTML code in the Error form field or a landingpage in the Error URL that code an action in the Action drop-down list, finish this step by clicking on the Save button.
Create a link to the archive form:
You first copy the link that is displayed in the archive form you just created and add the parameter &agnUID=###AGNUID## to it.
The link should look as follows:
https://rdir.de/form.action?agnCTOKEN=xxxxxx&agnFN=archive&agnUID=###AGNUID##
Instead of xxxxxx, your individual CTOKEN should be displayed and if you have registered your own domain or named the form differently, you will also see differences here. You can now insert this link into your newsletter and link to the newsletter archive.
If you integrate the archive into your website, it is advisable to create your own recipient,
e.g. Jon Doe, and attach his User ID to the link. You can obtain the User ID of this fictitious recipient by calling up a mailing preview, entering his e-mail address there and clicking on the Fullview link, for example. You can then copy the user ID from the URL line.
Enable mailings for archive view:
The last step is to select the mailings which are shown in the archive list. To do this open the mailing you want to have listed, enable the switch Show in online archive and save your changes. Each newsletter subscriber in future will be able to call up and display the list of archived mailings over the web browser.
Please note: In the online archive, the name of your mailing will be displayed in addition to the subject and this should of course also be meaningful for the recipient. It is recommended to use the date of dispatch and a short description of the content. In any case, avoid writing internal instructions or information in the name of the mailing.
Important: Archives only work for mailings that have already been sent.
4.6.3 Managing archives
In the following chapters you will learn how to create, edit and delete archives.
4.6.3.1 Create a new archive
To create a new archive, go to the Mailings menu and then to the Archive subsection in the navigation bar.
-
Open the Archive section and click on the button New in the upper right corner.
-
The entry dialog calls up the Name field where you can enter a short archive description, e.g. Newsletter. The Description should consist of one or two sentences characterizing your new archive. This will make mailing management easier once you have many archives which are used by several staff members.
-
Click on Save to conclude your entries and close the field.
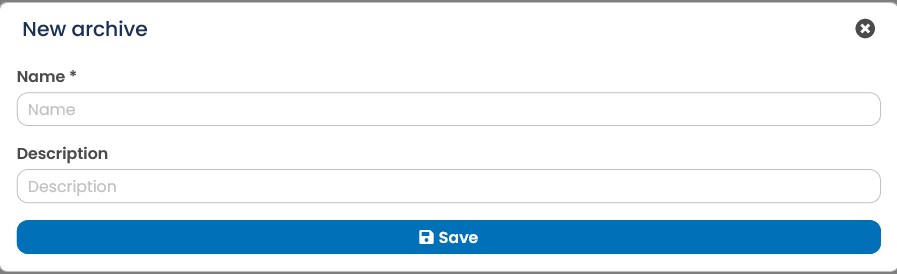
Fig. 3.90: All a new archive needs are two entries.
E-Marketing Manager will now display the overview of all existing archive, including the one you just created. You can use the Show button to specify whether up to 20, 50 or 100 archives should be listed on a page.
4.6.3.2 Display and amend details
In the Archive section you can display a list of all existing archives, sorted chronologically according to the date of first creation. In the table, the names and the first few words of the description are displayed. To display a detailed view of an archive as well as the mailings assigned to it, click on the corresponding line.
In the detailed view for the archive, the top of the screens shows the Name and
Description fields. If you want to change either the name or the description, all you need to do is to enter new text and confirm by clicking on Save. The bottom part of the entry dialog lists all mailings assigned to this archive. Clicking on an entry calls up the details for that particular mailing. To delete a mailing, click on the Delete symbol. E-Marketing Manager then asks you for confirmation; click on Delete.
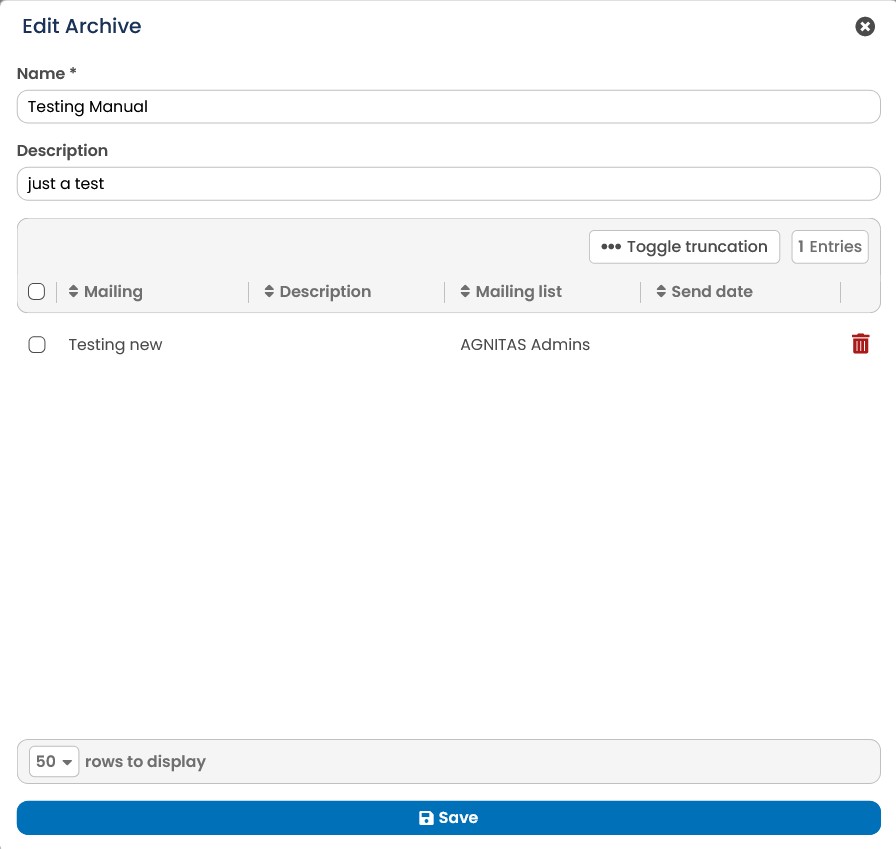
Fig. 3.91: In the detailed view of a archive, to call up a particular mailing, click on its name or description.
Please note: By deleting a mailing here, you not only delete it from the archive. It will be deleted completely from E-Marketing Manager without any way of restoring it later. If you wish to assign a mailing to a different archive, call up the details of the mailing. For details see chapter Assign mailing to an archive.
4.6.3.3 Deleting an archive
-
To delete an archive, call up the overview in the archive section.
-
Click on the Delete symbol at the end of the line for that particular archive.
-
As an additional safeguard, the system asks for explicit confirmation that you really want to delete the archive. You have to click on the Delete button before E-Marketing Manager will consent to deleting the archive. By clicking on x you will get back to the archive overview.
Please note: By deleting an archive, you do not touch the mailings assigned to that particular archive. They can still be viewed in the overview of the Mailings section and assigned to a new archive from there.
4.6.4 Assign mailing to an archive
An archive is like a file to group mailings. Mailings can be assigned to an existing archive. New mailings can be created as part of an archive and the assignment of mailings to an archive can also be amended.
4.6.4.1 Assign existing mailing
Assigning existing mailings to an archive at a later stage is not a problem. You may want to do this because you never used the archive function before, or because you forgot to assign the mailing to an archive when you created the mailing.
-
In the navigation bar, click on the Mailings button. The overview list features all mailings, whether or not they are part of an archive.
-
Open the Settings tab of the relevant mailing.
-
In the Archive drop-down list below General Settings, select an archive to assign the mailing to. Save the changes by clicking on the Save button. The mailing is now part of the selected archive.
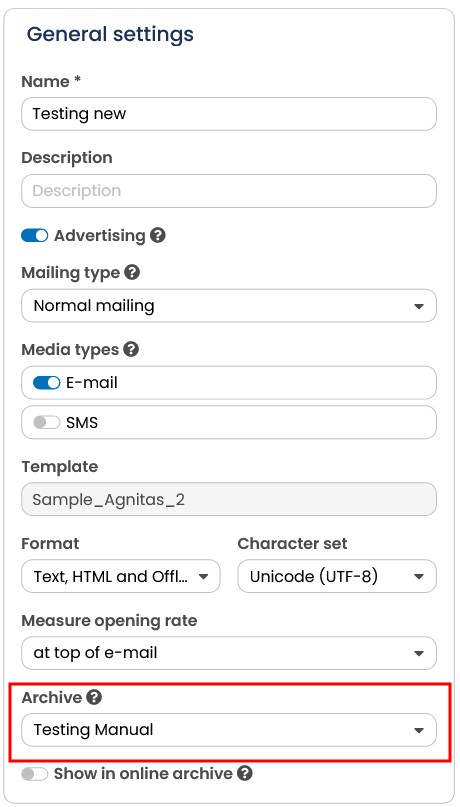
Fig. 3.92: It is in the mailing’s detailed view that you select which archive to assign it to.
- If you now open the archive section again and call up the detailed view of the archive, you will see that the mailing is displayed in the overview at the bottom of the screen.
Just follow the same procedure to change the archive assignment for a mailing.