11.9 Example form: Amend a profile
In this section, two forms are created that display the current user data in the profile database when called up and copy changes.
-
If a recipient clicks on the Change data link in the mailing, the first form directly displays the data that is currently in the database. After the recipient has adjusted his or her data and accepts this with Save, he or she is forwarded to the second form.
-
The second form confirms to the recipient that the change was successful and at the same time the data in E-Marketing Manager is updated in the background.
11.9.1 Create required actions
First you create two triggers. The first loads the existing recipient data into the form fields. The second saves the changed data in E-Marketing Manager after the first form has been submitted.
-
Call up New in the Trigger management section.
-
Enter a descriptive Name, e.g. Load recipient. This is important so that you can quickly find the trigger in the selection lists of the E-Marketing Manager later. The same applies to the Description input field.
-
In the Usage field, enter Only for forms. This determines that the E-Marketing Manager only displays the trigger in connection with forms, but not for measurable links. This makes it easier to define new forms and mailings.
-
The Type drop-down list determines what the trigger should do. Select the Load recipient data entry and click on Add. This trigger causes the system to load the data for the user in question when the form is called. No further entries are required. Note: So that the trigger knows which recipient is involved, the form call must be made later
with the agnUID. The trigger finds the information about which data is to be displayed in the form. Here the form fields are referenced with the recipient database.
- After you have added the step, a checkbox Load even if customer is not an active subscriber is displayed. In this way, addresses that have been logged off or bounced in the meantime can still view and, if necessary, edit their data.
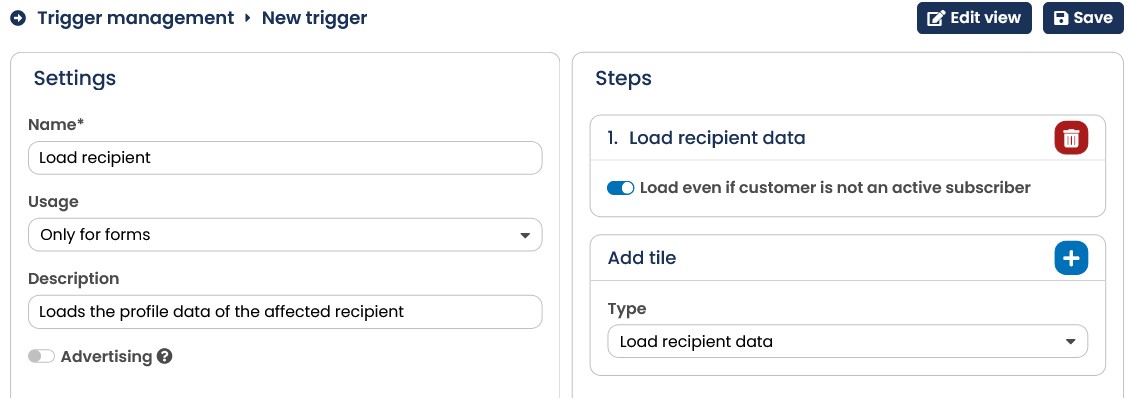
Fig. 10.20: The trigger loads the profile data of a recipient.
- Use the Save button to store the new trigger. Make sure that the status is active. For the example we do not need any further steps. Now we create the second trigger.
-
Create another trigger - as described above - which you call Save recipient. The exact name is not important, it just has to be unique. Set the Usage field back to Only for forms.
-
In the Type drop-down list, select the Add / update recipient option. Confirm your selection with Add.
-
Once the step is added, E-Marketing Manager offers additional options: The option Check for duplicate records only plays a role when saving an existing profile if the recipient changes the email address. Then E-Marketing Manager checks whether this address already exists. If the email address remains unchanged, no check takes place. Therefore, leave this option activated. If the slider is activated, you also have to select the Key column for duplicate-check and updates. Usually, email is used as a matching criterion here. The option Use double opt-in is not necessary in this case, since the recipients are already registered.
Note: You have the option of performing a new double opt-in dispatch if an existing recipient overwrites his or her email. However, since you probably do not want to confirm every name change with a DOI mail, this requires the extension of registration forms / profile change forms. If you have any questions regarding this, please contact our support.
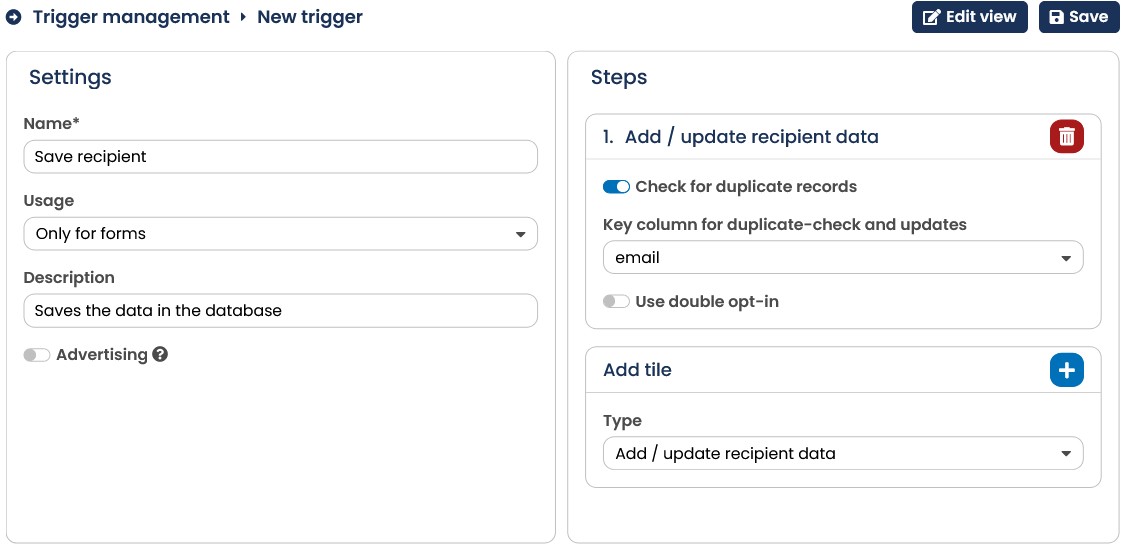
Fig. 10.21: The second trigger updates the data in the recipient profile.
- Store the new trigger with Save.
Now you will find two new entries in the Trigger management with the names Load recipient and Save recipient (if you have not used other names).
11.9.2 Creating a form to display data
The preparations are completed, now switch to the Pages & Forms section and click on New. First you create the form that is to display the existing recipient data.
-
Give the form a meaningful name. This name will also be inserted later in the link to call up the form. Therefore, you cannot use spaces, umlauts, and special characters. Depending on the Web browser and e-mail program, this can cause problems for the recipient. However, upper and lower case letters are not a problem. In the example, you enter profilemanagement as Name. In the Description, you explain the purpose of the form in one sentence.
-
In the selection list Introductory trigger, select the previously created trigger Load recipient.
Caution: Only those triggers are visible that have the setting Only for forms or Link and form and the status active.
-
In the Success form input field, enter the HTML code for the design of the form and the fields to be displayed. A highly simplified example of how to display the title, first name, last name and e-mail address is given below.
-
A final trigger is not required for the example. Therefore, leave the Final trigger selection list in the success form as No trigger.
-
The text that the system displays if, for example, the recipient was not found or the agnUID was missing, belongs in the input field Error form. All HTML commands are also available here. For the example, however, the text An error has occurred should be sufficient.
-
Store your entries with Save and set the status to active.
After saving, the system displays the URL under the name to call up the form, which you can now use in your mailings. For information on how to proceed, see Inserting forms into mailings.
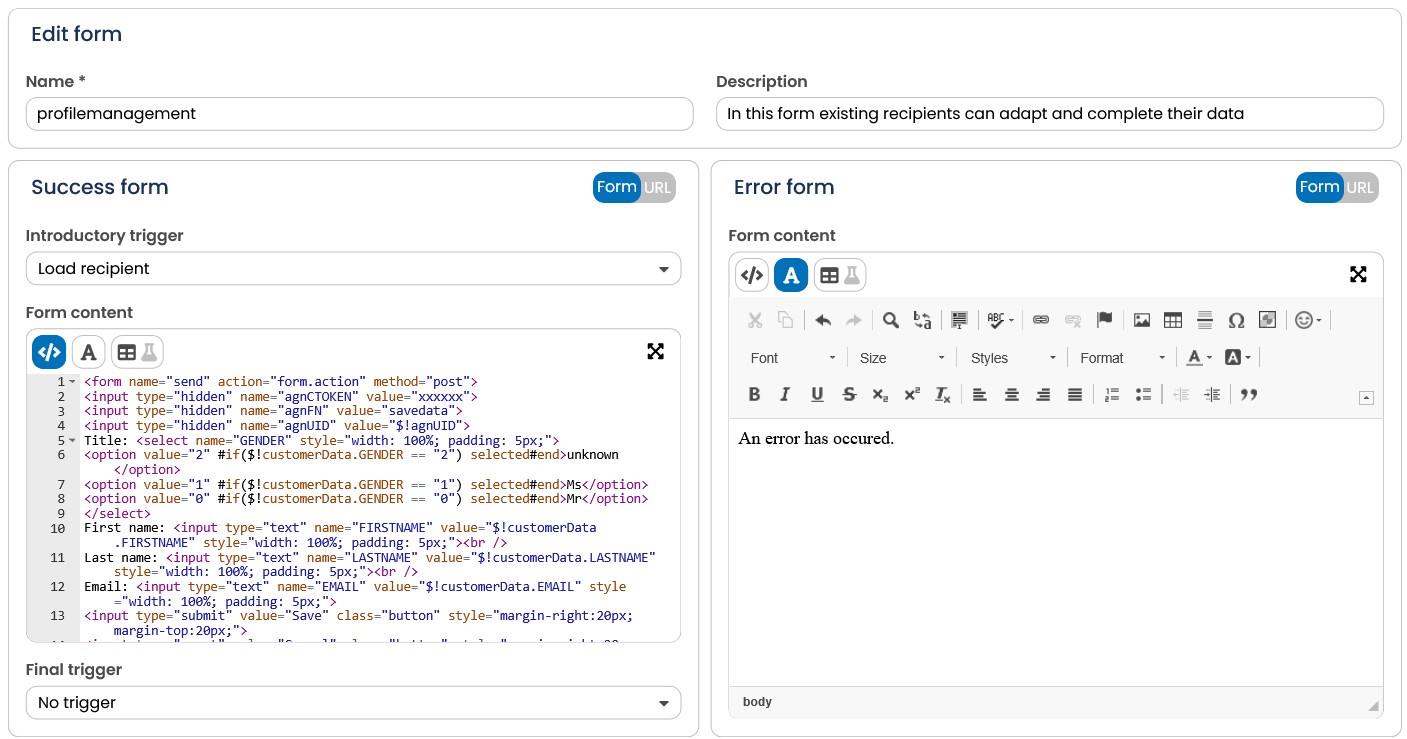
Fig. 10.22: With the profile management, recipients are able to update and complete their data themselves.
Note: Due to the use of a velocity code, display in the WYSIWYG editor is not possible in this example.
The example shown here displays the contents of the fields GENDER, FIRSTNAME, LASTNAME and EMAIL without much formatting. There is also a button each for Save and Cancel.
The complete HTML code looks like this:
\<form name="send" action="form.action" method="post">
\<input type="hidden" name="agnCTOKEN" value="xxxxxx">
\<input type="hidden" name="agnFN" value="savedata">
\<input type="hidden" name="agnUID" value="\$!agnUID">
Title: \<select name="GENDER" style="width: 100%; padding: 5px;">
\<option value="2" #if(\$!customerData.GENDER == "2") selected#end>unknown\</option>
\<option value="1" #if(\$!customerData.GENDER == "1") selected#end>Ms\</option>
\<option value="0" #if(\$!customerData.GENDER == "0") selected#end>Mr\</option>
\</select>
First name: \<input type="text" name="FIRSTNAME"
value="\$!customerData.FIRSTNAME" style="width: 100%; padding: 5px;">\<br /> Last name: \<input type="text" name="LASTNAME"
value="\$!customerData.LASTNAME" style="width: 100%; padding: 5px;">\<br /> Email: \<input type="text" name="EMAIL" value="\$!customerData.EMAIL" style="width: 100%; padding: 5px;">
\<input type="submit" value="Save" class="button" style="margin-right:20px; margintop:20px;">
\<input type="reset" value="Cancel" class="button" style="margin-right:20px; margintop:20px;" onclick="self.location.href='https://www.yourdomain.com'"> \</form>
Please note: If you include a date field, it must be divided into three individual input fields for day, month and year. The field names are always according to the scheme:
FIELDNAME_DAY_DATE, FIELDNAME_MONTH_DATE, FIELDNAME_YEAR_DATE.
Example of a date field birthday:
Birthday: \<input type="text" name="birthday_DAY_DATE" value="\$!customerData.birthday_DAY_DATE" />.\<input type="text"
name="birthday_MONTH_DATE" value="\$!customerData.birthday_MONTH_DATE"
/>.\<input type="text" name="birthday_YEAR_DATE" value="\$!customerData.birthday_YEAR_DATE" />
Note: The EU-GDPR demands that the recipient must be able to object to the tracking at any time. If you also want to offer the current tracking status in profile management, as well as a change option for it, you can include the following lines in profile management:
Newsletter tracking: \<select name="sys_tracking_veto" style="width: 100%; padding: 5px;">
\<option value="0" #if(\$!customerData.sys_tracking_veto == "0") selected#end>active\</option>
\<option value="1" #if(\$!customerData.sys_tracking_veto == "1") selected#end>inactive\</option> Explanation of the code:
This is an HTML form, so the tags are enclosed by \<form>. In the introductory tag, the action attribute controls which script evaluates the form when it is submitted with the Submit button. Here you always enter form.action and additionally as transmission method method="post".
The following three lines define hidden form fields. These do not appear in the Web browser, but the data is transferred when the form is evaluated. The E-Marketing Manager needs them to assign the changes to the correct recipient in the recipient data. The hidden fields have the following meaning:
-
\<input type="hidden" name="agnCTOKEN" value="xxxxxx">: The field with the name agnCTOKEN transmits the E-Marketing Manager your encrypted customer number (Company ID). The attribute value determines the ID, in the example xxxxxx. You can find the CTOKEN e.g. in the URLs of existing forms.
-
\<input type="hidden" name="agnFN" value="savedata">: The parameter agnFN tells the system which form to call up after sending with the Submit button. This subordinate form then saves the changed recipient data in the profile database. In the example, the name savedata is specified for value. You create this form in the next step.
-
\<input type="hidden" name="agnUID" value="\$agnUID">: To identify a specific recipient, E-Marketing Manager generates a unique ID (User ID). This user ID is required by the initial trigger to load the data and is stored with the value \$agnUID. You only have to enter this variable for value. E-Marketing Manager will replace this variable with the actual user ID when the form is called.
In the example, the following three lines display the data from the loaded recipient profile in the corresponding form fields. You decide which profile fields you want to display in the form. The structure of the \<input> tag is always the same. You can, of course, insert additional HTML tags that align the input fields and label properly, for example with a table. In the example, we have omitted this for the sake of clarity. The following line creates a field for the first name of the recipient:
\<input type="text" value="\$customerData.FIRSTNAME" name="FIRSTNAME"> Two attributes are decisive here:
-
The value attribute contains the initial value that the browser enters in the input field when the form is displayed for the first time. Of course, the current content of the recipient profile should be entered here. You can use the \$customerData script command to access all parts of the profile that you loaded with the introductory trigger. You append the name of the field in the profile database to the command, separated by a period. All fields of the profile are available. In the example, the first name is retrieved from the profile field FIRSTNAME.
-
To enable the E-Marketing Manager to establish a connection between the form field and the profile field, enter the field name from the database in the name field as well. In the example this is again FIRSTNAME.
At the end of the HTML tags you define the button with which a recipient can transfer changed data to the E-Marketing Manager. This is the usual submit button for HTML. The attribute value determines the label of the button, in the example Save:
\<input type="submit" value="Save">
And so that the recipient can leave the profile without making any changes, you can also offer him/her an alternative way to cancel. In the onclick attribute you can still define which page is to be loaded afterwards.
\<input type="reset" value="Cancel"
onclick="self.location.href='https://www.yourdomain.com">
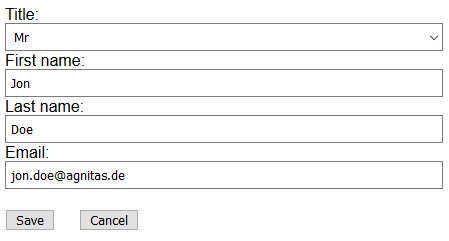
Fig. 10.23: The simplified example shows the recipient's profile data.
11.9.3 Creating a form to save data
As soon as a subscriber confirms changes made in the previous form by clicking Submit, a script on the E-Marketing Manager server evaluates data from the individual entry fields. The script reads both visible and hidden fields. It is intended to save all data read in the database. This is what a second form will do. The name of the form is already specified within the first form:
\<input type="hidden" name="agnFN" value="savedata">:
You will therefore need to create a new form named savedata.
-
In the navigation bar, click on Pages & Forms and then on New. In the Name field, enter savedata (or the name you gave the first form in your HTML code). Under Description, enter a short description to the effect that the form saves data read from another form. This will make it easier to manage forms if you have many of them.
-
In the Introductory trigger drop-down list, select Save recipient. This is the trigger you defined previously in chapter Create required actions.
-
The input field Success form is not used in this example. Instead, the EMM should redirect to a confirmation page on your website so that the recipient can access your remaining offer. To do this, select Success URL and enter the link to the landing page.
-
A Final trigger is not needed.
-
In our example, the Error form input field only contains a short text. In practice, you should at least enter an e-mail address or a telephone number for customer inquiries here, or also a landing page on your website.
-
Click on Save and set the status to active, if not already done.
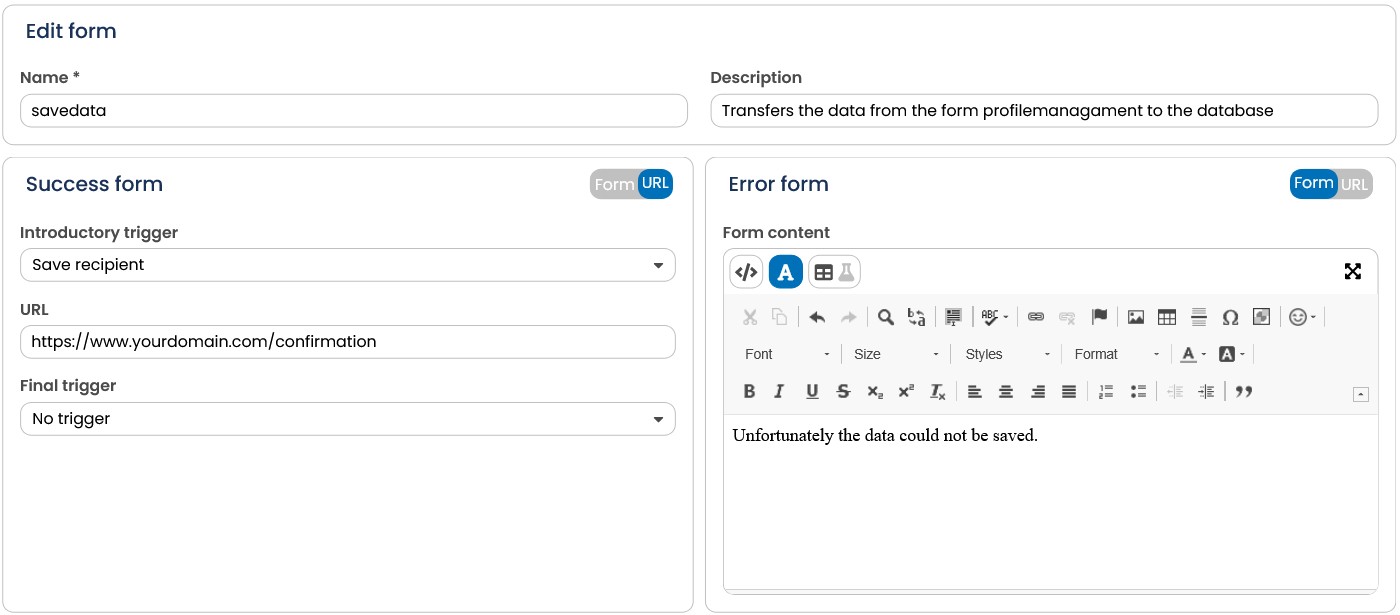
Fig. 10.24: The second form transfers the data into the recipient profile and forwards to the success URL.
11.9.4 Integrate profile management
In order for the system to establish a connection to the recipient profile that is to be displayed and edited, the AGNITAS user ID (agnUID) must also be transmitted when the call is made. For this reason, the Profilemanagement form can only be accessed from a newsletter, otherwise the error form is always displayed. Copy the URL that is displayed below the form name. Besides the CTOKEN and the form name, the link already contains a parameter for the agnUID. You can include this link directly in the mailing just like any other link.
In this example, the form call could look like this:
agnCTOKEN=xxxxxx&agnFN=Profilemanagement&agnUID=##AGNUID##
The placeholder for the agnUID is only matched and replaced with a real recipient profile in the mailing. The agnUID is generated encrypted from the recipient data and can be explicitly assigned to a data record.
Therefore, to test the Profilemanagement form, you must embed the link in any mailing. Then click on this link in the preview for a test recipient. You should now be able to see the success form with the test recipient data in the browser. If your test was successful, you can simply leave the link in the mailing, as it opens the individual profile for each recipient.
Instead of a long URL you can also use the agnTag for forms. This would look like this in our example:
\<a href=“[agnFORM name="Profilemanagement"/]”>View and change data\</a>
Tip: You can record form calls in the mailing as administrative clicks, then you can see at a glance in the statistics how many clicks have been made on your actual content. You can find out more in chapter Editing links.