8.7 Reference tables (Premium)
The premium feature Reference tables allows simple integration of dynamic tables into the E-Marketing Manager. Additional information, not directly relating to the recipient profile, may also be included in these flexible data tables. This means that certain data do need not be kept redundantly per recipient. Through links to a database field in the recipient profile, the data may nevertheless be assigned to any number of recipients. An example will explain this: You may create a reference table of your products containing, among other, information on product price, color and availability. Only the article number of the product is linked to the recipient profile. Changing product data may be conveniently managed from a central station. Although recipient profiles linked to the reference tables will remain unchanged, all recipients will nevertheless have updated product information.
Information in reference tables may also be used in mailings, via AGN tags. Individual voucher codes may also be included in mailings quite easily in this way: Every recipient will receive his or her personal voucher in the amount of e.g. 5 € by mail, with an individual code. AGN tags may be used to control this process such that the next code from the reference table will in each case be inserted. You will simply need to store a sufficient number of codes in the reference table.
Reference table administration
For an overview of all the reference tables already created in the E-Marketing Manager, click on Reference tables in the main menu item Data management. The reference tables with their names and corresponding description will be listed there.
Click anywhere in the relevant row to edit a reference table. A reference table may be deleted by clicking on the trash icon and confirming the confirmation prompt with Delete.
You can use the Show locked entries and Show deleted entries sliders to filter the tables in the overview according to your preferences. Locked entries refers to reference tables that cannot be edited.
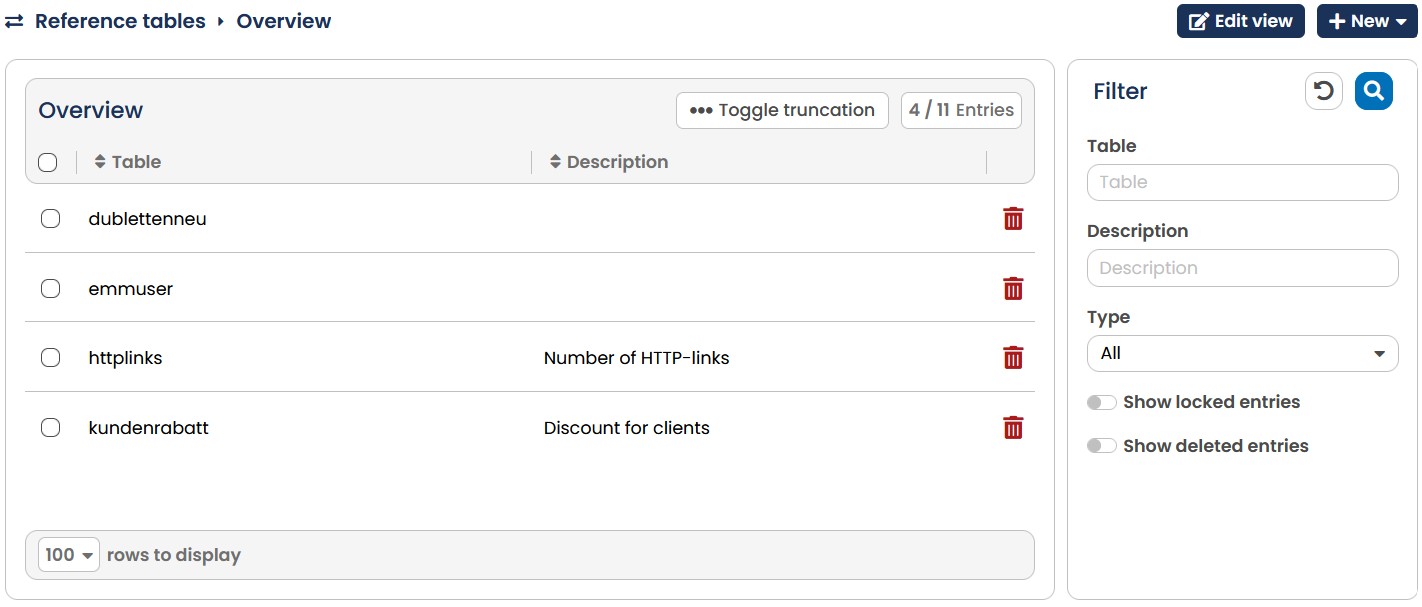
Fig. 7.19: Overview of reference tables created already.
8.7.1 Creating new reference tables
Create a new reference table by selecting the Reference tables submenu via main menu item Data management and then clicking on New and there Table. Details for the new reference table may then be specified in the next window. Proceed as follows:
-
Under Name, enter a preferably meaningful name for the new reference table. Use only letters from A to Z, at least 3 characters long. Special characters, umlaut marks, hyphens or spaces are not allowed, since the E-Marketing Manager will use this to generate the database table name.
-
The optional field Description should preferably contain some information on the new reference table. This facilitates use by other users of the reference tables you created.
-
The field Database table is created by the E-Marketing Manager when creating the reference table and cannot be edited. It here serves for information purposes only.
-
Key column: The key column name is assigned in this field. The reference table information will be linked to the dataset via this column.
-
The recipient profile field to which the reference table data will link is specified in dropdown menu Reference condition. The E-Marketing Manager will generate the listed selection options based on existing database fields for the specific account.
Complex links involving several tables are also possible via the Reference condition field. Please contact the AGNITAS Support team in this respect.
The E-Marketing Manager will accept your settings after clicking Save in the top right-hand corner of the window.
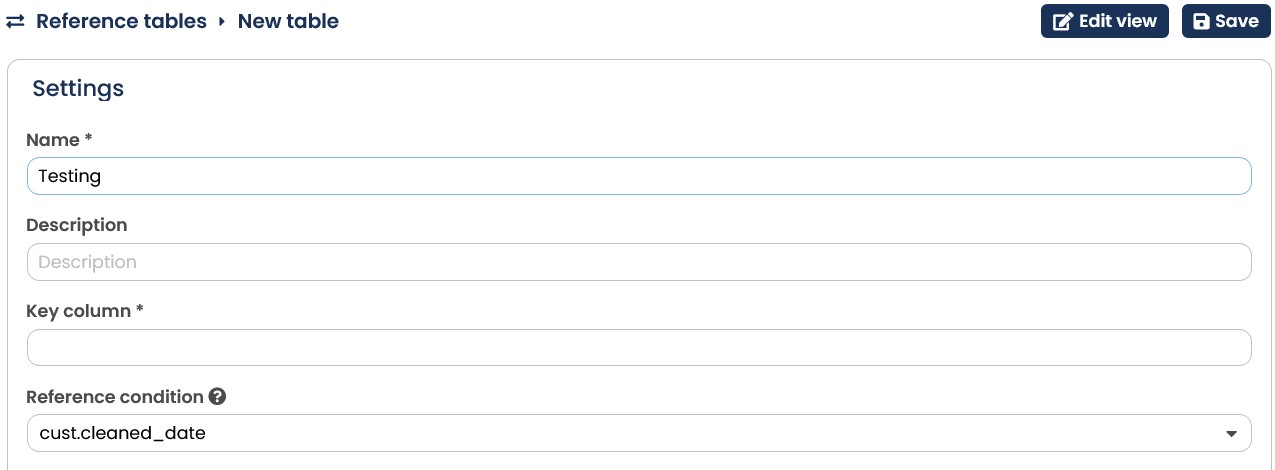
Fig. 7.20: A new reference table is simple and quick to create.
After saving the reference table, three new tabs Content, Import and Export will appear, as well as the new area Fields. You may edit the reference table data via the Content tab and all import and export profiles created for the reference table will be available under Import and Export. Refer to Chapter Editing a reference table for details on these tabs.
Please note: There is a limit of 5 reference tables. In case you feel the need of increasing this limit, you can do this by purchasing a higher limit.
8.7.1.1 Defining fields
In the detail view of a reference table under Fields, the E-Marketing Manager will provide the content of the reference tables broken down by the individual fields. Each new reference table initially contains only one field, named after the key column. Each field has 4 additional database entries defining its content and properties. By clicking anywhere on the field, these metadata may be called up and edited at any time. This includes the following entries:
-
The Field name in database: The first field of a newly created reference table will be named after the key column.
-
Type defines the permissible entries for the field. Type Alphanumeric has no restrictions whilst Integer number and Decimal number allow only numbers and Date without time as well as Date with time accept only date entries.
-
Length specifies the maximum number of characters to enter in the field. This upper limit applies only if field type is Alphanumeric. The E-Marketing Manager limits the length to 7 characters for Date type fields and 38 characters for Numeric fields.
Please note: Since Alphanumeric does not have a standard length, it is imperative that you specify a length – failing this, the E-Marketing Manager will issue an error message.
-
Default value: The initial value of the field is specified here. Should you create, for instance, a new recipient, the E-Marketing Manager will enter the default value in the profile. A default value of 0 is therefore an option for numerical fields. In an alphanumeric field for specification of a main holiday destination, a standard value of “none” may be suitable. You may then, for instance, easily after a few months filter out recipients who have not specified anything yet, via the search function (Chapter Searching for fields). No default value is provided for Date format fields. Entries will always follow format YYYYMMDD, e.g. 19650905 for 5 September, 1965.
-
Field is allowed to be empty: This selection field is used to specify whether zero values are allowed. With Yes the field may remain empty. With No the field must always be filled in to enable entries in the database.
Note: Remember to save your entries by clicking on Save in the top right-hand corner of the window.
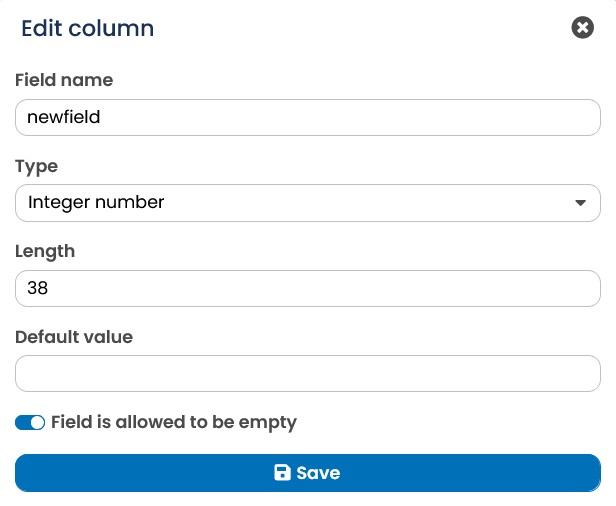
Fig. 7.21: Individual properties may be assigned to each field in the reference table.
8.7.1.1.1 Adding and deleting fields
More fields may be added in the reference table via the Add column button. You can find the button in the Fields tab. An input screen will pop up, containing the database fields described above - the same fields you will also find when creating a new reference table (field name, type, length, default value and Field is allowed to be empty). As before, accept your settings by clicking Save.
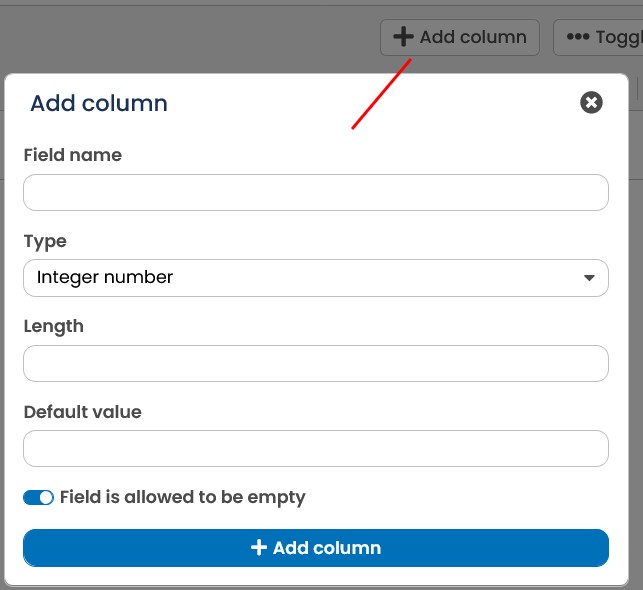
Fig. 7.22: Only a few instructions are required to add new fields to the reference table.
To delete a field in a reference table, simply click on the trash icon.
8.7.2 Editing a reference table
Reference table content may be edited in two ways: either by manual input under tab Content or for a second, more convenient option, by reading in the table data via the Import tab.
Manual entry of content
For the first option, select the required reference table in the Reference tables menu and then go to tab Content in the detail view. Already completed reference table fields will be shown under Overview.
The content of each field may be edited manually by clicking the New button. After clicking Save, E-Marketing Manager will accept your changes and automatically update the overview.
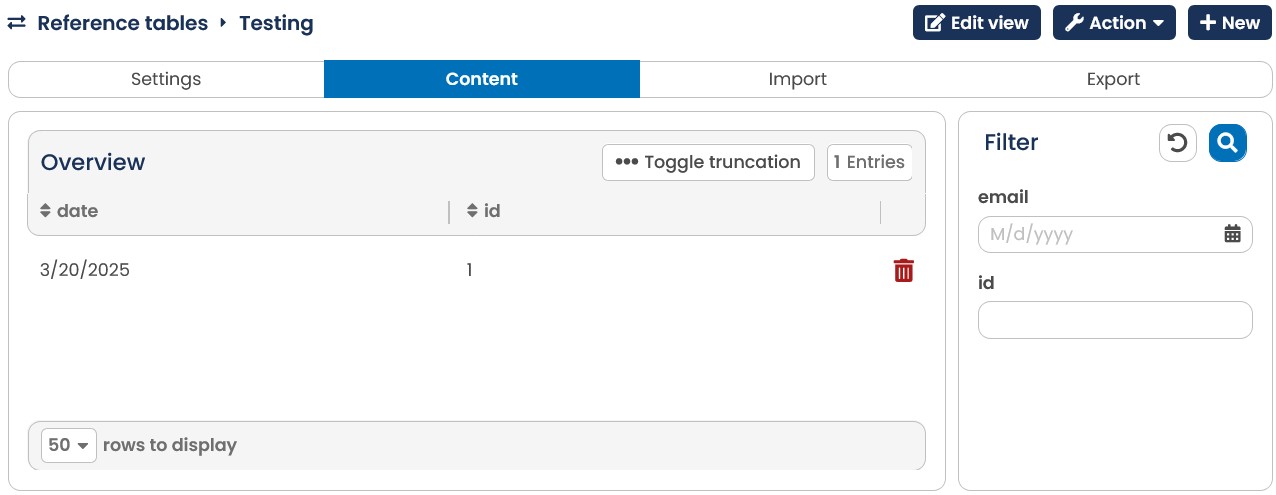
Fig. 7.23: You may optionally enter the content of a reference table manually or via the Import function.
You also have the possibility to import encoded information like an encoded client ID for example. If you would like to use this feature, please contact the support of AGNITAS.
8.7.2.1 Import
A list of all existing reference table import profiles and their most important key data will be given in the Import tab. This includes, among other, the Name and Character set as well as the Separators and Text recognition characters used.
To edit an import profile, click anywhere in the relevant row. An import profile is deleted by clicking on the trash symbol and confirming prompt with Delete.
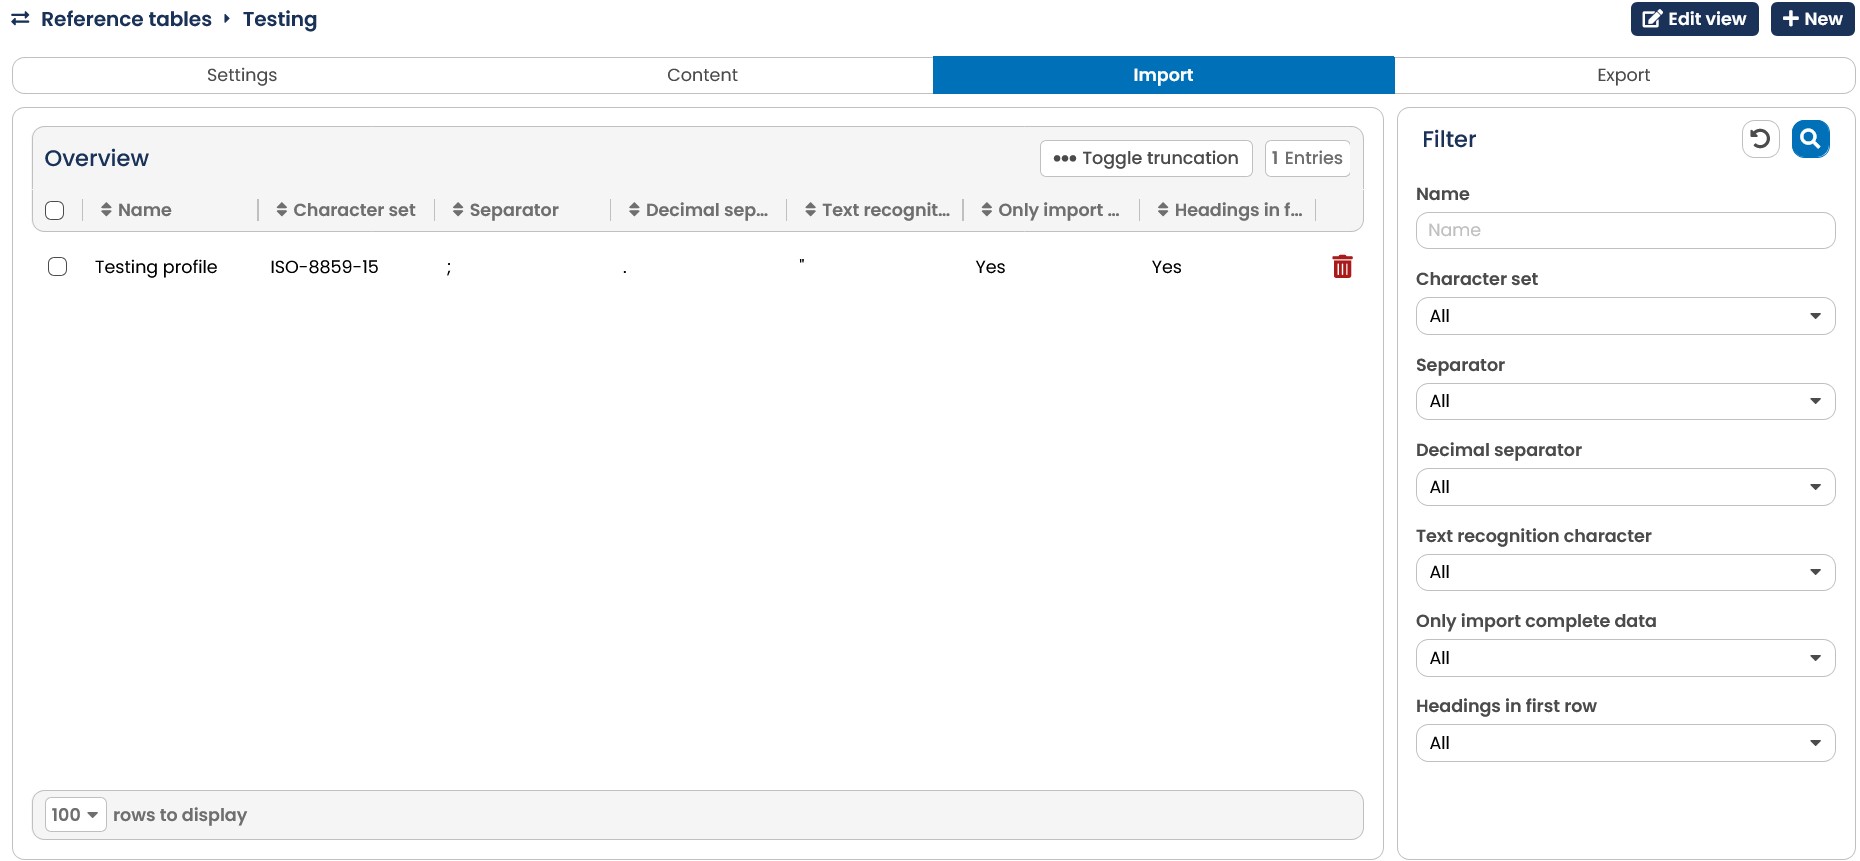
Fig. 7.24: The import profiles for a specific reference table are administrated via the Import tab.
Create new import profile
To create a new import profile, click on the New button in the overview of import profiles. This requires just three steps:
-
Create import profile
-
Select and upload a file with the data to import
-
Assign the file columns to the corresponding reference table columns.
First enter the import profile settings. These are:
-
Profile name: The name of the new import profile
-
Headings in first row: Enter Yes or No in this check box to specify whether the reference table headings should be in the first row of the imported file.
Note: This selection is offered only if you have the right to perform imports without column identifiers.
-
Character set: ISO-8859-15 or UTF-8.
-
Separators: When generating an import profile with a spreadsheet program such as Excel and saving this as a CSV file, all the data will generally be separated by a semicolon. Different programs may use other separators, however. The E-Marketing Manager is informed accordingly via the Separator field. Options include: comma, semicolon and the ^, | character as well as Tab.
-
Text recognition character: If your import profile contains the separator in use, the separator must be marked by an additional character. If, for instance, commas are specified as separators and the imported data also contains commas, then the commas in the import profile must be prepared for import using these characters.
-
Only complete data can be imported, please try again.: If you want the E-Marketing Manager to accept only a complete file, activate this function. If the function is not activated, individual fields of the import file may be empty.
-
Import method: Specify how the import file should incorporate the reference table data here: Clear old data before insert, Update and insert, Update only or Insert only.
-
Update method: Update all or Don't update with empty data. Depending on the selection, existing data may be overwritten by empty fields in the import file.
-
Check for duplicate records: If Yes is selected, the key column is checked for duplicates during import. If a record occurs more than once, the entry is always updated (the last entry wins). If No is selected, the subsequent duplicates are output as errors.
-
Pre-Import Action: If your own pre-import actions have been created for you, you can select them here. In this case, the data will be refined according to the predefined rules before being imported. If you are interested, please contact our Support Team.
-
Zip password: You can also import zipped files. If your zip file is protected with a password, specify it here.
-
In addition, you will also have the option of entering Email Address(es) for Reporting or entering Additional Email Address(es) for Errors.
-
Report language: Select the language that your import file contains.
-
Report time zone: Select the time zone to be applied to the data (concerns especially date fields).
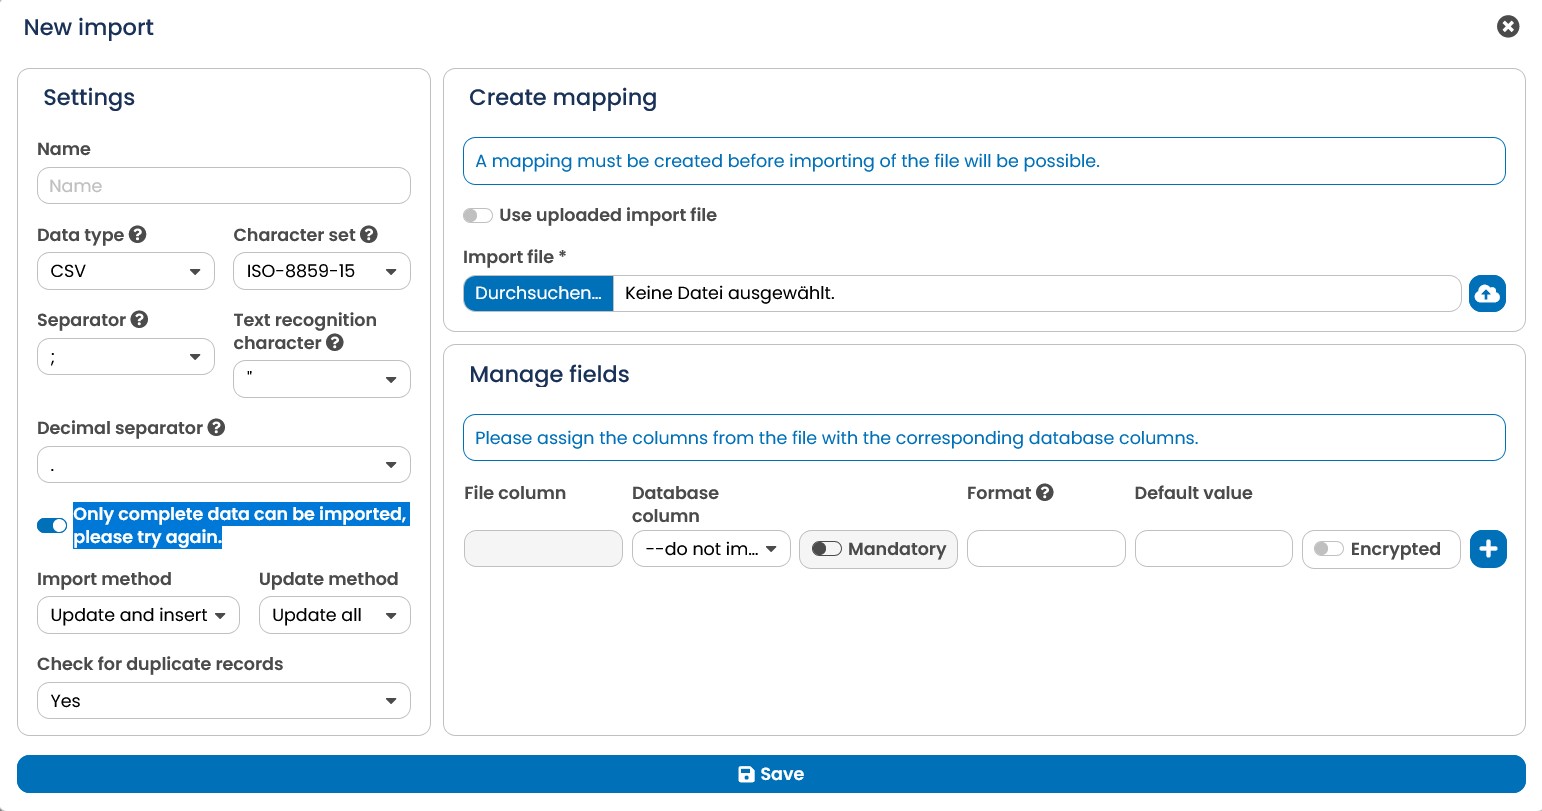
Fig. 7.25: Every import profile may be configured in detail – from character set via used separators and down to import and update methods.
After you have made the settings for the import profile, select the file in the detail view of your import profile. You can either upload a file from your computer or, if you have activated the Use uploaded import file switch, access the files stored in the Upload file menu. If you want to import the file directly, click on the Import data selection. Alternatively, you can also access an auto import profile. Finally, in the Manage Fields section, assign the appropriate database columns to the columns of your file.
You can specify the custom date format as well as the decimal separator in the Format column. The following issues should be taken into consideration when doing so.
-
Decimal Separators: periods or commas.
-
Format for Dates: The Java SimpleDateFormat will determine the specification of the date format for your import profile. For example, the following characters can be used: YYYY (year, such as 1986), MM (month number, such as 07; this specification must use capital letters because mm indicates minutes), dd (day number for the month, such as 10), HH (hour, such as 04), mm (minutes, such as 30), ss (seconds, such as 20) and a for AM or p for PM. The timestamp format YYYY-MM-dd, HH:mm could correspondingly result in the following timestamp: 2017-01-10, 08.30.
In addition, you can also use default values. You will find more information about this in the Manage columns section.
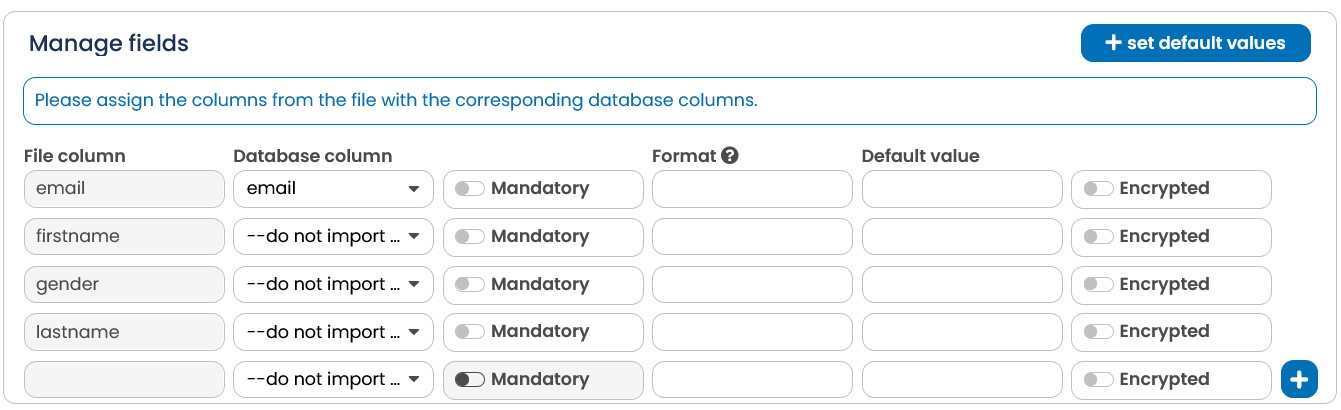
Fig. 7.26: In the second step you choose the import file and assign it to the fitting columns.
Note: Remember to save your settings by clicking on Save in the top right-hand corner of the window.
Importing may commence as soon as the import profile has been configured. Start by clicking on Import data.
By clicking action you can also perform an auto import. This is also a premium feature with which you can import zip-files. On top of that you will receive an email report after you finished your auto-import, but only if you entered an adress in the field e-mail address(es) for report or an additional e-mail address for errors. Otherwise you will not receive a report.
Please also note: In the field Format you can use the keywords "lower", "upper", "trim" and "email. Those can also be combined, for example: "lower" and "trim"
This will be applied to the delivered data which results in the system checking, whether or not a valid email-address (Syntax) is present.
8.7.2.2 Export
A list of all existing reference table export profiles and their most important key data is provided under the Export tab. This includes, among other, the Name and Character set as well as the Separator and Text recognition character used.
Drop-down menu Show will instruct the E-Marketing Manager to show 20, 50 or 100 export profiles per page. Click Show for the system to accept your selection. To edit an export profile, click anywhere in the relevant row. Delete an export profile by clicking on the trash icon and confirming prompt with Delete.
Create new export profile
In the export profile overview, click on New to create a new export profile.
-
Name: The name of the new export profile · Character set: ISO-8859-15 or UTF-8.
-
Separator: Many spreadsheet programs such as Excel use a comma as a separator for CSV file data. It is possible that different software will use a different separator.The EMarketing Manager is informed accordingly via the Separator field. Options include: comma, semicolon and the ^, | character as well as Tab.
-
Text recognition character: If, for instance, commas are specified as separators and if the imported data also contains commas, then the commas in the import profile must be prepared for import using text recognition characters. You can choose between a single (‘) or double (“) quotation mark. Should the export data not contain the separator, the third option None is recommended.
Note: Remember to save your settings by clicking on Save in the top right-hand corner of the window.
Start the export by clicking on the Export data icon on the right of an entry.
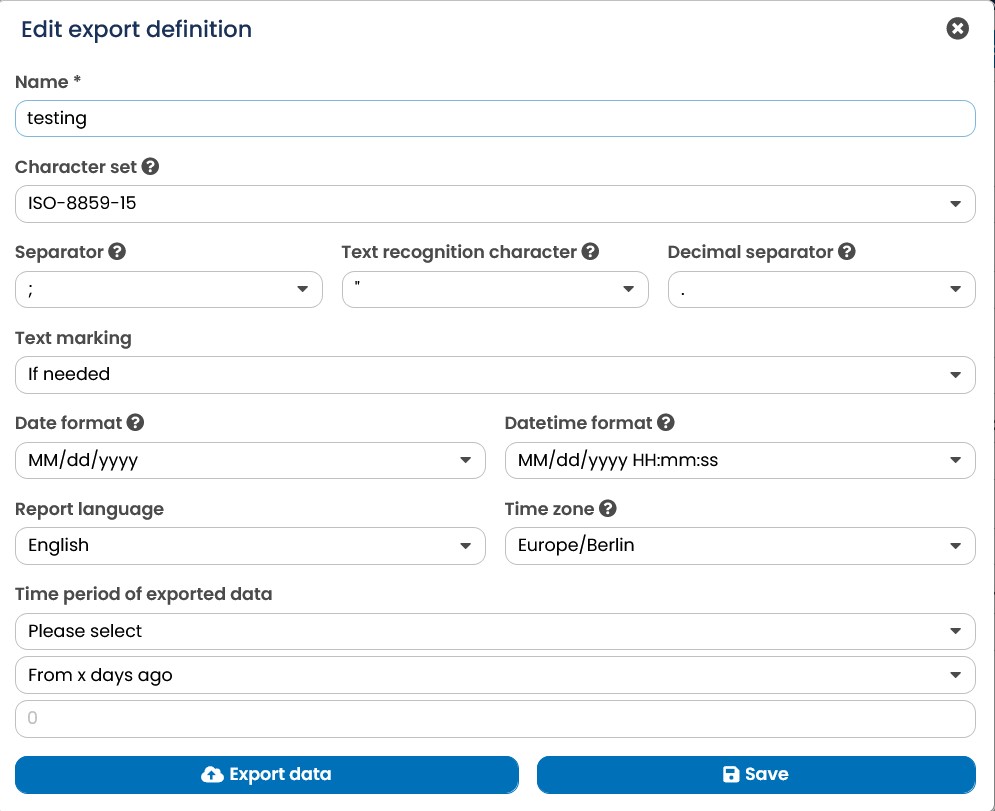
Fig. 7.27: An export profile requires only a few settings to run without a problem.
If you have booked the Retargeting Package, you will be able to specify the time period for exporting reference tables. To do this, go to the Export tab within your reference table and create a new export or edit an existing one. You can then enter the relevant time period for your export under Time period of exported data. Here, you must first select a date field from your reference table that you want to use as the basis for the time period. After that, you can narrow down the time period.
Please note: If you are interested in exporting raw data, e.g. the entry of all openings with time and device ID or bounce data from the database, please contact us. We will create a reference table for you in the administration area, which you can use to access the corresponding data. + Description of how to proceed for the export.
8.7.3 Reference tables from tracking points
The reference tables retargeting_alphanumeric, retargeting_numeric and retargeting_simple are indicated by default. They contain the collected data of the respective tracking points and can be used conveniently to create target groups. In chapter Creating advanced target groups you will find a detailed explanation on how to use a reference table to create a target group. The key column is defined as customer_id in this case. Also the links to the database fields are already given. Therefore, all three tables contain a link to the following fields: Customer_id, company_id, ip_adr, mailing_id, page_tag, session_id and timestamp. In addition, the alphanumeric reference table links to the database field alpha_parameter and the numeric table to num_parameter.
You can use the information of these reference tables just like any other. Let alone the import function which is not available in this case as the E-Marketing Manager automatically inserts the information in the tables, all functions can be used as usual. While the reference tables give you an overview of all activities concerning one tracking point, you can check all the recipient related data of a tracking point in the Recipients main menu point. For more information on this, go to chapter Retargeting history (Premium).
8.7.4 Voucher codes using reference tables
You will also have the ability to create a coupon table as part of the premium reference table features. To use this feature, open the Reference tables submenu from the Data management menu. You will find the Voucher Code Table button after clicking on New in the upper right corner.
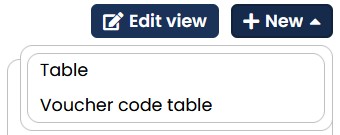
Fig. 7.28: You can create a voucher-code table within the premium feature reference tables.
Clicking on the button will take you to the Create New Voucher-Code Table entry. Enter the Name and the Description (optional) for your voucher-code table and click the Save button. You also have the following additional options:
-
Allow reassignment: Use this slider to determine whether a voucher should be used multiple times for the same recipient, e.g. for follow-up mailings, or whether a new voucher code must be assigned each time.
-
Threshold %: Here you enter the value in % from which a notification mailing should be triggered that only xx% of vouchers are still available. The value must not exceed 100.
-
Test interval: Here you define whether a check interval should be used. If yes, you can choose between an hourly or daily check.
-
E-mail address(es): Here you can specify one or more e-mail addresses to which the notification e-mail is sent. The separation is made using a comma.
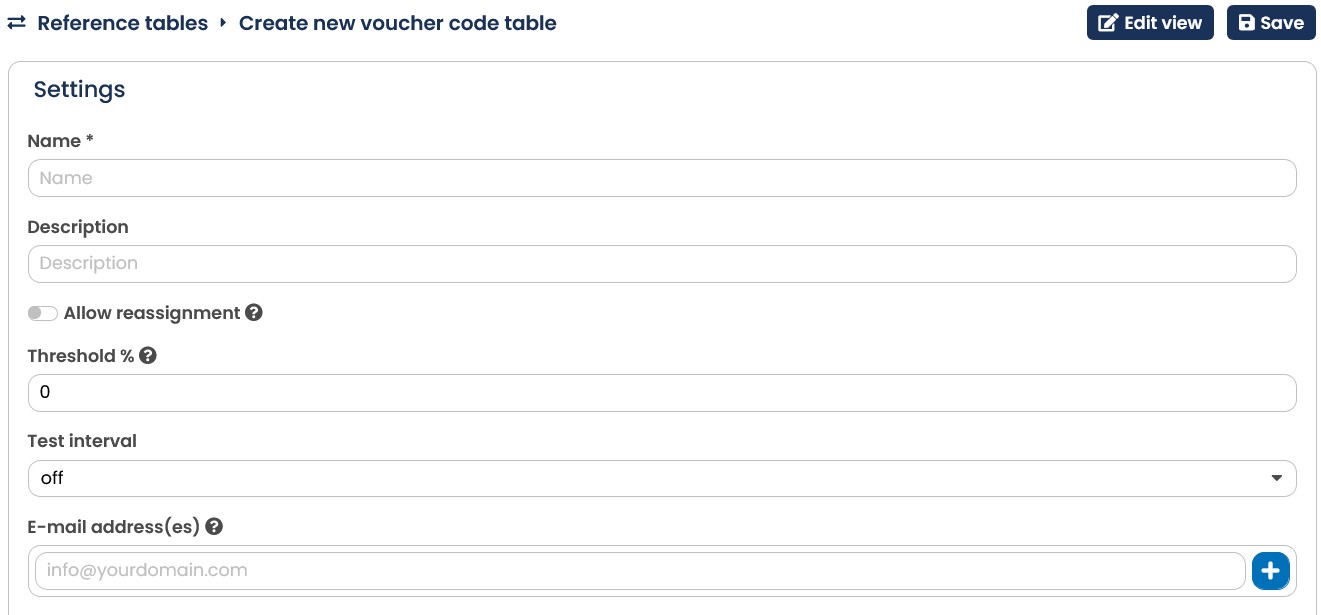
Fig. 7.29: You can set the name of the voucher-code table in the tab "create new voucher-code table".
You will then enter the edit mode of the voucher table, which is almost identical to a conventional reference table. However, the database fields of the voucher table are predefined as follows:
-
customer_id
-
creation_date
-
mailing_id
-
voucher_code
-
assign_date
With the help of the import, you can store new codes within the table and then use them in a mailing, via [agnVOUCHER...]. Details about the agnVoucher tag can be found in the chapter agnVOUCHER.
In the detailed view of a voucher table, you can then see how many of your codes are still available. The first value is the number of voucher codes available, the second value indicates the total number of voucher codes contained in the table. This is followed by the percentage of codes available in brackets. If more than 50% of your codes are still available, the display is highlighted in green. As soon as less than 25% are available, the display is highlighted in red. For all values in between, the background is yellow.
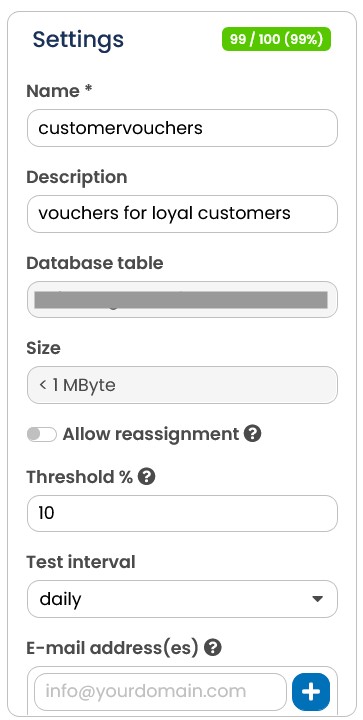
Fig. 7.30:The amount of voucher codes available is displayed at the top right.
The import for the individual database fields is the same as for a normal reference table. For more details, see the Import chapter.