12.3 Create or change triggers
To edit an already created trigger, simply call up the entry in the overview under Trigger management. When editing the fields and steps, you have the same options as when creating a new trigger. For this reason, the following description refers to both creating and editing a new trigger.
To create a new trigger, click on the New button in the top right-hand corner of the overview. Then the input dialog for triggers opens. By default, all new triggers are already marked with the status active. However, if you do not want to mark the trigger as active until it is completed, deactivate the slider in the meantime. Deactivated triggers are not displayed in selection menus for forms or links, nor are they executed if they are already stored somewhere.
-
First assign a unique Name for the trigger. This name appears at various places in the E-Marketing Manager and the clearer the name, the easier it is to assign. There is no restriction in the naming. You can use any characters and upper and lower case letters.
-
Directly after this you will see the selection field Usage. Here you can choose between Only for links, Only for forms, Links and forms. This setting only affects the selection menus in which the new trigger is offered to you, and is only used for clarity. The setting has no effect on the functionality.
-
In the Description field, it is best to enter a detailed explanation of the task(s) the trigger will perform and where it will be used. Especially if several people work with the E-Marketing Manager, it makes sense to be as precise as possible here.
-
The Advertising slider allows you to mark triggers that must not be executed in case of a tracking objection. This only affects triggers that are used for links.
Note: In case of a double opt-in confirmation, the slider must remain deactivated to be able to save this information at the recipient profile.
-
Next, in the Steps section, you define what the trigger should do. To do this, you must add at least one step, but you can also combine any number of steps. Select a step in the Type dropdown menu and confirm with the Plus. You will find an overview of all types and an explanation directly below.
-
The individual steps are numbered and are processed in the appropriate order. If, for example, it is necessary to load certain data first before any further trigger is taken, this must also be selected first for the steps. On the right side you will find a delete button for each step, which you can use to remove it.
Please note: The E-Marketing Manager deletes the step without confirmation, so you should be careful with the button.
-
Once you have finished defining the trigger, click Save in the upper right corner.
-
After saving, the tab Used in will be added to the detail view of the trigger. Here you will be able to view the forms and links associated with this trigger. Clicking the icon at the end of the row will take you directly to the detailed view of the connected object.
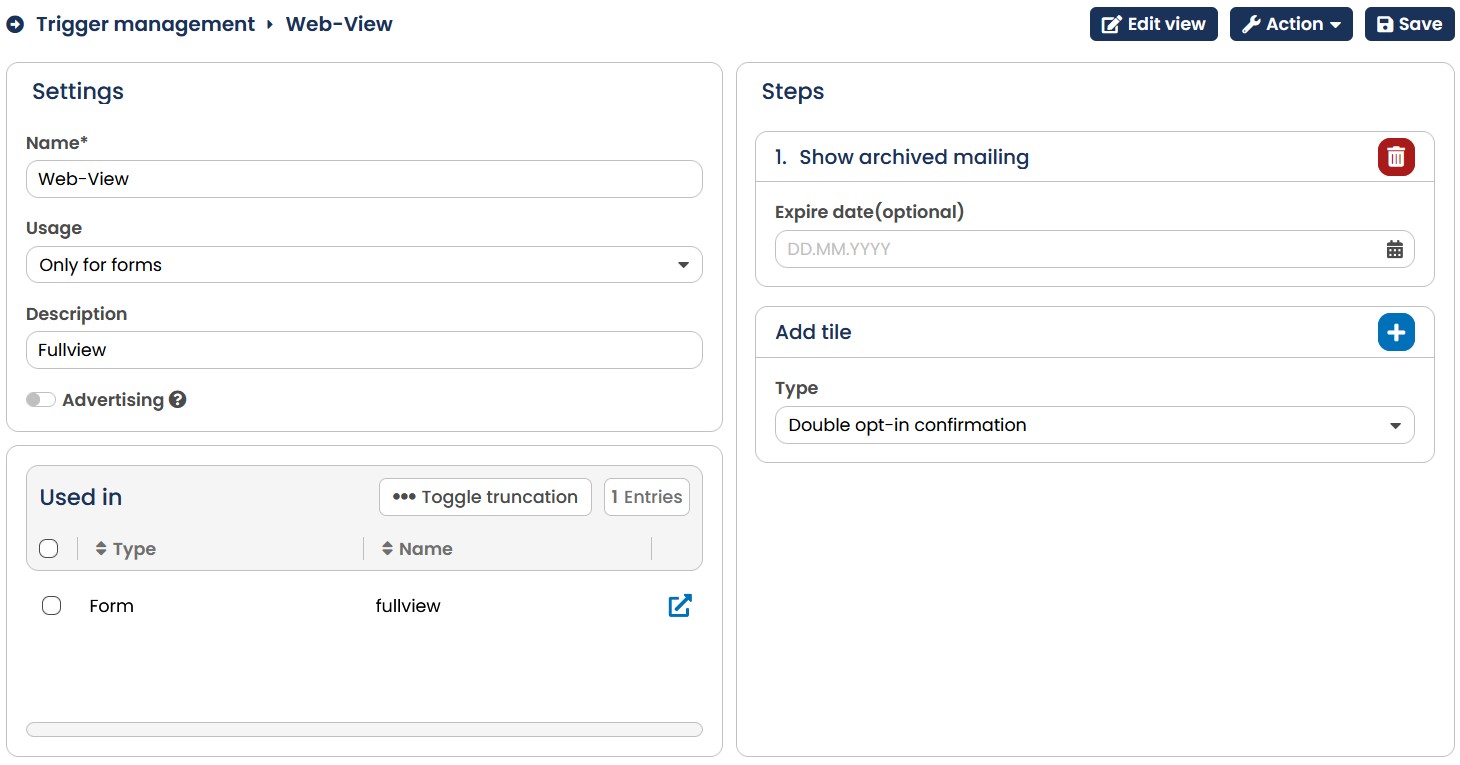
Fig. 11.2: In the detail view you can see and edit all trigger settings.
The Type drop-down menu in the Steps area offers you various options, some of which are self-explanatory and do not require any further settings, some of which need to be further specified with parameters or, in the case of script triggers, can become extremely extensive and flexible:
| Type | Description |
|---|---|
| Unsubscribe | Unsubscribes a recipient from a mailing list. Usage: You can unsubscribe either by clicking a link in the mailing (one-click unsubscription) or by using an unsubscription form - see chapter Example form: Unsubscribe. Parameters: none With the Additionally unsubscribe from the following mailing lists button you can select several individual mailing lists from which the recipient will be unsubscribed. Alternatively, you can select the All mailing lists option. |
| Send trigger-based mailing | Sends an activated, trigger-based mailing - see chapter Example trigger: Triggering an trigger-based double opt-in mailing Usage: Can be triggered by clicking on a link or initiated by a form. Parameters: Mailing: Defines the mailing to be sent; only activated mailings appear in the selection menu Delay: delay of the dispatch after triggering the trigger, selection menu offers different possibilities - from no delay over hours to 7 days BCC recipient: Here you can specify an e-mail box to which all mailings are sent in blind copy, e.g. for verification purposes for double opt-in mails Send to: You can specify who should receive the mailing. The choices are Active recipients, Recipients with status 'Waiting for double opt-in confirmation', as well as Active recipients and Recipients with status 'Waiting for double opt-in confirmation'. |
|---|---|
| Add / update recipient data | Subscribes a recipient to a mailing list - optionally with double opt-in confirmation. For this, at least the information about the mailing list, gender, e-mail and mail type must be transferred from the form. See chapter Example form: Subscribing with double opt-in. Usage: This trigger only makes sense in connection with a form, since the data is entered there. Parameters: Check for duplicate records: The slider defines whether a duplicate check should be performed. If the duplicate check is activated, a selection field appears for the key column. Key column for duplicate-check and updates: All existing profile fields appear in the selection menu. E-Marketing Manager compares this column with the database and updates the existing data for an existing recipient or adds a new recipient. By default email should be selected here to avoid double deliveries. Use double opt-in: The slider defines the type of login procedure. If the selection is activated, the recipient is transferred to the database with the status Waiting for confirmation. |
| Show archived mailing | Generates a personalized fullview (also webview) of the received mailing for the recipient, e.g. to avoid display problems in the e-mail client by loading the mailing in the browser. To do this, a form is called up from the mailing, which uses the Show archived mailing as the introductory trigger. See chapter Example form: Fullview Usage: This trigger is only suitable for forms, because it requires a form to display the mailing in the browser. That means the form is linked in the mailing. Parameters: Expire date (optional): After this date the fullview is no longer accessible and an error page is displayed. This setting is optional and recommended for single triggers only. |
|---|---|
| Double-opt-in confirmation | Sets the status of a new recipient from Waiting for confirmation to Active. See chapter Example form: Subscribing with double opt-in. Usage: Usually the setting Only for links makes most sense, because the recipient confirms the registration by clicking on a link in a previously sent double opt-in mailing, but you can of course also link a form where the double opt-in is executed as an introductory trigger. Parameters: Confirm on all mailing lists: If this option is activated, the recipient can confirm the subscription for several mailing lists with just one click. The status is only set to Active for the mailing lists that the recipient selected when subscribing. Confirm DOI for media type: The default setting is the media type E-mail. If you have enabled other media types, you can also select SMS and Post. |
| Recipient-login | Allows access to a protected area that is called up via a form. The trigger requires verification via profile fields for user name and optional password. See chapter trigger: Recipient login. Usage: The verification of access data always takes place via a form. Parameters: Username column: Select the profile field containing the user name from the drop-down list. Password column: In the second dropdown you can optionally select the profile field that contains the password. The default setting is Don't use a password. |
| Load recipient-data | The recipient data of a recipient is loaded into a form, e.g. the profile change page. The agnUID must be transferred. See chapter Example form: Amend a profile. Usage: This trigger only makes sense for forms or in connection with script triggers and sending service e-mails, because the loaded data can only be processed there. Parameters: Load even if customer is not an active subscriber: The recipient data will still be displayed even for subscribers who have unsubscribed, if they call up a corresponding form after unsubscribing. |
|---|---|
| Archive overview | Generates a personalized archive for the recipient with an overview of all mailings already received. These mailings must be marked with Show in online archive under Settings and assigned to the selected archive. The displayed mailings can be accessed via fullview links. Usage: This trigger is only suitable for forms, because it requires a form to display the archive in the browser. Parameters: Archive: Selection of the archive from which the mailings may be displayed. Limit view: Set a limit on the retention of mailings by quantity or time. |
| Modify profile | Modifies a profile field of a recipient. It can specify a specific value or, in the case of numeric fields, change an existing value by addition or subtrtrigger. See chapter trigger: Changing recipient profile. Usage: Can be used for both link clicks and forms. Parameters: Use tracking point: The used values for profile modification are delivered by a measuring point to be selected. Column name: Selection of the profile field, trigger and value to be changed. Note: Fields that have been marked as invisible are not displayed. Fields that cannot be edited (e.g. system fields such as customer_id) are also not offered, but old records can still be changed. |
| Send service e-mail | Sends an e-mail notification to a selected recipient with the contents defined in the trigger. The recipient of the service email does not have to be included in the newsletter distribution list. This trigger can, for example, inform customer service if someone has previously downloaded a file. If you want to transfer data from a recipient profile in the content of the service e-mail, you must use the trigger Load recipientdata in the first step. In addition, a valid agnUID must be transmitted to prevent misuse. Usage: Can be used for both link clicks and forms. Parameters: To: E-mail address of the recipient. From: Input field for sender e-mail address Reply-to e-mail: Input field for a different recipient address for replies Subject: Subject of the e-mail Format: Defines the format in which the service e-mail is sent. You can choose between Text and Text and HTML. Text version: Enter the content of the service e-mail in Text format. HTML version: Enter the content of the service e-mail in HTML format here. |
| Send last newsletter | This trigger is intended as the last step of a subscription form. The new recipient will receive the latest newsletter from the mailing list to which they have subscribed as long as they fall within the target group of this newsletter. Usage: The trigger can be used for forms and for links. |
| Script-trigger | With the help of numerous velocity script methods you can define and execute your own triggers. See chapter Example trigger: Integrating your own scripts. Usage: Can be used for both link clicks and forms. Parameters: Script: The script to be executed is defined here. |
| Show specific content block | Displays the contents of a text module of a mailing (only available for the standard method). Works like the Show archived mailing trigger and loads the personalized module from the currently opened mailing for the recipient in the browser. To do this, a form is called from the mailing, which uses the introductory trigger Display specific content module. Usage: This trigger is only suitable for forms, since it requires a form to display the module in the browser. This means that the form is linked in the mailing. Parameters: Name of the content block: Name of the module in the mailing |
Note: You can mark forms and triggers that you no longer need, but do not want to delete, as inactive. In both the overview and the object, you can see whether it is currently being used or not. In this way, you can keep track of your active forms and triggers. On the other hand, you can keep the contents for verification purposes or for quick reactivation.
12.3.1 Example trigger: Changing recipient profile
In the following example, you would like to make a change in the recipient profile for recipients who click on articles from the Travel section in the newsletter. A previously created profile field Interest Travel is used to record who reacts particularly frequently to content from the travel category.
Proceed as follows for the new action:
-
Click the New button under Trigger management. The input dialog for the action appears in the content area.
-
Select meaningful texts for Name and Description so that you can always understand what the trigger is used for.
-
Since this trigger is to capture retriggers to newsletter content, select the setting Only for links in the Usage field.

Fig. 11.3: Give the new trigger a meaningful name and description.
-
Next, select Modify profile in the Type selection field and confirm your selection with Add. Read more about the other options in chapter Create or change triggers.
-
Once the step has been added, you will be offered further input options: In the first selection field for Column name you will be offered your individual profile fields, the system fields like First and Last name are not available for this trigger. Now select the field Interest Travel. In the middle selection field, use the operator to define how the field is changed. You can choose between + sign (adds the entered value to the existing value), - sign (subtracts the entered value from the existing value) and = sign (transfers the entered value to the profile field). In our example the + sign is required. And in the last field you enter the value to be used by the profile modification. In the described example, each click should increase the value in the profile field by 1.
Note: The plus and minus signs only work in conjunction with numeric fields. With the equal sign (=) you set the field content to a specific value, no matter what was previously stored. You can use this operator for all field types, i.e. numeric, date and alphanumeric. Of course, the content of the last input field must match. You may enter any Unicode characters in an alphanumeric field, but only numbers in numeric fields. The system expects a date in the format YYYYMMDD, so about 20221224 for Christmas 2022.
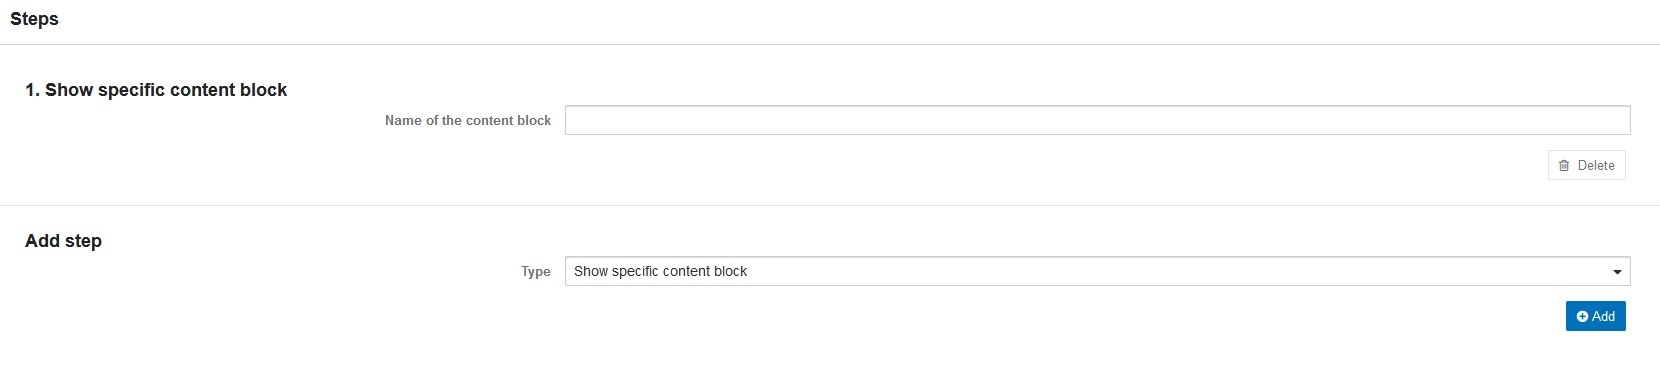
Fig. 11.4: In the selection list you choose which field should be changed and how.
-
If you are finished with the entries, transfer the changes to the system by clicking the Save button.
-
You can now define any additional steps in the Add tile area. It is no problem to combine profile modifications, e-mail sending and other types in one trigger. You may make changes to already existing steps at any time. To do so, simply enter the new values and confirm with the Save button.
-
To remove a step, click on the Delete button at the end of the line.
Please note: The E-Marketing Manager deletes the step without confirmation, so you should be careful with the button.
12.3.2 Example trigger: Triggering an action-based double opt-in mailing
A typical use case for action-based mailings is the sending of a double opt-in email immediately after registration. The trigger in this case is the registration of the new recipient. Before we can create a corresponding trigger, we first need a suitable actionbased mailing. The following steps are necessary:
1. In the input dialog for the new mailing, enter a unique Name and a meaningful
Description. Leave the setting for the Advertising slider deactivated, since you have a legitimate interest in tracking because of the obligation to provide proof of a legally valid opt-in. The other basic information is optional. In the Sender settings you can enter a Subject, Sender e-mail as well as Sender full name and, if desired, different answer information. Under Targeting settings, select the Mailing list for which the double optin applies and choose Action-based mailing as the Mailing type in the General Settings. Then save the new mailing with the Save and generate mailing button and continue with the content creation. (For more information, see chapter Mailings Sending out newsletters).
Please note: In the content there must be a prominent button to confirm the registration in any case.
Also important: The double opt-in mailing must not have an advertising character, so you should limit the content to the pure confirmation function.
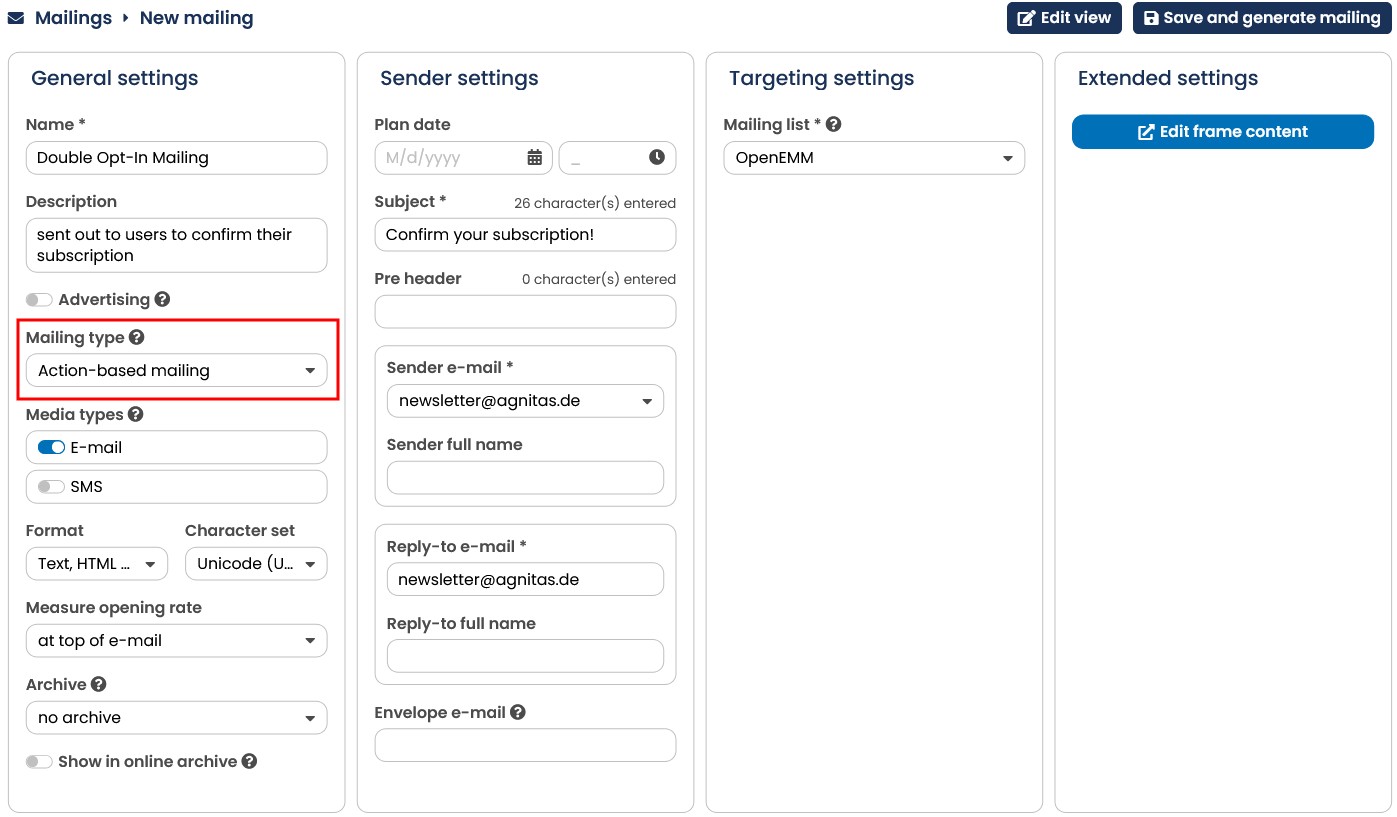
Fig. 11.5: To send an action-based double opt-in mailing, create a new mailing with the type Action-based mailing.
-
The confirmation link is now linked to the trigger Double-Opt-In: Confirmation (more in chapter triggers for double opt-in process). To do this, simply call up the Links tab and select the previously created trigger in the trigger selection field. Note: In the selection menu, only triggers with the status active and the usage Only for links or Links and forms appear. A welcome page on your website can be used as a link target. Alternatively, you can also create a welcome form using the E-Marketing Manager.
-
When you have completed the mailing content and linked the link to the trigger, switch to the Send Mailing tab. Since an trigger-based mailing is sent repeatedly over a longer period of time, you cannot set a sending date here, but you release the mailing for sending by clicking Activate. Now activate the finished double opt-in mailing. Note: Since action-based mailings are always triggered by a trigger or a campaign, you can activate the mailing without hesitation. No dispatch will take place for the time being.

Fig. 11.6: With the Activate button you release the action-based mailing for dispatch.
- In the next step we create the trigger that triggers the sending of the double opt-in mailing. Call up the input dialog for a new trigger and enter the Name and Description. In the Usage selection field, select Only for forms, since the trigger will be used for the subscription form. In the Steps section, select the option Send action-based mailing in the Type selection field and confirm with Plus.
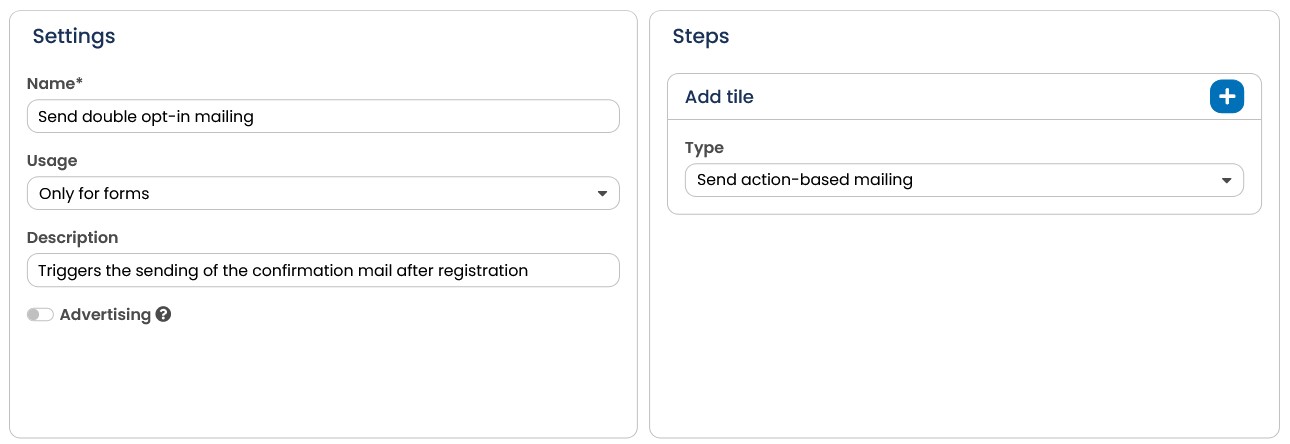
Fig. 11.7: Add the step Send action-based mailing.
- Further input fields now appear under the step Confirm DOI for media type. The Media Type selection list shows all possible media. In the Send to selection field, select one of the two options that take into account recipients with the status 'Waiting for double opt-in confirmation'. You can decide whether active recipients should also be delivered again.
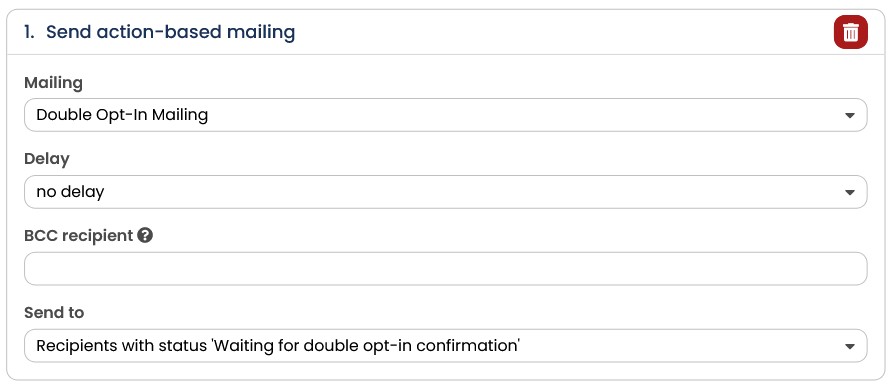
Fig. 11.8: Select the Double Opt-in Mail in the mailing selection box.
- After you are finished with the settings for the step, create the new trigger with the Save button.
The trigger for sending the double opt-in mailing is now complete and can be linked in the feedback form of your registration process. Read more about the creation of the entire double-opt-in registration process here Example form: Subscribing with double opt-in.
12.3.3 Example trigger: Access restriction with recipient login
Another, somewhat more unusual area of application for actions is to protect special contents by a login barrier. The following examples explain how to implement access restriction with recipient login. This is an action in E-Marketing Manager that can only be used in conjunction with a form.
Examples of use:
-
Login to a password protected download area
-
Personalized landing page with exclusive voucher code for newsletter subscribers
(access and individualization based on email address)
- Access to a personalized online newsletter archive
Example 1: Login to a download area with username and password
Prerequisite: You need two profile fields at the recipient, which contain the user name and password.
How it works: In a first form the user has to fill in username and password. By clicking on
Submit, the first form transfers the data to another EMM form with the introductory trigger Check login data. If the entries match the data in the EMM database for user name and password, the success form is output with the download documents, which can also be personalized with data of the recipient from the database. If the login data do not match, the error form is displayed.
-
For the implementation, create a new trigger with the Name Check login data. In the Usage field, select Only for forms. Under Description you explain where this trigger is used. In the Steps section, select the trigger Recipient login in the Type selection field and confirm with Add.
-
Now two input fields appear under Recipient-login. In the Username column, select the profile field in which the corresponding entry can be found - the e-mail address could also be used here. Proceed in the same way for the selection field Password column. When the assignment is complete, confirm your entry with Save.
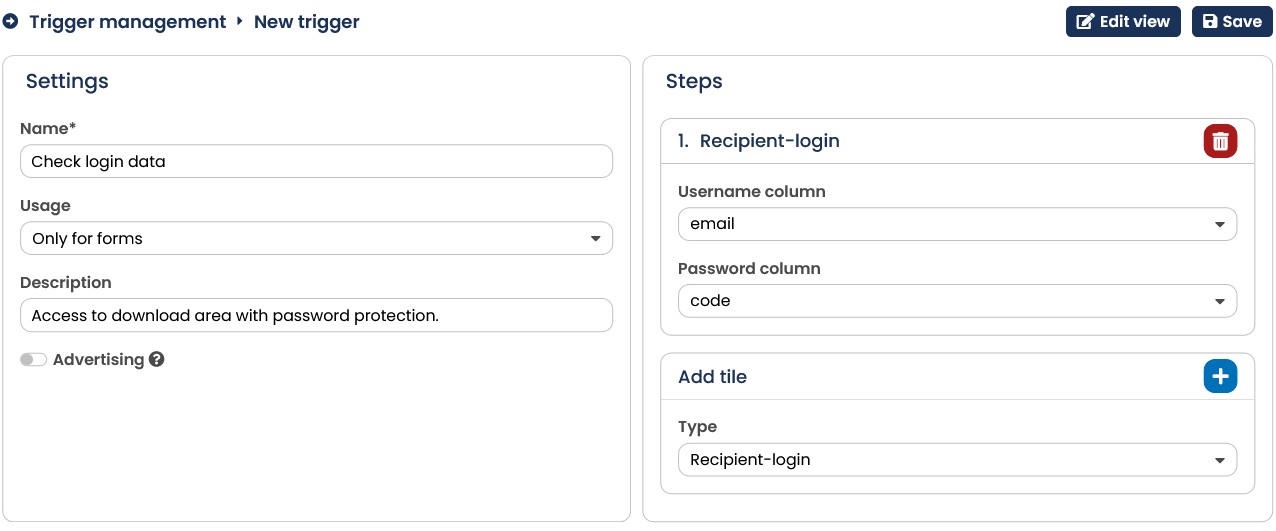
Fig. 11.9: The trigger Recipient-login allows access restriction for special content.
Example 2: Personalized landing page with exclusive voucher code for newsletter subscribers (access and individualization based on email address)
Prerequisite: For this trigger, only the e-mail address must be available in the database.
How it works: You advertise on your website that newsletter subscribers receive special discounts to make subscribing to the newsletter more attractive. To do this, you place a link Redeem newsletter bonus in your purchase process. This link opens a popup asking the buyer to enter his email address to verify that he is a newsletter subscriber. This popup is a first EMM form. By clicking on Verify, the email address is forwarded to a second form with an introductory trigger Check email. If the trigger finds a matching entry in the database, the success form is displayed with the special advantage code for newsletter subscribers. A script can be used to load additional user data from the database and personalize the landing page for the recipient. If there is no matching entry for the e-mail address, the error form appears, which in this case is a registration form for the newsletter.
You can also access the advantage code directly from the newsletter by clicking on the form with the transfer of the e-mail address, e.g:
https://rdir.de/form.de? agnCTOKEN=xxxxxx&agnFN=newsletterbonus&EMAIL=max.mustermann@agnitas. de
-
For the implementation, create a new trigger with the Name Check email. In the Usage field, select Forms only. Under Description you explain where this trigger is used. In the Steps section, select the trigger Recipient-login in the Type selection field and confirm with Add.
-
Now two input fields appear under Recipient-login. In the Username column select the profile field email. For the selection field Password column, leave the setting on Don't use a password. Confirm your entry with Save.
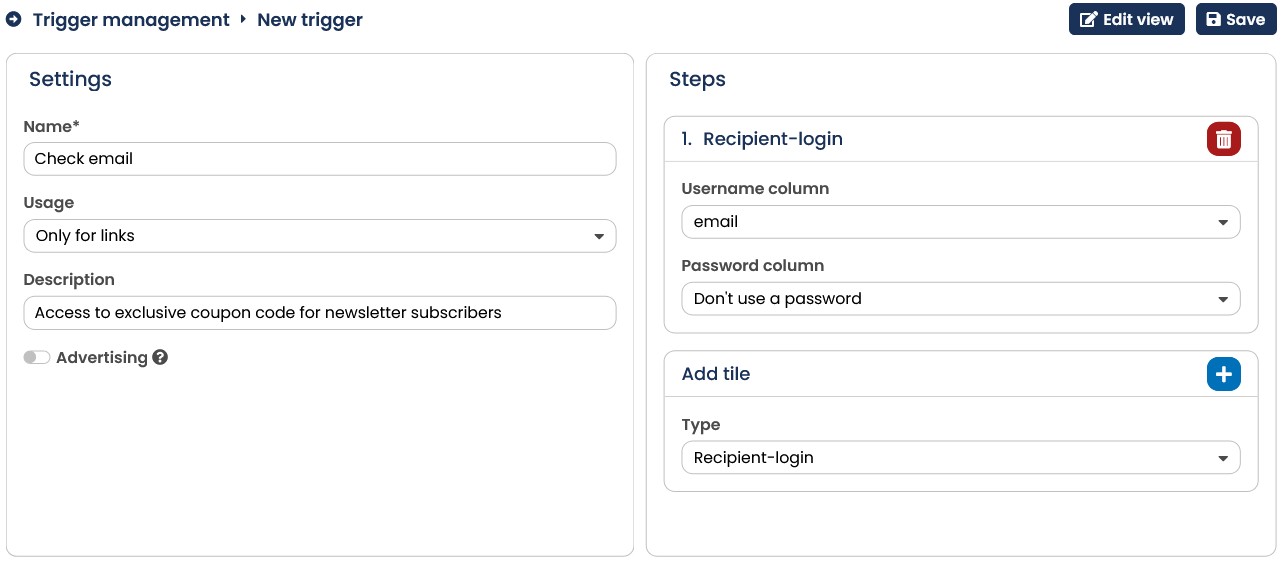
Fig. 11.10: The trigger recipient login also works without password for less sensitive content.
You could realize the access to a personal newsletter archive in the same way. However, you need one more step Archive Overview in your trigger.
12.3.4 Example trigger: Integrating your own scripts
The \<%PRODUCTNAME%> allows you to execute your own scripts and thus integrate individual functions. The E-Marketing Manager offers a variety of valid velocity script methods for this purpose, which you can work with. These are summarized in a separate documentation, as this would go beyond the scope of this chapter. The velocity script documentation can be downloaded in the E-Marketing Manager via the Help icon placed at the bottom of the menu bar on the left in the Documents section.
Examples of use:
-
Activating the newsletter subscription for selected mailing lists with only one double opt-in link
-
Validate a Google reCaptcha token
-
Exclusion of certain domains, e.g. freemailer, for newsletter registration
-
Sending the last newsletter to a new newsletter recipient
-
Create a SHA-512 hash from text
Example: Sending the last newsletter immediately after registration
How it works: Usually, clicking on the activation link of a double opt-in e-mail leads to a welcome page. In this case, insert a EMM form in between, which as an introductory trigger confirms the registration and triggers the sending of the last mailing.
-
To set up this function it is only necessary to extend your existing trigger for subscription. So select your subscription trigger in the Trigger management. It makes sense to adapt the Description of the trigger, e.g. subscription with newsletter resend, so that you don't lose track of what is happening.
-
In the Steps section, first select the type Load recipient data, because the customer ID of the recipient is needed in the next step, and then select the type Script-action. Then insert the following commands:
#set(\$companyID = \<cid>)
#set(\$mailingListID = \<ml_id>)
#set(\$lastSentMailingID=\$ScriptHelper.getLastSentWorldMailingIDByCompanyAnd Mailinglist(\$companyID, \$mailingListID))
#set(\$mailing=\$MailingDao.getMailing(\$lastSentMailingID, \$companyID)) \$ScriptHelper.sendEventMailing(\$mailing, \$customerID, 0, "1", null)
#set(\$scriptResult="1")
Please note: You have to replace the placeholder \<cid> with your assigned company ID. You can find this under your user name in the left-hand navigation. Instead of \<ml_id> you must insert the desired mailing list ID.
- Finally, click on Save. The trigger is now active. You should subscribe to the newsletter once to test the new trigger.
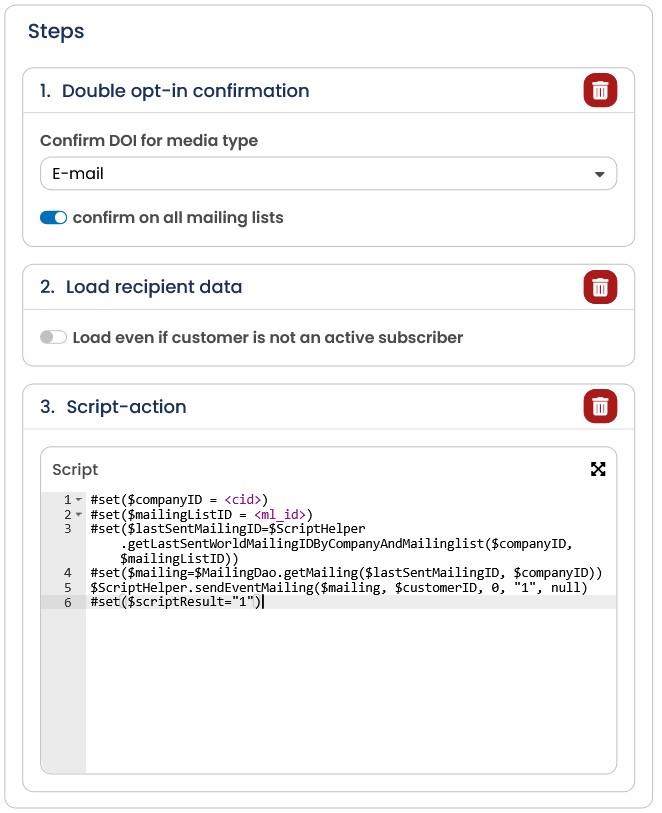
Fig. 11.11: With own script triggers various use cases are realizable.