7.2 Managing recipients
You can call up a list of all recipients by clicking on Recipients and automatically end up in the submenu Search. The overview standardly shows Salutation, First name, Last name and email. These fields are stored as master data in the E-Marketing Manager.
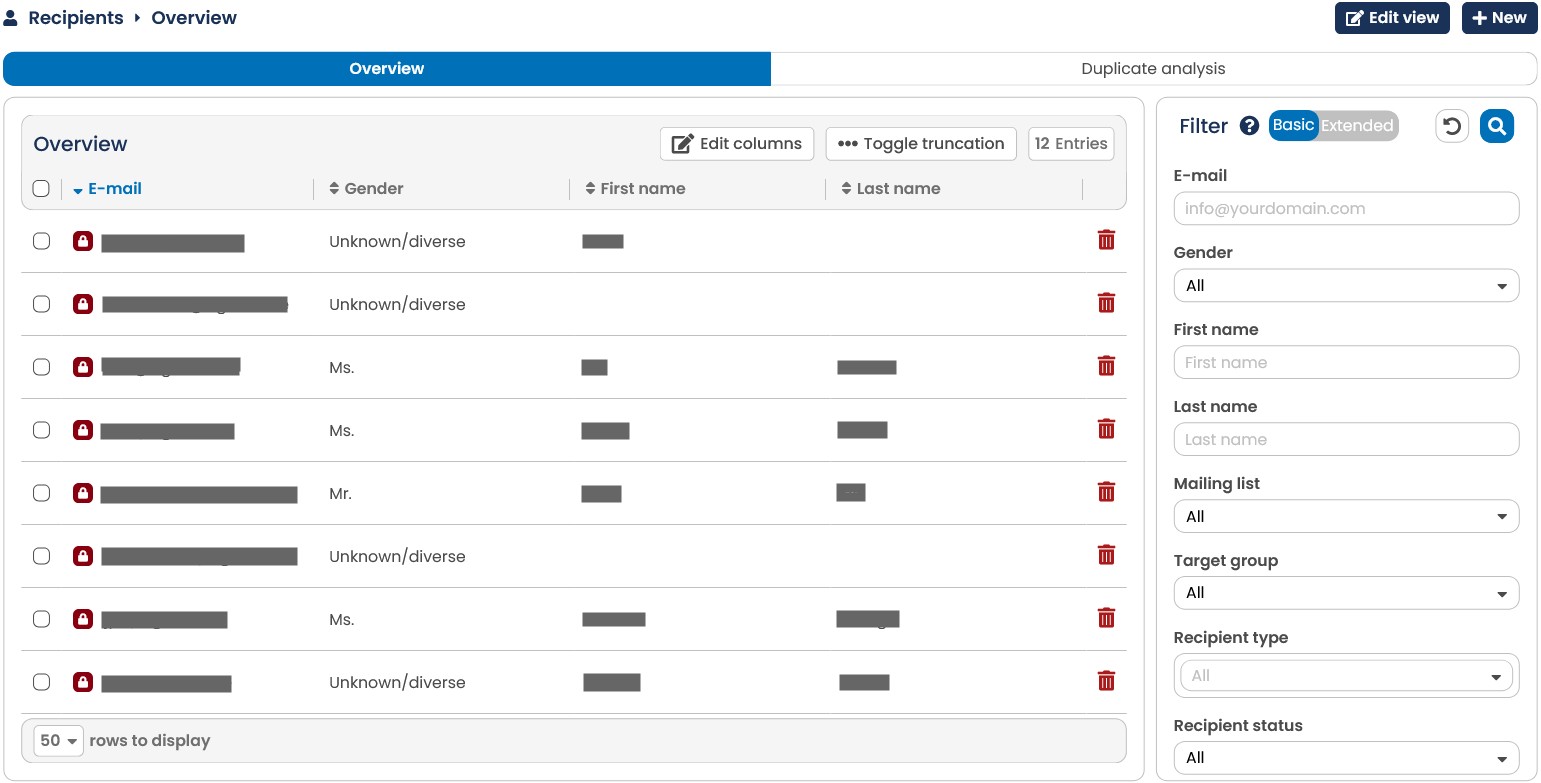
Fig. 6.3: The list in the overview shows all available recipients.
-
Sortable lists: To be able to maintain an overview of longer lists, you can sort these according to column headers.
-
Number of data records: Via the list, the numbers of selected elements is displayed. You can also choose how many data records are to be displayed on a page in the lower left corner.
-
Edit columns allows you to define the columns shown yourself. To do so, define the desired columns in by clicking on Plus or Minus. Please note that you can select a maximum of 8 fields. When you click on Save columns, E-Marketing Manager updates the recipient list shown. The email column is always output.
You filter the displayed recipients via selection lists such as Mailing list, Target group,
Recipient type and Recipient status on the right. If you are using the Premium feature Inner clients on target group basis, you will see another selection field ALTG at this point, with which you can filter the desired internal client (for more information, see the chapter Internal clients on access limiting target group basis (Premium)). E-Marketing Manager displays a maximum of 10,000 entries in the recipient list as standard. This value can, however, be modified to fit individual needs after discussion with AGNITAS Support, but does delay the display of the list.
If the number of available recipients is too large, the program only displays the first page and by means of an error message makes you aware that the displayed selection must be limited.
- A lock icon (premium) next to the email address indicates whether the recipient can be delivered encrypted (normal lock) or not (crossed out lock). Periodically, a check is made to see if the current setting is still accurate.
You can read more about the search functions in the Searching for recipients chapter.
Note: You can optionally have the profile data of recipients who are no longer active on a mailing list anonymized automatically after 30 days. However, the email address remains stored to facilitate potential reactivation. If you use DataAgents or master/subclients, this setting should never be used. If you wish to do so, please first contact AGNITAS AG.
Note: You can only search and edit recipients that are in mailing lists to which you are assigned. In order to avoid duplicates, a warning message appears when an address is already existent in a different mailing list.
Note: In the recipient overview, you have the option of displaying all duplicates that currently exist in your client. To do this, call up the Duplicate analysis tab next to Advanced search. In this area you will see all addresses that appear more than once in your distribution list.
7.2.1 Show recipient profile
The database contains specific data for each recipient - their profile. You call up the data for each recipient by clicking on the on the corresponding entry. In the content area, an input dialog with the data for the selected recipient appears on the right-hand side of the Recipient tab.
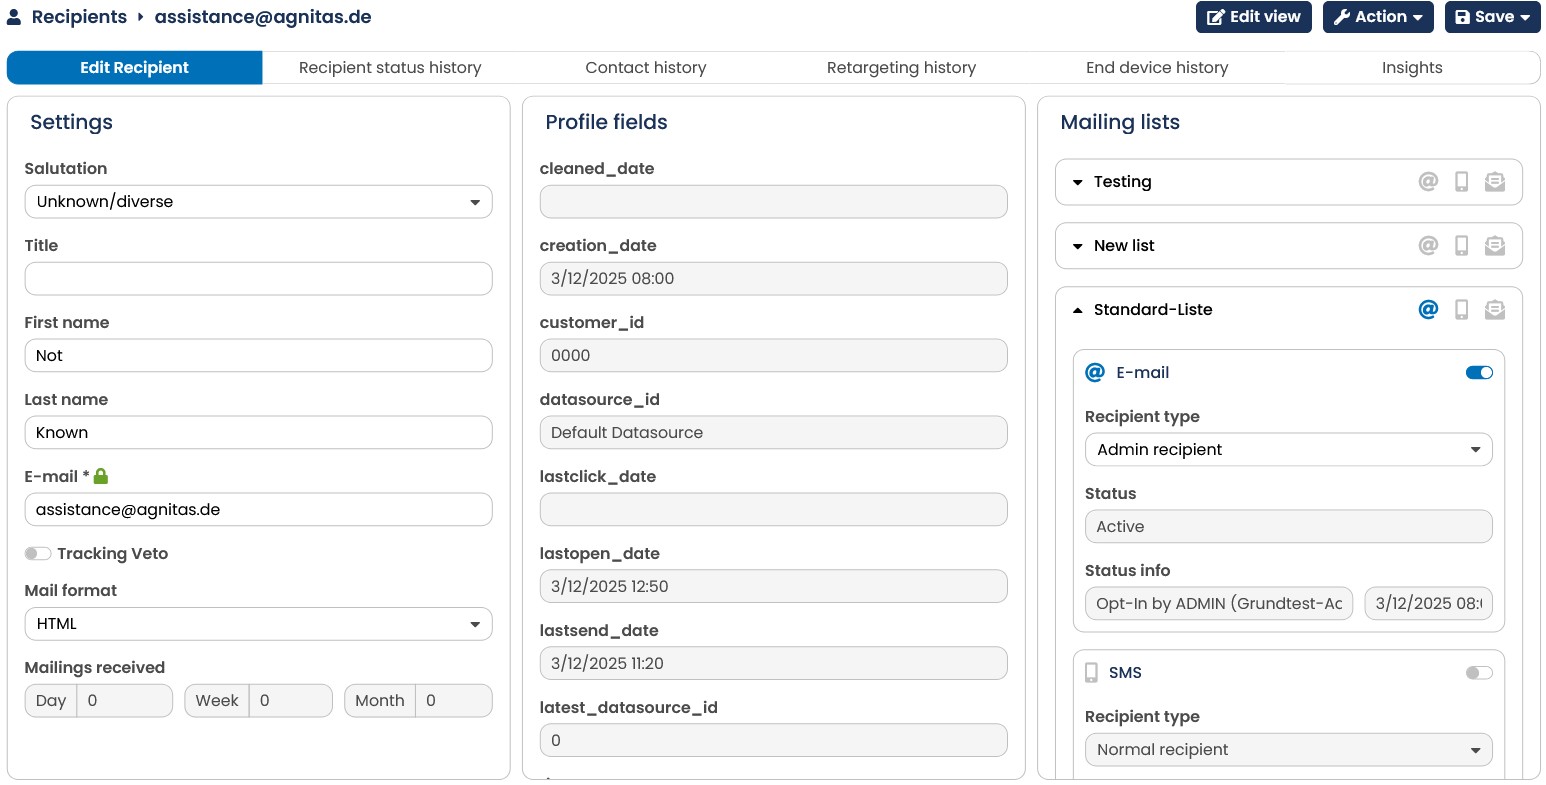
Fig. 6.4: Profile of a subscriber with individual database entries.
Data from the profile are organized in three distinct areas. On the left you will find general information, followed by additional profile data and on the right you will find the available mailing lists.
The Customer_ID is an identifier which is automatically assigned by the EMM for each data record (recipient) and which is unique. This means that duplicates can also be clearly delimited using the identifier. The ID is available for the recipient search, exports, target groups and also in the recipient profile.
With the Advanced Encryption Premium Package, a lock icon next to the email address indicates whether the recipient can be delivered encrypted (green) or not (red and crossed out).
Note: If you are interested in Delivery Package PLUS: advanced encryption, please contact your account manager.
Note: EU-GDPR Feature
According to the EU-GDPR, every user has the right to demand a report about all information concerning him. To grant this report, all you have to do, is click the button Action - Information Report, in the top right corner.
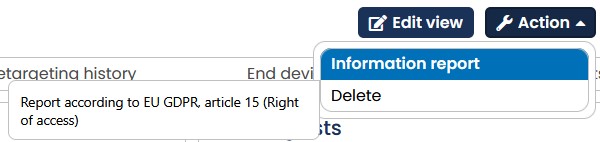
Fig. 6.5: By clicking action - Information report, you can export a report with all data concering a certain recipient.
Please note: Since people who refuse tracking can not be differentiated in statistics, there is only one number for anonymous openings and clicks remaining. Unfortunately the system is not able to say how many people participated in that number.
7.2.1.1 Recipient base data
The top contains general profile information prefixed by E-Marketing Manager, i.e.: Salutation, Title, First name, Last name, email and Mail format. All fields are optional except for the email address. Default salutations are Mr., Mrs. and Unknown. This only sets the recipient’s sex. Chapter Forms of salutation contains information on how to define different forms of salutations.
-
EMAIL: Recipient’s email address.
-
FIRSTNAME: Recipient’s first name.
-
GENDER: Recipient’s sex (gender). E-Marketing Manager uses numbers to identify a recipient’s sex: 0 means male, 1 means female, and all recipients whose sex is unknown are marked 2.
-
LASTNAME: Recipient’s last name.
-
MAILTYPE: The mailing type selected by the recipient. 0 means text, 1 is HTML and 2 means Offline-HTML.
Note: Once you surpass the mark of 750.000 profilefields , you are no longer able to delete profiles yourself. If that should be the case for you, please contact our support.
7.2.1.2 Other profile data
The More profile data section contains fields for internal use as well as all user-defined fields for the recipients’ profiles. Fields for internal use are:
| System fields | Meaning |
|---|---|
| CLEANED_DATE | Timestamp of data cleansing when a recipient is no longer active on any mailing list for 30 days. Excepted from this is information that is subject to verification as defined by the GDPR. Note: This field can be used for target groups and filters, but is otherwise hidden. |
| CREATION_DATE | Date of recipient profile creation. |
| CUSTOMER_ID | The E-Marketing Manager automatically assigns the customer number for each newly created recipient. This ID is unique in the system; a particular recipient can be uniquely identified by the CUSTOMER_ID. |
| DATASOURCE_ID | ID of the data source from which the recipient data was imported. When importing CSV data via the import function, the E-Marketing Manager automatically assigns an ID. |
| Email address of the recipient | |
| System fields | Meaning |
| FIRSTNAME | Firstname of the recipient |
| GENDER | Gender of the recipient. The E-Marketing Manager uses numbers to mark the gender: a 0 stands for male, a 1 stands for female. The number 2 marks all recipients where the gender is diverse or unknown. |
| LASTNAME | Lastname of the recipient |
| LASTCLICK_DATE | Timestamp of last click, cannot be determined for recipients with tracking objection after tracking objection has been activated. |
| LASTOPEN_DATE | Timestamp of the last measurable opening, cannot be determined for recipients with tracking objection after tracking objection has been activated. |
| LASTSEND_DATE | Timestamp of the last dispatch to the recipient |
| LATEST_DATASOU RCE_ID | Identifier of the data source from which the record was last modified. |
| MAILTYPE | The mail type that the recipient wants. A 0 stands for text, a 1 for HTML, a 2 for offline HTML. |
| SYS_ENCRYPTED_ SENDING | If the recipient can receive encrypted emails, the value is set to 1. If encrypted delivery is not possible, the value 0 is seen there. |
| SYS_TRACKING_VE TO | In the recipient profile, this field can be seen in the master data as Tracking veto. In the database, the value 0 stands for tracking consent and the value 1 for tracking objection. |
| TIMESTAMP | The date of the last change to the recipient profile. |
| TITLE | Title of the recipient (Dr. etc.) |
Please note: The fields LASTCLICK_DATE and LASTOPEN_DATE are updated once a day only.
User-defined fields are on top of that. This list is alphabetically sorted can be of any length and is based solely on your needs and requirement criteria, for instance customer IDs or other reference numbers. By default, 50 individual profile fields can be created. If you need more, please contact your account manager.
If your recipient database contains many fields, the recipient profiles quickly become confusing. To prevent this, you can mark individual profile fields as invisible in the menu point Administration under Edit profile fields. These no longer appear in the recipient overview although they are of course still present. In order to do so, click on the respective profile field and deactive the slider Field visible in the Settings area.
To also increase clarity in the recipient profile, it is possible to order the profile fields. This permits you to put important fields in the profile in first place. The definition is carried out under Edit profile fields and then drop-down list Sort in the Settings area.
7.2.1.3 Mailing lists and recipient types
The submenu Mailing Lists contains all mailing lists created so far. E-Marketing Manager shows which lists and media-types your recipient has subscribed to by ticking them. For this the corresponding mailing list has to be expanded by clicking on its name. If the recipient has subscribed to a particular mailing list, E-Marketing Manager shows additional data. It also shows the status of the user. If you want to learn more about status, check chapter Remarks.
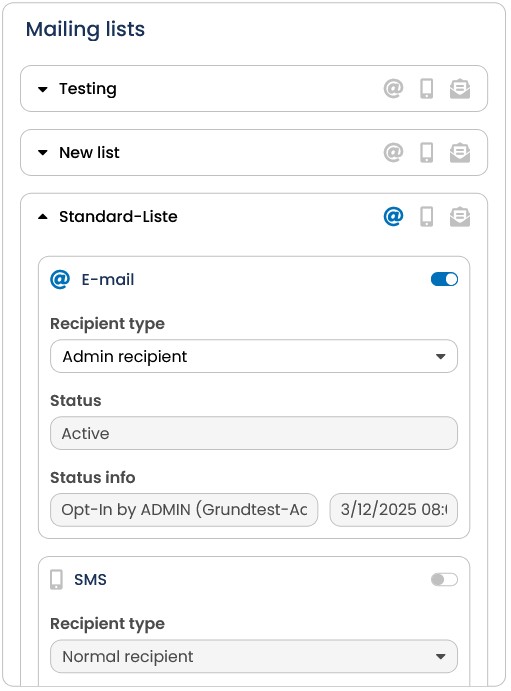
Fig. 6.6: The right part of the screen shows which newsletters a recipient subscribes to.
The Recipient type selection list can have the following values:
-
Admin recipient: The creator of a mailing is the admin-recipient. You should create a recipient profile for yourself (if you have not already done so) and assign yourself the status of Admin recipient for that mailing list. For details see chapter Creating adminrecipients and test-distribution lists.
-
Test recipient: To test the mailing, it is essential to send a few test mails to test recipients. They are not real recipients but e-mail addresses only you have access to.
You could also assign that status to someone who has to check a mailing prior to sending it to all recipients on the list.
-
Test VIP: You can define your own employees as VIP recipients. Test VIP recipients always remain as test recipients in a mailing list even when they click on the Remove link for test purposes. The Test VIP recipient will receive every test mailing and only those.
-
Normal recipient: All recipients who have subscribed to a newsletter and want to receive it are normal recipients. For details see chapter Creating admin-recipients and test-distribution lists.
-
VIP recipient: You can define your own employees as VIP recipients. VIP recipients always remain as recipients in a mailing list even when they click on the Remove link. VIP recipients receive an e-mail even if they are subscribed to the mailing list but not in the target group selected for the mailing. Attention: A VIP recipient cannot remove himself from the mailing list. Observe legal stipulations and use only internal e-mail addresses. The Normal VIP recipient will only receive the final mailing and no test mails.
The Status of a recipient can assume the following values:
-
Active: The recipient has subscribed to this mailing list. The remark explains which action caused this status.
-
Bounce: The address is invalid. The recipient was de-registered from the system.
-
Opt-In: The recipient was registered as a subscriber of this mailing list. This may have been done by the recipient himself via the web interface or by the administrator (followed by: by ADMIN).
-
Opt-Out: The recipient has opted out from the mailing list. This may have been done by the recipient himself via the web interface or by the administrator (followed by: by ADMIN).
-
Blocklisted: The recipient has been placed on the Blocklist. The ID of the user who placed the recipient on the Blocklist is also given.
-
Suspended: The recipient is currently excluded from transmissions. This status can only be set directly via the database and is assigned when necessary by AGNITAS.
Under Status-Info, E-Marketing Manager shows if the recipient is activated for that mediatype or the reason why he is not. The Remark provides the date and time as well as the last action and the Opt-In IP address. If the login has taken place on a shop page, the URL of the login page is also displayed here (this feature does not work for master and sub clients).
7.2.1.4 Recipient status history
When calling an already created recipient’s profile, you will find the three additional tabs Recipient status history, Mailing history, Retargeting history, End device history as well as Insights.
In the Recipient Status History page tab, the EMM offers you the possibility to view all data related to the recipient status at a glance.
The status history is displayed here. The status changes are logged by default for each mailing list. In addition, the table also contains the profile field history (Automation Package PLUS) for the master data and the five fields selected for it.
The Field Name/Mailing List field tells you whether the master or permission data has changed. If you find a profile field here, the master data has been changed. If you see a mailing list, the permission data has changed.
In the Overview area you will see a list of all status changes. The fields Date, Field name/Mailing list, Old value as well as New value give you all information of interest.
For example, you can see from the Recipient Status History when the status changed and the recipient went from Active to Bounce. So you can look up the time of the changes, the last status as well as last remarks.
With Automation Package Plus, the values Email, First Name, Last Name, Salutation and Mailing Type are logged by the logging. If desired, you can also define additional, customized profile fields for your recipient status history. For more details, please refer to the Profile fields chapter.
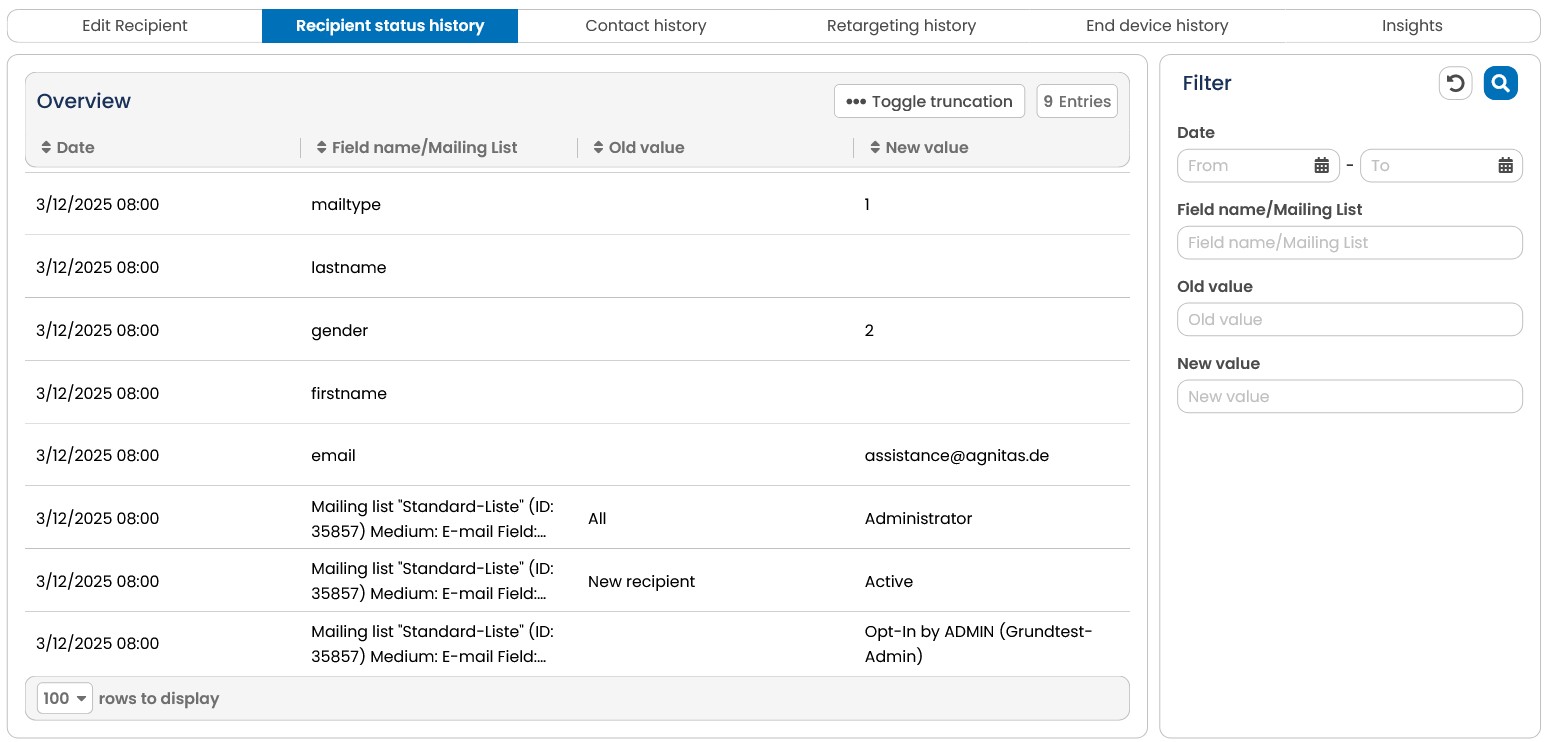
Fig. 6.7: The overview of all changes concerning the recipient status histroy can be found in the respective tab in a recipient's profile.
The contact history in the recipient profile has now been expanded to include concrete delivery information. Here you can also see, for example, why a mailing could not be delivered. This feature is a Plus offer of the Automation Package.
Note: If you delete a recipient, the Customer_ID and the e-mail address are retained for the time being. These are automatically deleted after 3 calendar years in accordance with
GDPR.
7.2.1.5 Contact history (Premium)
If you open an existing recipient profile, you will see the contact history (provided you are using the Automation Package) as well as other tabs.
The contact history provides you with an overview of all messages including the associated reactions of a recipient. The retention period is displayed above the table with the data records.
From the area you can see the date of sending, mailing type, mailing name, subject, date of delivery (default: visible for 180 days) as well as the number of openings and number of clicks.
If you click on the Number of clicks area, a pop-up window opens showing details of which link was clicked how often and when it was last clicked.
Note: Date- and action-driven mailings may have been sent multiple times in the same period. The most recent entry is displayed here, the reactions contain the sum of all mailings.
Please note: This is premium feature which needs the Automation package. If you are interested in it, please contact your Key Account Manager.
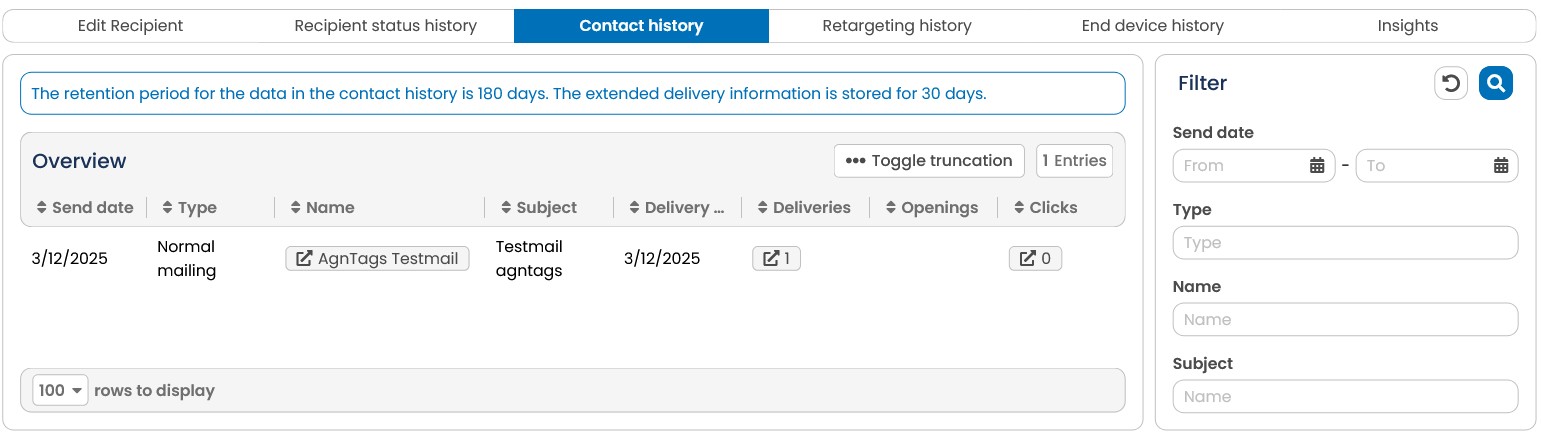
Fig. 6.8: The contact history shows all messages received by the recipient in chronological order.
If logging of delivery information is active (a Plus offering of the Automation Package), you can also view the detailed information of the delivery and - or delivery attempts - for the recent shipments here. To do this, click on the desired line to include this data. This feature is a plus offer of the Automation Package.
7.2.1.6 Retargeting history (Premium)
When you open an existing receiver profile, you see the retargeting history (provided you use the Retargeting Package) as well as other tabs.
In the Retargeting History area, you can view the data that is collected on the basis of measuring points. The E-Marketing Manager displays in chronological order which measuring points of the recipient took place on the site and which mailing brought the recipient to the site. This enables the customer journey to be traced, starting from the email.
The Overview area lists all the activities of the recipient on the site. The columns Date, Mailing name, Tracking Point and Value display all the relevant information.
The following examples will clarify this: The measuring point Revenue is enabled by default
and indicates the generated revenue of the recipient with reference to the respective mailing. The specified value is numeric and corresponds to the submitted orders. You can also check using several measuring points. Basically, you can send alphanumeric and simple values using the three measurement points. Please see the chapter More types of tracking points (Premium) for creation of numeric, alpha-numeric or simple tracking points. If, for example, you have created a simple measuring point with the name basket, which is placed on your website in the shopping cart, you can now determine whether or not a specific recipient ended up in the shopping cart. In this example, the corresponding value is simply Yes or No.
An alpha-numeric tracking point can be easily placed at various places with product descriptions on your website. In this way, you can track whether a recipient was interested in searches for sales or for a new collection. The specified values thus correspond to your definition – category or product names, for example.
Note: With the help of reference tables, you can also use the information acquired here to create a target group based on measuring points. See the chapter Reference tables from tracking points and Creating advanced target groups.
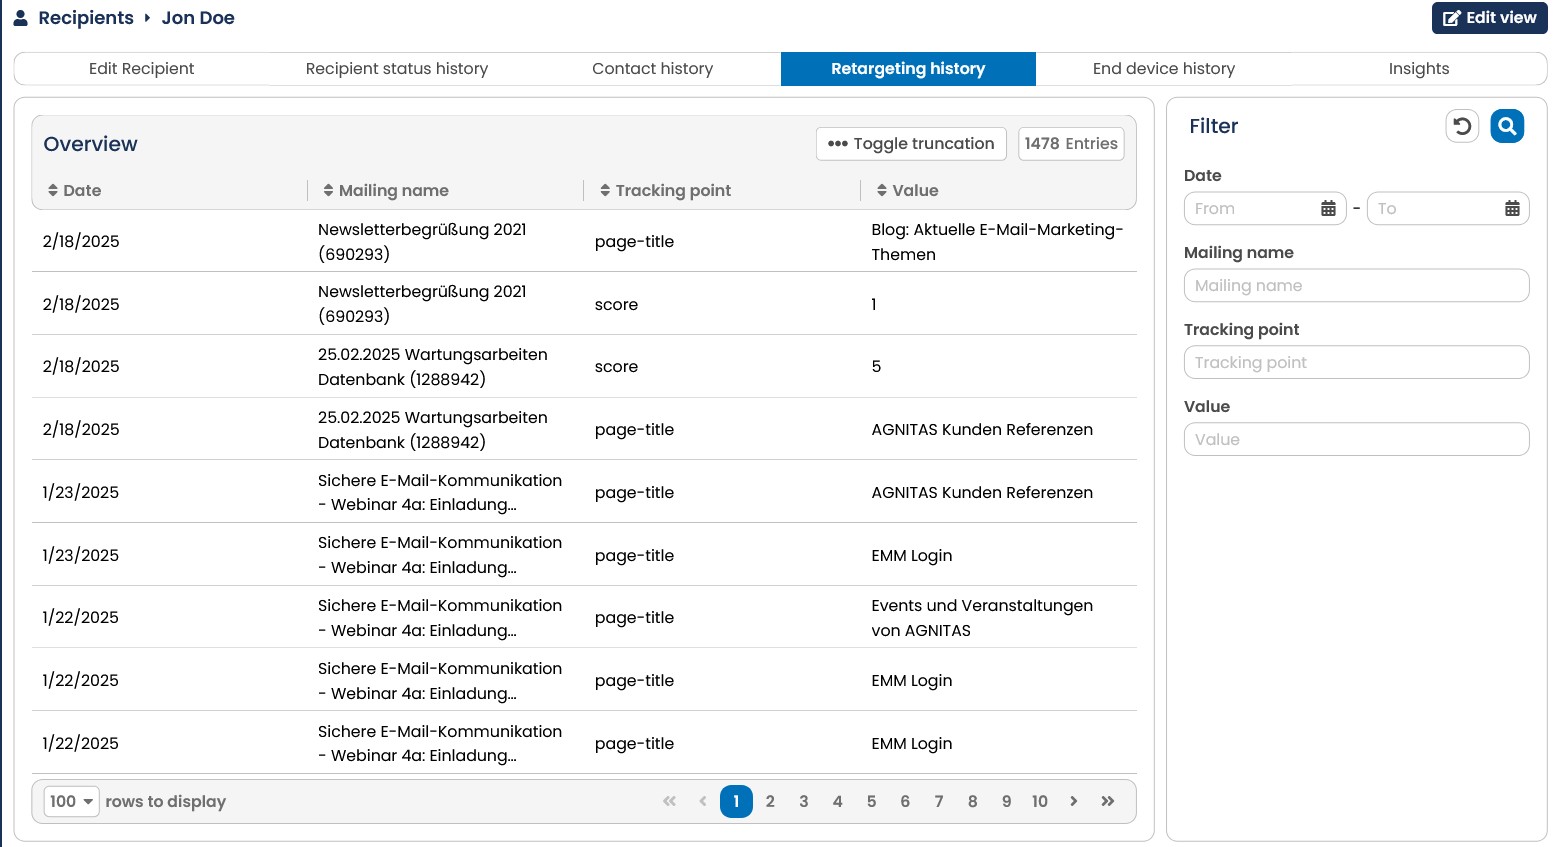
Fig. 6.9: The overview of all tracking point changes can be found in the Retargeting history tab.
7.2.1.7 End device history
When you open an existing recipient profile, you see the End device history (provided you are using the Automation Package) as well as other tabs.
In the End Device History, E-Marketing Manager lets you see all the data related to the end devices.
The overview shows you the date, the mailing name, the action (openings or clicks), the end device type and the end user device name.
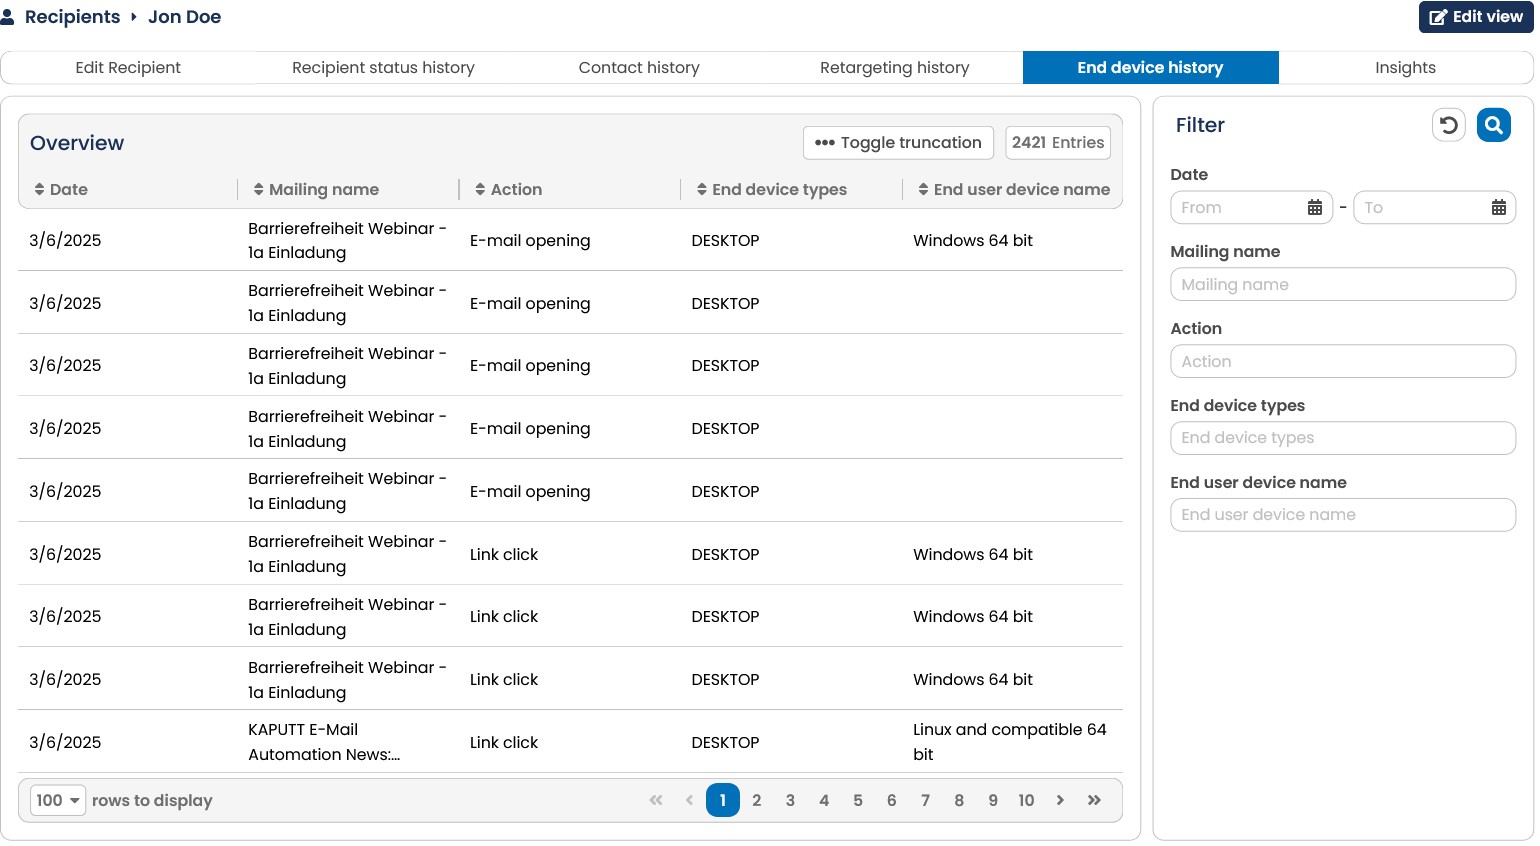
Fig. 6.10 You can find an overview of all entrys regarding the end device history in the recipient profile.
Note: The end device history can also be used for target group selections. You can find details on that in the chapter Narrowing down to end devices.
Please note: If your recipient is using an Apple endpoint device, there may not have been a true opening, as Apple proxy servers automatically load images for privacy purposes.
7.2.1.8 Insights
If you open an existing recipient profile, you will see the Insights tab in addition to other tabs.
In the section Insights, when and how which reactions were triggered by the recipient.
You can split up Insights into the following sections:
Day of reaction:
This statistic gives you a percentage overview, about how the reactions are scattered trough out the week.
Time of reaction:
Shows you at which times the recipients reacts the most or the less.
Reactions in progress:
Shows on which day the recipient generated revenue, a page impression or a reaction.
Mailings led to revenue:
Informs you about the mails that made the recipient purchase something and how high the generated revenue was.
Devices led to revenue:
Shows which device has been used for opening the mail and reacting to it.
On the right you can find the average numbers based on the last 90 days about a recipient as well as an evaluation based on the boston consulting matrix.
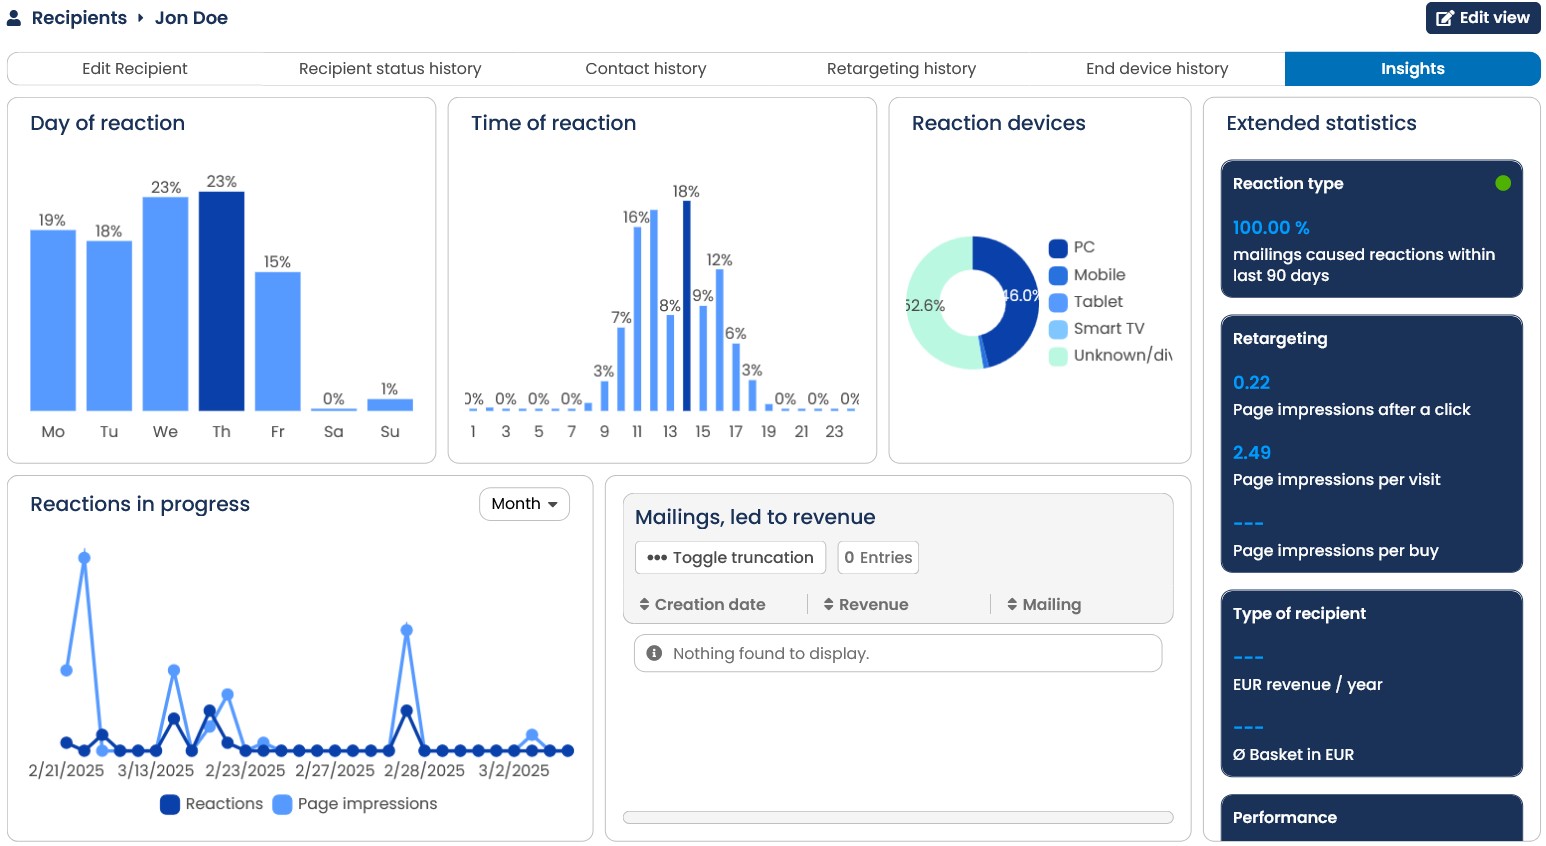
Fig. 6.11 Under Inisghts you will find all the overviews mentioned in this chapter.
7.2.2 Edit recipient profile
You may edit recipient profile data at any time.
-
You call up the relevant recipient as described in chapter Show recipient profile.
-
Enter new information in the relevant fields. You may change the Recipient Type in the relevant drop-down list: Administrator, Test recipient or Normal recipient.
-
Finish by clicking on Save. E-Marketing Manager saves your changes and reopens the recipient list.
The recipient’s profile also contains the information which media types the recipient has authorized for his or her mailing lists. Each mailing list allows the for your client enabled media types. Usually at least E-Mail is enabled.
7.2.3 Create new recipients
The E-Marketing Manager system allows creation of individual recipients. This only makes sense if you want to create a few new recipients. In most cases, importing existing data (see chapter Import function for recipient data) or having users register themselves via the web interface will be more practical (chapter Pages & Forms). To create a new recipient, proceed as follows:
- Click on Recipients, then New in the navigation bar.
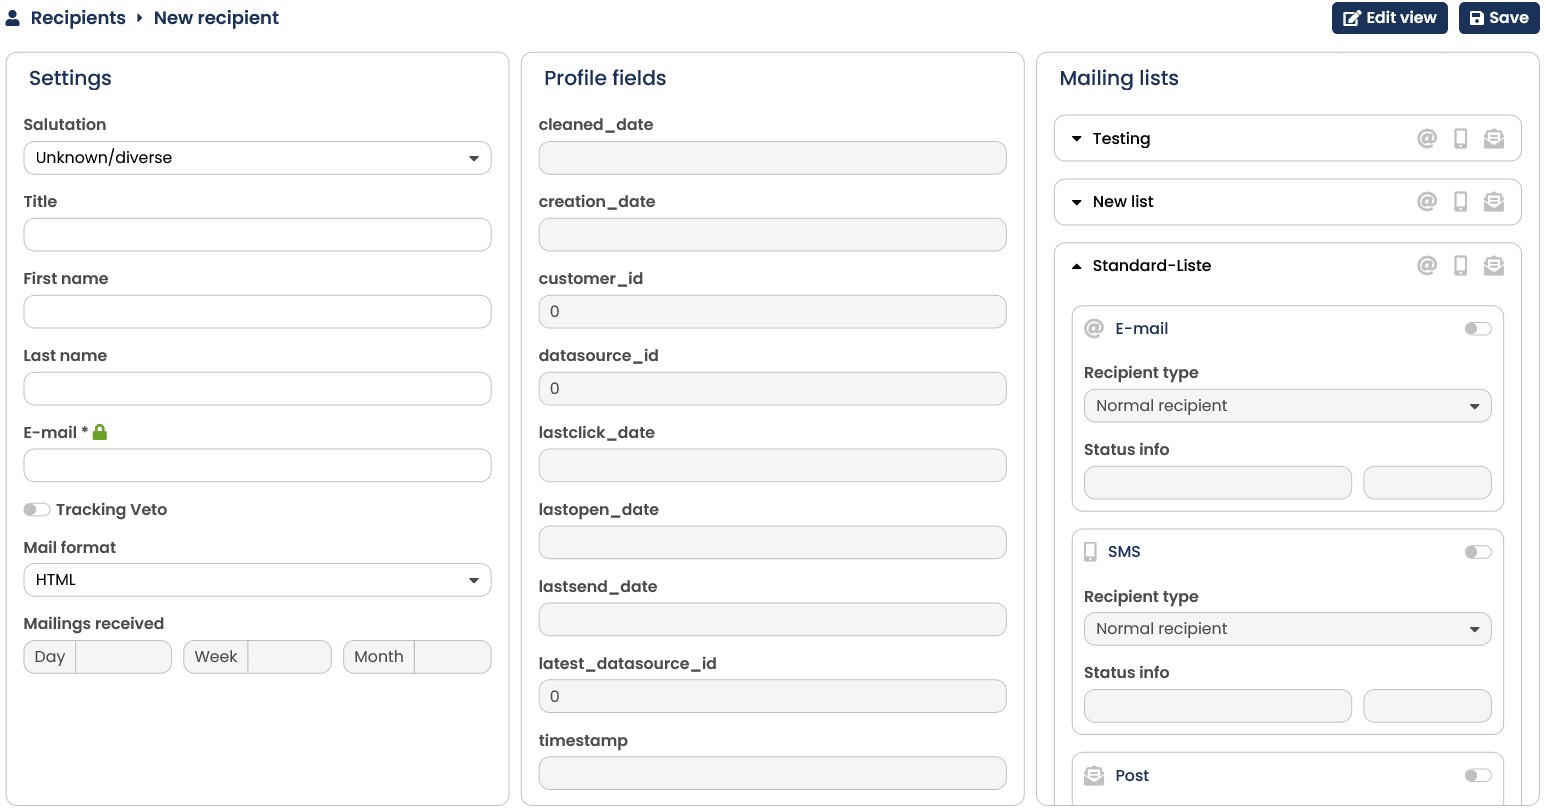
Fig. 6.12: This entry dialog allows inserting a new recipient into the database by hand.
- An entry dialog opens in the contents area for you to enter data for the new subscriber. This looks like the screen for new recipients (chapter Show recipient profile). Fields in the upper area (from salutation to e-mail) should be filled in to do personalized E-MailMarketing.
Please note: You must enter a unique e-mail address for the new recipient. The EMarketing Manager will inform you if the entered e-mail address is already stored in the database. Now you can decide whether you want to create a duplicate or edit the existing record.
Internally, E-Marketing Manager manages all e-mail addresses in small letters. When entering the e-mail address you do not therefore have to take capitalization into account and all addresses can be entered directly using small letters.
The Salutation drop-down list only sets the recipient’s sex. The actual form of address is defined elsewhere (see chapter Forms of salutation). Leave the mail format as HTML
(default) unless you want another format (see chapter Mailings - Sending out newsletters).
3. All grayed out input fields, such as creation_date, customer_id, etc., will be filled by EMarketing Manager automatically. You can enter relevant data in user-defined fields where necessary.
1. Under Mailing lists you can tick the lists the new recipient wants to subscribe to. Leave the default value Normal recipient in the Recipient type drop-down list unless you want to enter a different type for testing purposes. Other types are test and admin recipients. Test recipients will receive mailings that were sent via test dispatch. Admin recipients will receive all sent mailings.
4. The recipient input mask offers you two save options: You can stay in the recipient profile after saving by clicking Save, for example, to switch to other tabs such as Contact History. With the Save and back option you can switch back to the recipient overview when you are done with the changes.
Note: The EMM will automatically execute a doublet check, based on e-mail-addresses. However, you can simply ignore the hint in the EMM and make a new entry with an already existing adress. If you would like to have that feature turned off entirely, please contact our support.
7.2.4 Creating admin-recipients and test-distribution lists
A recipient can be one of five types: Normal recipient, Admin recipient, Test recipient,
Test VIP or Normal VIP recipient. All subscribers who will only receive mailings are Normal recipients. The other recipient types are used for testing and managing mailings (see chapter Sending out test mails).
The creator of a mailing is the administrator. You should create a recipient profile for yourself (if you have not already done so), enter your own email address and assign yourself the status of Admin recipient for that mailing list. Later, you can use the Admin recipient to test a mailing. You will then be sure that only you will receive that test mailing.
A test-distribution list is similar. You create several test recipients with different settings, for instance different mailing formats (text, HTML and Offline-HTML). They are not real recipients but email addresses only you have access to. You could also assign that status to someone who has to check a mailing prior to sending it to the final recipients on the list.
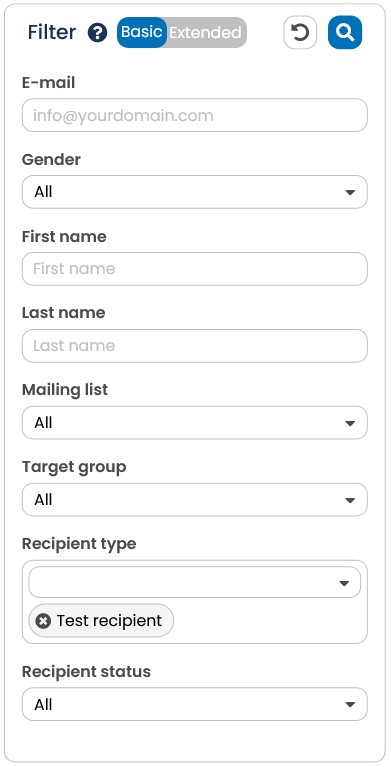
Fig. 6.13: Using the filter function to display only the test recipients in the database.
7.2.5 Deleting a recipient
Sometimes recipients may request to be deleted from a mailing list. Please note that you do not have to delete a recipient to stop his newsletter subscription. All you need to do is to unselect the relevant mailing list (remove the tick) as described in chapter Edit recipient profile. The recipient profile remains in the database. To delete a recipient from the database altogether, proceed as follows:
-
Call up the list of recipients by clicking on the Recipients menu. You may have to use the search function to find the recipient you want (chapter Searching for recipients).
-
Click on the Delete symbol in order to delete the subscriber from the list. The whole record is deleted from the database.
Alternatively, you can click on the Delete button in the recipient profile.
7.2.6 Remarks about recipient status
Information in advance:
The recipient comment is supplementary information to the recipient status and is usually set automatically by the E-Marketing Manager. It is possible that the status and comment do not match. This can happen if the comment is not overwritten by a status change by one of the following services.
The remark can also be freely defined by :
-
manual activities on the database by AGNITAS AG
-
Imports / Updates via DataAgents
-
Creating / changing recipients using Velocity Script
-
Adding to / changing the status of a mailing list via web service
In addition, there are defined remarks that are set automatically:
| Status | active : |
|---|---|
| Remark | Description / Source |
| Opt-In-IP: |
is set when the recipient clicks the DOI confirmation link |
| CSV File Upload | Auto import / EMM import as active receiver |
| 1. / 2. Hardbounce Validation | Reactivation by AHV (advanade hardbounce validation) - Process |
| Opt-In by ADMIN | manual registration in the EMM (recipient profile) by the named user (for older records also without username) |
| Status: | bounced |
| Remark | Description / Source |
| bounce: |
Dispatch to the recipient has triggered a hardbounce. (For older data records also without bounce code) |
| bounce: soft / Softbounce | converted from soft to hard bounce according to bounce management rules |
| Mass Bounce by Admin | Auto Import / EMM Import as Bounce |
Status: Opt-out-by-Admin
| Remark | Description / Source |
|---|---|
| Opt-out through CSA mandatory link |
|
| Unsubscribe via Hotmail / AOL / Yahoo feedback loop |
|
| Opt-Out by ADMIN (Username) |
|
| Mass Opt-Out by Admin |
|
| Status: Opt-out-by-User | |
| Remark | Description / Source |
| Opt-Out-Mailing: <number> |
|
| User-Opt-Out: <IP> |
|
| Opt-out through CSA mandatory link / Optout by mandatory CSA link / same in other languages |
|
|
|
|
|
| waiting for DOI confirm |
|
| CSV Import |
|
|
|
| Remark | Description / Source |
| auto opt-out due to Blocklist |
|
| Blocklisted by <number> |
|
| Blocklisted by import datasourceid: <number> |
|