7.5 Mailing lists
Content of this chapter
-
You will get to know the function of mailing lists and define different "distribution lists".
-
You will learn how to share mailing lists with users.
-
You edit and delete mailing lists.
7.5.1 What is a mailing list?
Mailing lists are the key element for sending out newsletters using the E-Marketing Manager. A mailing list contains all prospects and subscribers for one or multiple newsletter. The mailing list manages all declarations of acceptance (or permission information) which recipients have given when requesting e-mails and thus equals your mailing distribution list. When you want to manage separately several distribution lists, for example private costumers and corporate costumers, you have to create a mailing list for each distribution list.
7.5.2 Creating a mailing list
When you log in for the first time, you will already find a first mailing list named Standard List in your E-Marketing Manager. You can use and rename this list directly (see Modifying a mailing list). If you need additional mailing lists, proceed as follows:
-
Select the submenu Mailing Lists in the main menu. An overview of all existing mailing lists is now displayed. If you click on the New button at the top right, the input dialog for mailing lists opens.
-
Enter the relevant data in the fields Name and Description. Each time you have to select a mailing list, E-Marketing Manager will display the name. Recipients, however, will not see this text. You should try to use meaningful descriptions which will make your work easier once you have to manage many different mailing lists. Especially if several employees use the E-Marketing Manager, unambiguous mailing list names are a must.
-
If you would like to define a fixed Sender and reply-to email for your new mailing list, fill in the corresponding fields. You can also specify the Sender full name and Replyto full name here. When you select the mailing list for a new mailing, the corresponding fields in the mailing will be automatically filled in with the information you entered.
-
If your user has the appropriate rights, you will see the Email addresses for mailing approval field. Here, you can enter the email addresses of the people who should be authorized to approve a mailing for sending. If you use this option, this list of recipients will be automatically displayed in the Send Mailing tab when you activate the Request Approval slider.
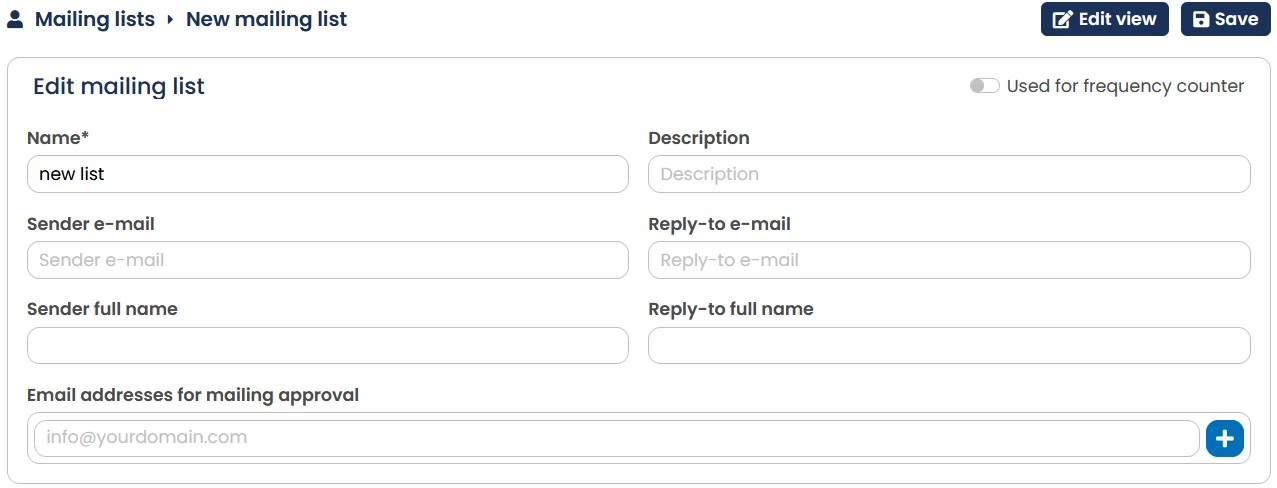
Fig. 6.20: A mailing list is the basis for your newsletter.
- To conclude your entries, click on Save in the upper right. The system now saves your data and you will be automatically forwarded to the editing screen of this mailing list. For more information see chapter Modifying a mailing list. If you click on Mailing Lists, your new mailing list will be displayed.
The overview also shows you the MailinglistID of each mailing list. These IDs are created automatically. You need it when creating some forms e.g. for subcription or fullview.
Please note: You can also create a mailing list from the list of recipients for a target group (see chapter Target groups - Dynamic filters). E-Marketing Manager will highlight all recipients selected by that particular target group as subscribers in the recipient database and transfer them to a new mailing list. However, this procedure should only be used with caution. Unsubscribing can quickly lead to errors, because the recipient cannot unsubscribe from the new mailing list if you do not include the new mailing list in your forms.
7.5.3 Modifying a mailing list
Carry out the following steps to change the name, description, sender address or character set of a mailing list.
-
Click on the Mailing Lists submenu.
-
The overview area will display a list of all mailing lists defined so far. Click on the respective mailing-list entry.
-
The contents area will now display an entry dialog with current mailing-list descriptions as well as a recipient statistics. Just change the text in the entry fields or the item in the drop-down list. Save the changes by clicking on the Save button.
You will find a statistic under the Name and Description entries, which shows the development of the recipient for the selected list. You can have the development for a certain period displayed using the Month and Year drop-down lists by clicking on the Refresh button. You will find the values for Opt-ins, Opt-ins without confirmation, Optouts, Bounces and On blocklist below the chart.
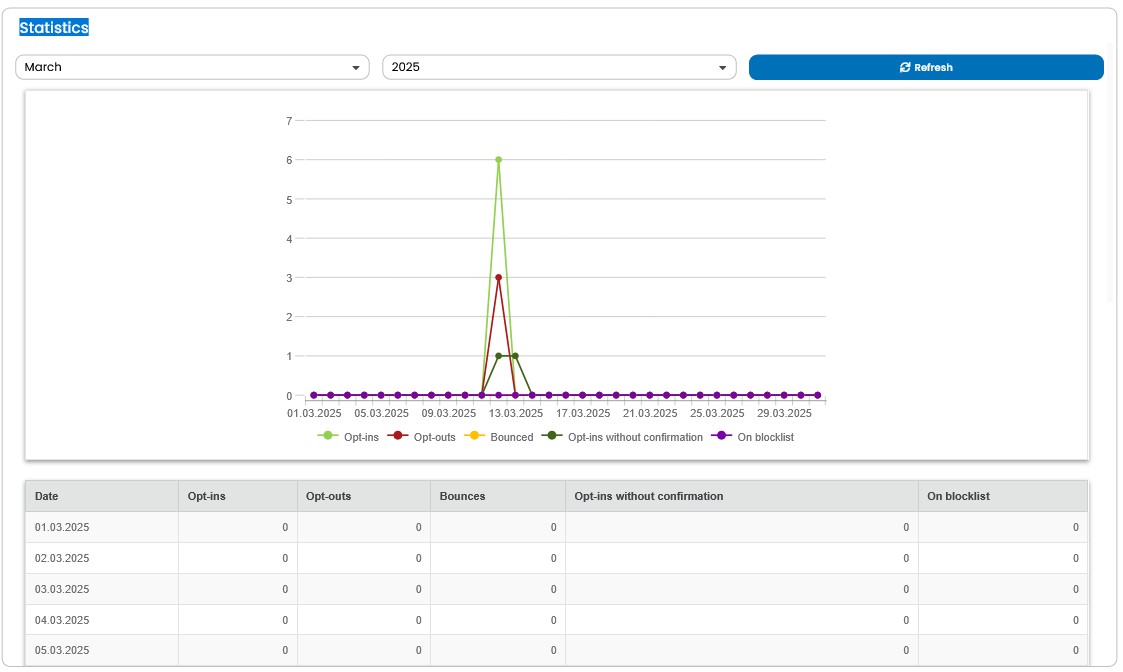
Fig. 6.21: The statistics shows you the development of the recipients withing the mailing list.
7.5.4 Deleting the recipients of a mailing list
The recipients of each mailing list can be deleted at any time with just a few editing steps. To do this, select the relevant mailing list in the overview and open the editing view.
Now call the drop-down menu Action and choose the option Delete recipients of this mailing list. Before E-Marketing Manager takes action, you can give more exact information on the procedure as follows. Two filters are available:
-
Delete only active recipients: E-Marketing Manager deletes all recipients from the mailing list who have their status set to active. Recipients with a bounced or Blocklisted status are, for example, not deleted.
-
Don't delete admin and test recipients: Activate this slider if admin and test recipients are not to be deleted from the mailing list.

Fig. 6.22: You have two filters available for deleting recipients from a mailing list.
To execute the changes, click on Delete and confirm the subsequent security question with Yes.
Please note: If the recipients are still on another mailing list, only the information regarding the selected mailing list is deleted, the recipients themselves are not deleted.
7.5.5 Deleting a mailing list
If you want to delete a mailing list altogether, call up the mailing list overview. You now have three options:
-
Click on the Delete symbol at the end of the unwanted mailing list in the overview.
-
Click on the name of the unwanted mailing list to call up the edit dialog. In this dialog, call the Actions drop-down menu and select Delete.
-
If several mailing lists are to be deleted, the Bulk action at the overview page offers a faster way: First mark the candidates for deletion by placing a tick in the checkboxes in the first column of the corresponding list entry. Then call the drop-down menu Bulk action and click on the command Delete selected mailing lists.
In all cases, E-Marketing Manager asks you for confirmation. This is meant to ensure that you do not inadvertently delete the wrong mailing list by clicking on it. Only after confirming that you want to delete the mailing list by clicking on Delete again the list will be deleted.
Please note: You should think hard before deleting a mailing list. Once deleted from the database, it is very difficult to re-create that particular mailing list. Moreover, the permission information saved on individual recipients is also deleted so that you can no longer check whether or not a particular recipient ever subscribed to a mailing list.
7.5.6 Approval (Premium)
In the overview of the Mailing lists menu you can see all existing mailing lists by default. If you now select a mailing list and click on the Approval tab, you will see for which users the respective mailing list is activated. Changes can only be made by an administrator.
The EMM offers the possibility to create so-called inner clients by means of mailing list release (Access Limiting Mailing List, short: ALML). The recipients of this mailing list form the inner client.
By releasing the mailing list for certain users, the access of the users is restricted in different areas. A user can also be given the release for several mailing lists. These users will only see the recipients, imports, exports, mailings, templates, reports, statistics and all other recipient-related content belonging to the shared mailing list. This also includes all the rights to create, edit and delete the affected items. For example, when a restricted user creates a new mailing, they can only select from the mailing lists shared with that user.
In addition, the mediapool offers the option of linking individual categories to access limiting mailing lists. This means that only users with access to the selected mailing list(s) can view the images in the corresponding category.
If you are interested in the mailing list-based inner-client capability, contact your personal account manager.
Note: Mailing lists with restricted access are marked with a lock symbol in the overview and in the detailed view.
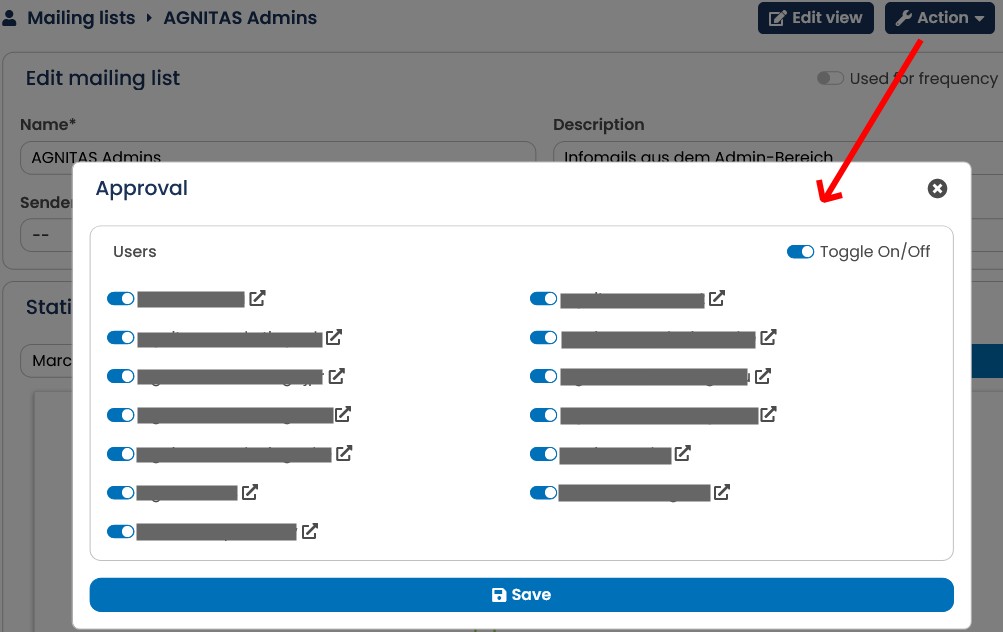
Fig. 6.23: Approval of Mailinglists
Note: By sharing mailing lists with specific users, so-called inner clients can be created.
These users will only see the recipients, mailings, reports, statistics and all other mailing list
related content belonging to the shared mailing list. This also includes all rights to create, edit and delete the items concerned. If you are interested in the intra-client capability, contact your personal account manager. The price regularly includes 5 mailing lists for inner clients.