8.1 Import
In addition to the possibility of importing your customer data into the recipient database through the AGNITAS AG, you can also use the import function for the database directly in the E-Marketing Manager for smaller and simple imports.
Prerequisite: The data must be in a suitable format (CSV, Excel, JSON).
In addition to the standard import function, the E-Marketing Manager offers a further option for uploading user data on request. The Import wizard function (see chapter Import Wizard) does without an import profile and guides you manually and step by step through the upload process.
You have the option of importing encrypted information such as an encrypted customer number. If you wish to make use of this option, please contact the AGNITAS Support.
Note: It is not possible to re-register already existing recipients with the status opt-out by admin or opt-out by recipient (status active) or to set the status Waiting for double opt-in confirmation. This applies to all three import methods (standard-, wizard, auto-import).
Note: You can only import into fields that are released for your own mailing list.
Please note: The upper limits for file sizes are 200,000 records for Import Wizard, 500,000 records for Standard Import with a Profile, and 200,000 records for imports into reference tables. So that the imports do not burden the performance of the system, a maximum of 1.5 million data records can be imported per day. Therefore, make sure to import only changed or new data records.
8.1.1 Import methods
The Import function can be found in the navigation bar under Import. When you go to the option Import, you are offered two methods. You can choose either the standard import or the import wizard method. Both methods are suitable for adding new recipients and/or updating existing recipients.
Note: If you want to import data into reference tables, you must do this via the table administration in the menu item Administration. Please refer to the chapter Managing Tables (Premium) to find out how to proceed in this case.
The standard import is particularly useful if you want to import files with a constant structure on a regular basis. The standard import works with an import profile that have to only create once and then can use again and again. This procedure saves time during the import and reduces possible errors to a minimum. You can read more about the standard import in the chapter Standard import.
The Import Wizard is useful for one-time imports with an individual data structure. Here you are guided step by step through the import menu. No import profile is required, since you configure the settings for the import during the process. You can learn more about the Import Wizard in chapter Import Wizard.
8.1.1.1 Standard import
If you have prepared your import file and a suitable import profile exists, you can use the Standard Import method. Proceed as follows:
- In the first input dialog box, start by selecting the file that should be imported. You can either upload the file from your computer or use a file that is already stored in the Upload menu. In the first option, you inform the system of the storage location of your import file via the Browse button. Confirm your choice to return to the import dialog. In option two, you must first activate the Use uploaded file slider. In the selection menu you can now select the corresponding file. This procedure is only useful if you work in a team and another user provides the data. You can find out more on the subject of uploading files in the File Upload chapter.
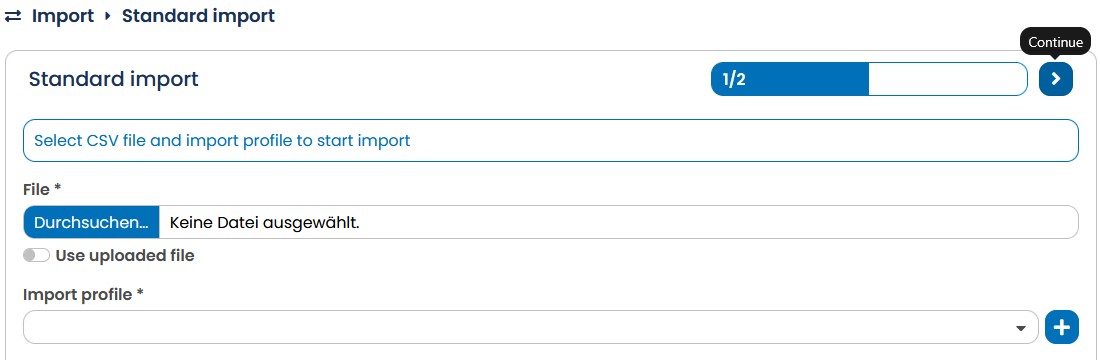
Fig. 7.1: The Standard import needs an import file and an import profile to be able to import recipient data into the database.
-
E-Marketing Manager makes all import profiles saved in the system available in the Import profile drop-down. Choose a profile that fits your recipient data.
-
Once you have selected a file and an import profile, start the Import using the Continue button.
8.1.1.1.1 Preview and Mailing List Assignment
The Standard Import now reads the import file in and processes it in exactly the way defined in the import profile. If the column names in the import profile are identical with the column names of the file, both columns are automatically assigned to one another. The system displays a preview of the recipient data to be imported, showing the first lines of your import file.
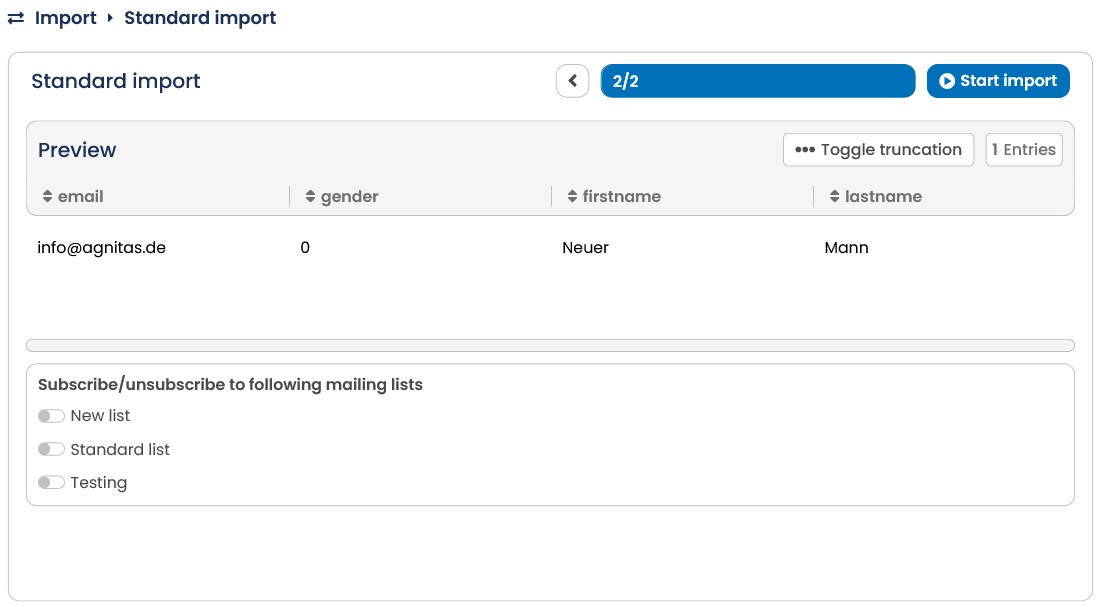
Fig. 7.2: The Standard Import shows a preview of the import file.
In the preview, only the columns that are actually to be imported appear. If your file contains additional columns that were not assigned to the Import profile, then those will be ignored for the set import. Note that this is only a preview and the data cannot be changed. If you discover errors here, you must change these in the original file and prepare a new file for import.
Please note: In this first step, E-Marketing Manager only checks whether the import data is in the correct format and whether a filled-out key column exists for each recipient. If for example the e-mail address has been defined as being the key column, it must contain content. E-Marketing Manager does not however carry out deeper syntactical checks here. The system therefore does not check either capitalization or spelling of the import data.
For this reason, you should go through the complete import list carefully before the import. Experience shows that import files often contain erroneous data. This can cause considerable problems after the import. When such erroneous recipient data has been stored in the E-Marketing Manager database, tracking it down is difficult and takes a lot of effort. Voluminous imports in particular often harbor much potential for conflict.
Below the preview, select one or more mailing lists for which the mode selected in the import profile is to be applied. The mode controls whether the imported recipients are created on the mailing list or whether existing recipients are updated, deregistered, marked as bounced, or Blocklisted. If a mailing list assignment has already been defined in your import profile, this selection is now displayed. However, you can adjust the selection in this step as required. At least one mailing list must be selected.
Please note: To allow the recipient data to be allocated to a mailing list, this must already have been created in E-Marketing Manager. You can find out more on the subject of mailing lists in chapter Mailing lists - Managing list subscription.
Selecting one or more mailing lists simultaneously activates an E-Marketing Manager security function: If there is a recipient in the import file whose administration status has already been set to opt-out, the data will no longer be imported by E-Marketing Manager. This prevents the recipient from accidentally receiving mailings even though they have already de-registered from the mailing list.
Please note: The selection of one or more mailing lists applies for all recipients that are about to be imported. For a selection in which some recipients must be added to mailing list A and other recipients to mailing list B, proceed as follows:
Example: Your import file consists to one third of recipients who are to be added to mailing list A, a further third should be added to mailing list B, and the final third to both mailing lists A and B. In this case you must split the recipients into three separate import files and carry out the import procedure with each of the three files. For the first import procedure, tick mailing list A, for the second import procedure tick mailing list B, and for the third import procedure tick mailing lists A and B.
As soon as you have marked the mailing list you want with a mouse click, you can start the read-in procedure by clicking on Start import. After the import process has been completed, a results page with an error analysis is displayed. You can export the results as a CSV file and process them further.
8.1.1.1.2 Error handling
In principle, two kinds of error can occur when importing files into the database:
-
The import profile chosen does not match the import file.
-
The import file contains errors.
If the E-Marketing Manager does not even display the first lines of the file as a preview, the file chosen does not match the import profile. This can occur when no information on the column names or on the key column is noted in the import profile or the column names in the import file do not match the mapping in the import profile. E-Marketing Manager therefore indicates an error and switches directly to the input mask of the selected import profile for correction.
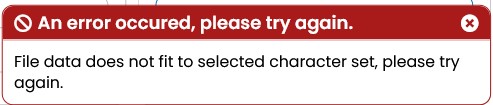
Fig. 7.3: The E-Marketing Manager reports an error when importing recipient data. The import profile chosen does not match the import
file.
Now take a look at the Manage fields tile. Choose a file and assign the columns you want to import – at a minimum the key column – to a database name and accept the changes with Save. Then restart your import. Once you return to the start page for the standard import, the fields File and Import profile are prefilled. By clicking Continue you should see the preview and the selection for mailing lists.
In the second case – the import file contains errors – E-Marketing Manager does not switch to the import profile but remains directly in the Import dialog. After clicking on the Start import button in the import preview, the system carries out a search for errors. This includes a search for erroneous email addresses and wrong numerical values. If discrepancies occur, the system announces those found on the following page, for example with the following output:
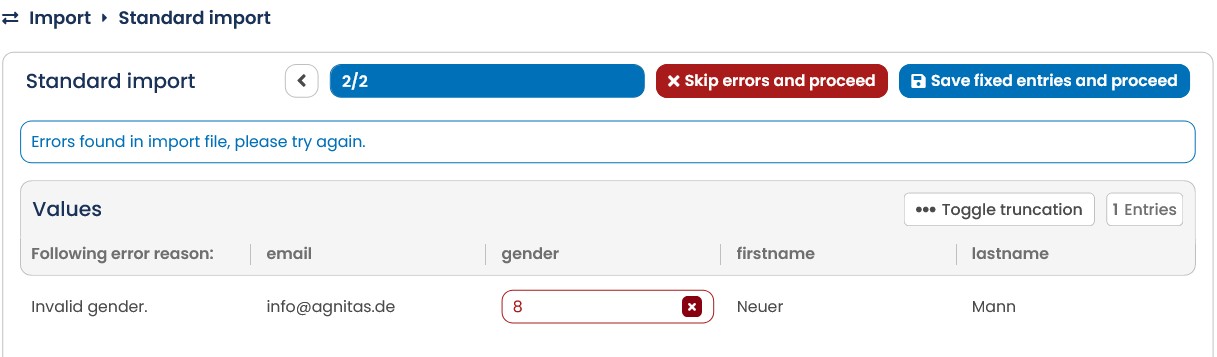
Fig. 7.4: E-Marketing Manager has discovered an error in the import file.
E-Marketing Manager highlights fields containing wrong information with a red outline, and requests that you enter the correct data. The corrected information is accepted with Save fixed entries and proceed. The search for errors is subsequently restarted to check your corrections. Alternatively, you can Skip errors and proceed. The erroneous information is then not imported.
If in the import profile you have given an email address in the field E-mail address(es) for reports, E-Marketing Manager sends a message that can contain the following information, if it is not empty:
-
A file containing the found and corrected errors. An import file corresponding to the figure above would consist of three lines. The first line contains individual categories such as gender, last name and e-mail address; Line two contains the data records of the recipients with the incorrect gender specifications. The second line contains the data record for the recipient that has the wrong e-mail address.
-
A file with the wrong lines that were not imported.
-
A report containing import statistics.
8.1.1.1.3 Importing the CSV file
In the next step, the E-Marketing Manager transfers the import file to the database while simultaneously checking for errors. Amongst other things, the system searches for agreements with the Blocklist and duplicate addresses, and also checks for the correct line structure of the import file.
In principle, E-Marketing Manager can import erroneous files because the lines containing errors are skipped during the import. It is however a good idea to first correct all errors in the import file. Otherwise you will never know exactly whether the desired recipient data was imported or not.
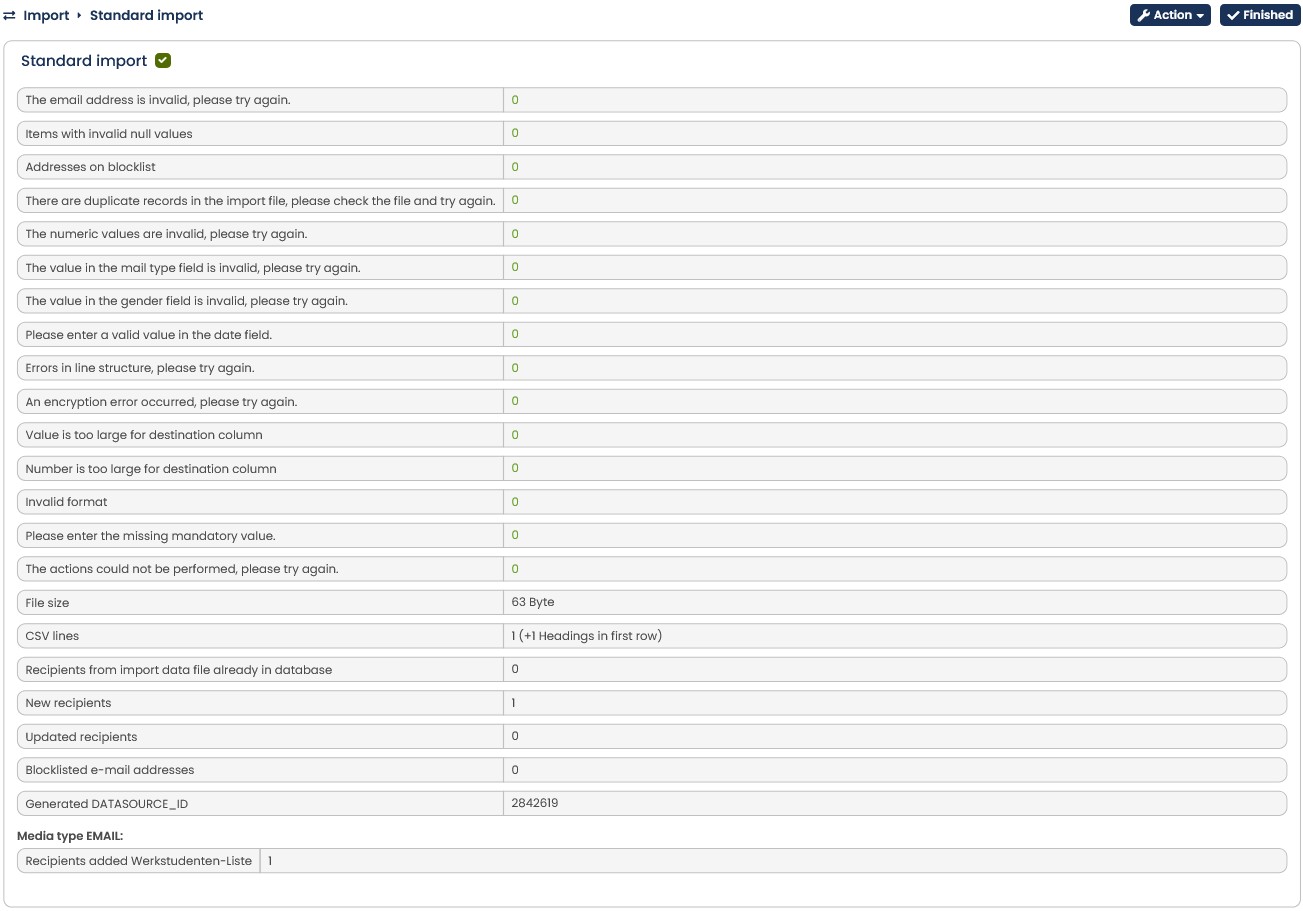
Fig. 7.5: You have successfully finished the import. You can download the results via the Action button.
After the import up to five reports are available. If you click on the Action button, you can download most of them as a CSV file. If the E-Marketing Manager tells you that errors occurred during import, you can easily go through the list and modify the import data accordingly by, for example, deleting or correcting the recipients with erroneous data.
-
Result: An overview of the import.
-
Valid recipients: Successfully imported respectively updated recipients.
-
Invalid recipients: Recipients, which could not be imported
-
Duplicate recipients: Recipients, which were recognized as duplicates corresponding to the setting. The source of the multiple duplicates will be displayed in an additional column with file (within the import file) or db (within the data base).
-
Fixed recipients: Recipients, which were manually corrected in the previous step.
When you have imported the data from your file into the system, click on the Finish button to switch to the submenu Overview in the navigation bar entry Recipients. The overview automatically displays the most important parameters such as salutation, first name, last name and e-mail address. If recipients for more than one media type are imported, the EMM shows you how many new recipients have been added per media type. You can read more about managing the recipients in chapter Managing recipients.
8.1.1.2 Import Wizard
The Import Wizard, unlike the standard import function, uses no import profiles. It will guide you step by step trough the import, instead.
The Import Wizard is useful when your recipient data often uses different designs. If, for example, you work with data from various address suppliers, you may find that the associated tables use differing fields or are filled out differently. The Import Wizard lets you easily manage this task. To do so, proceed as follows:
- Call up the Import Wizard by opening the Import menu. Here you can choose the Import Wizard method. Then click on the Browse button and tell E-Marketing Manager where the file whose data you want to import is stored.
Alternatively you can use a file from the Upload section that you have already sent to EMarketing Manager. To do so, activate the slider Use uploaded file and choose the appropriate file in the selection menu. You can find out more on the subject of uploading files in the File Upload chapter.
- The Import Wizard leads you through the importing of your recipient data in a total of seven steps. The classic import takes into account all the parameters you have defined for an import profile. These include, for example, the separator and text recognition characters, the date format, the import mode, the duplicate comparison and the assignment of the file columns to the database columns. All settings are described in detail in chapter Creating a new import profile.
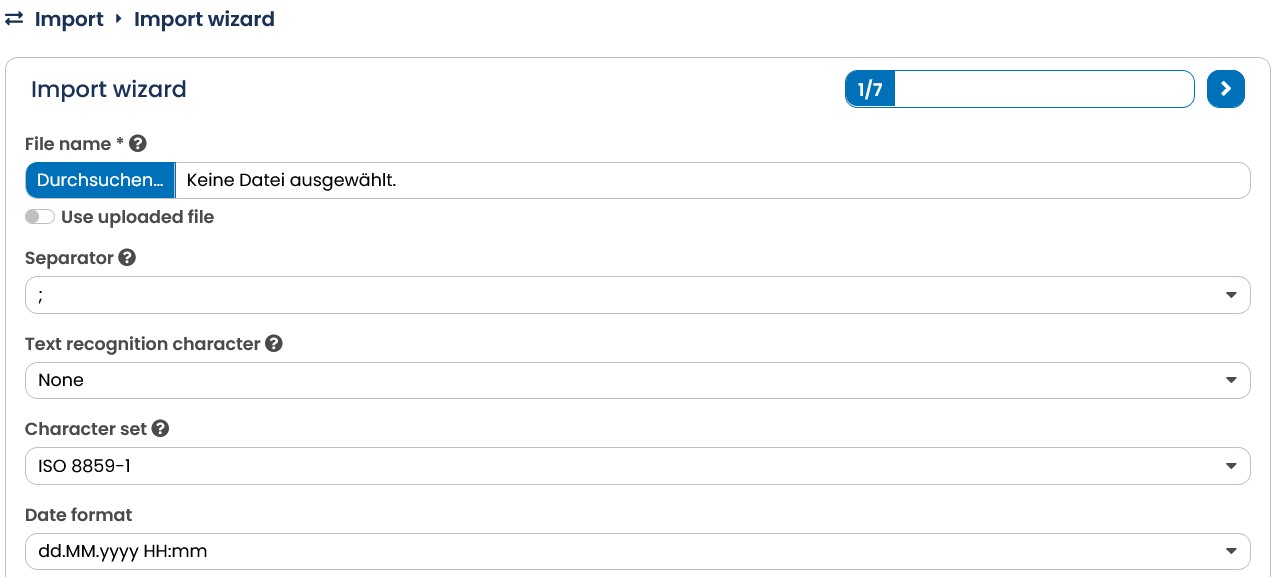
Fig. 7.6: The import wizard.
- Carry out all of the import steps. If you have finished the settings for a certain import step, move on to the next one with Continue. Back calls the preceding step. After the last import step, you conclude the wizard with a click on Finish.
Note: In step 3, only profile fields that are marked as visible can be selected.
Upon request we will gladly enable the classic import function. Please contact our AGNITAS Support Department or your Key Account Manager.
You have the possibility to import encoded information, such as client numbers for example. If you want to do so, please contact the AGNITAS support.