12.5 Closed-loop marketing
Closed-loop marketing is the ideal case of direct marketing, because here the focus is on the recipient's interest and the content can be flexibly adapted to the respective interests. This dialog marketing process consists of a self-controlling control loop in which the behavioral data of an e-mail campaign is directly incorporated into the design of the next campaign. The E-Marketing Manager gives you the appropriate instrument with triggers to increase the relevance for your recipients. Because the response data of the recipients automatically expands the recipient profiles and subtly captures interests. You can optimize your customer approach by incorporating the interests of your recipients into future campaigns.
In concrete terms, this means addressing prospects and customers with content that is personalized and individualized for each recipient with the help of behavioral data in order to achieve a maximum response rate.
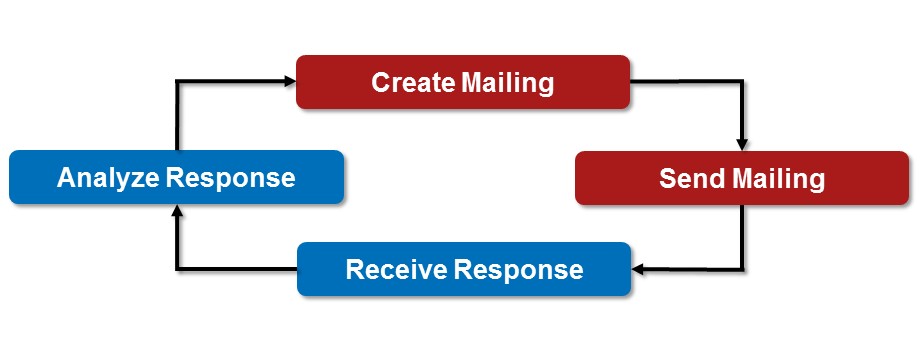
Fig. 11.12: Using the information fed back, you can plan your next mailing campaign more
If a recipient clicks on a specific link in the e-mail, the \<%PRODUCTNAME%> changes the profile of the clicking recipient. The click behavior in turn controls the content for upcoming email campaigns.
An example makes the processes clearer. Suppose you offer two links in your newsletter: One to an individual travel offer to Australia and another to a package tour to Mallorca. Recipient A clicks on the individual travel offer, while recipient B clicks on the package deal. In the profile of the respective recipient these clicks are counted - from the dialogue with the recipient an interest profile crystallizes after a few dispatches. When the number of clicks by the recipient reaches a certain predefined value, further e-mail campaigns can now be triggered based on the click behavior: Since Recipient A is obviously interested in individual trips, individual trips can be sent to him specifically. Likewise, recipient B will receive more package tour recommendations based on his clicking behavior.
You implement the closed-loop principle in four steps in E-Marketing Manager:
-
First you create additional fields (one field per interest or category) in the recipient profile to store the click behavior.
-
Then you define an trigger for each interest, which modifies the recipient profile in the corresponding field.
-
Now you connect the links in your newsletter with the appropriate triggers.
-
In further newsletters you assign content to specific target groups, which in turn are based on the profile fields.
12.5.1 Extend recipient profile with fields of interest
In the example, the interest of the recipients in two different topics (individual travel and package tours) is to be measured. Two additional fields in the recipient profile are required. Each time the recipient clicks on a topic-related link, the field content should be increased by 1. After a few mailings, this will give a fairly clear picture of the recipient's interests. Whoever clicks once on an individual travel link is not as interested as a recipient with 15 clicks from this area. You need two fields of type Integer number, which are set to the default value 0. As meaningful names you use Individual Travel and Package Tour.
-
In the navigation you will find the submenu item Profile fields under Recipient. Click on the New button.
-
Now enter Individual trip in the Field name field. Under Description enter the purpose for this field. You can use Individual_trip as the Field name in database. Upper and lower case is not important but spaces must be replaced. In the Type drop-down list, select Integer number. The default value is 0. All recipients will then have the same starting value. You can make the remaining settings as you wish.
-
Complete the entry by clicking on Save. If you want the value to influence the sorting of the contents of a mailing later, activate the slider at Value defines grade of interest after saving.
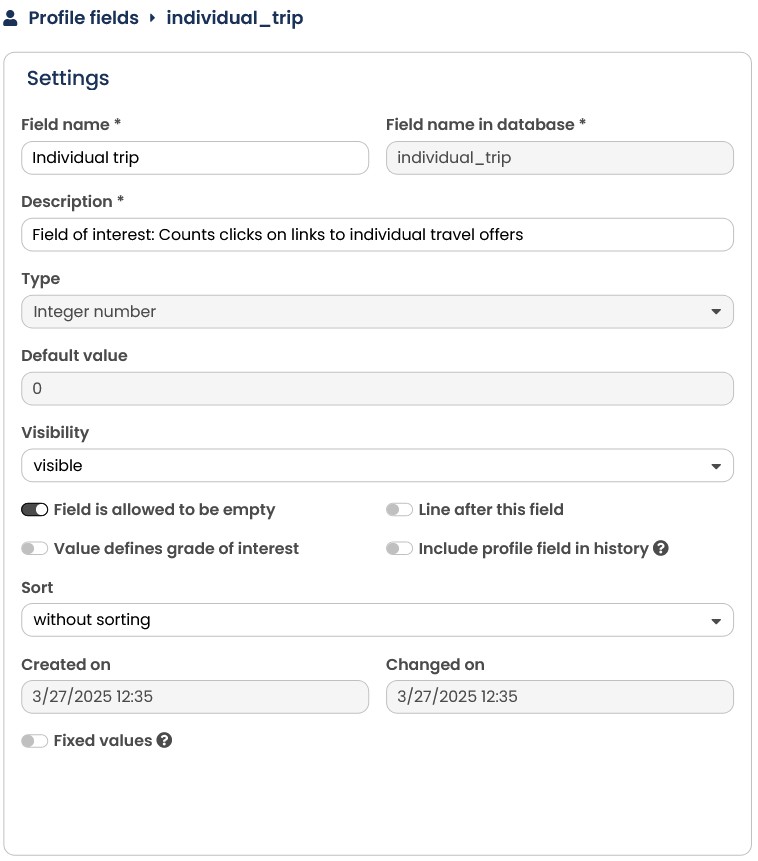
Fig. 11.13: Create a new numeric field per interest.
- Repeat the steps for the Package Travel field.
Note: If there are many profile fields in your recipient database, the recipient profiles quickly become confusing. To prevent this, you can mark individual profile fields as invisible. These will no longer appear in the recipient overview, although they are still present, of course (see chapter Creating new fields).
To increase the clarity in the recipient profile, you can also influence the order of the profile fields under Sort. This allows you to move important fields to the front of the profile.
12.5.2 Define triggers for profile modification
For the example, you need two triggers with which you can increase the fields Individual trip and Package tour by the value 1 each when clicked. The following steps are necessary for this:
- Click on Trigger management in the navigation bar and then on the button New.
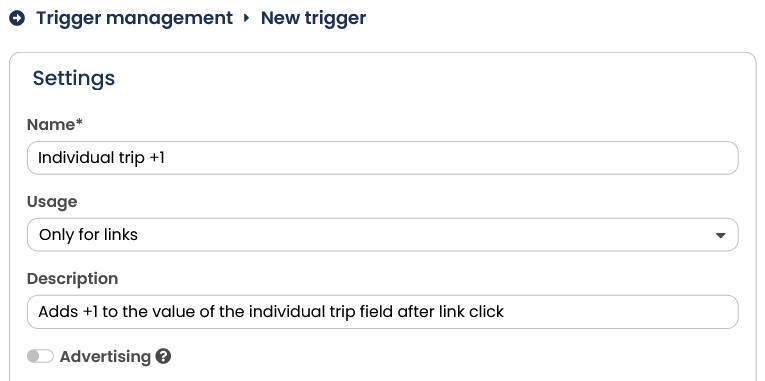
Fig. 11.14: Create a new trigger to modify the value in the profile field.
- In the Name field, enter Individual trip +1. The more unique the name, the easier it is to recognize the correct trigger later in the selection menu. In the Usage field, select Only for links, since this trigger will be used later in mailings. The Description should describe the purpose of the trigger in more detail so that other users can understand the function. In the Type drop-down list, select Modify profile. After clicking on Plus, select the field Individual trip in the Column name. As operator use the +-plus sign and for value enter 1.
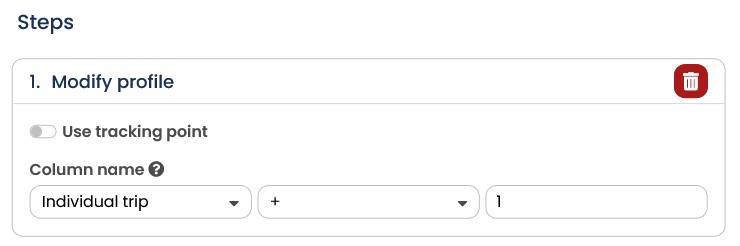
Fig. 11.15: The trigger increases the field value by 1 with each click.
-
Complete the input with the Save button.
-
Now create an identical trigger with the name Package Tour + 1, which increases the field Package Tour by 1 accordingly.
The two new triggers are now visible in the Trigger management. If you have set the triggers to inactive when creating them, you can now set them to active.
12.5.3 Connecting links to triggers
Now you create the mailing in which you would like to present your travel offers. This mailing is structured like any other normal mailing. Only the links to the offers are linked to the two triggers from the last chapter. How to create a mailing in general is described in the chapter Mailings - Sending out newsletters. For this example we assume that you have already created the mailing. You only have to edit the links accordingly.
-
Open your mailing and click on the Links tab. The E-Marketing Manager shows in a list all links contained in the mailing.
-
First click on the link for the individual travel offer to Australia. As Description you can enter a text like Individual Travel Australia, the description will appear later in the statistics and is easier to enter than long links. Note: It is important that the link is marked as trackable. Choose the appropriate setting for your mailing, e.g. Text and HTML version. In the selection list Action, now select the trigger Individual Travel +1. Finally, save the changes with the Save button.
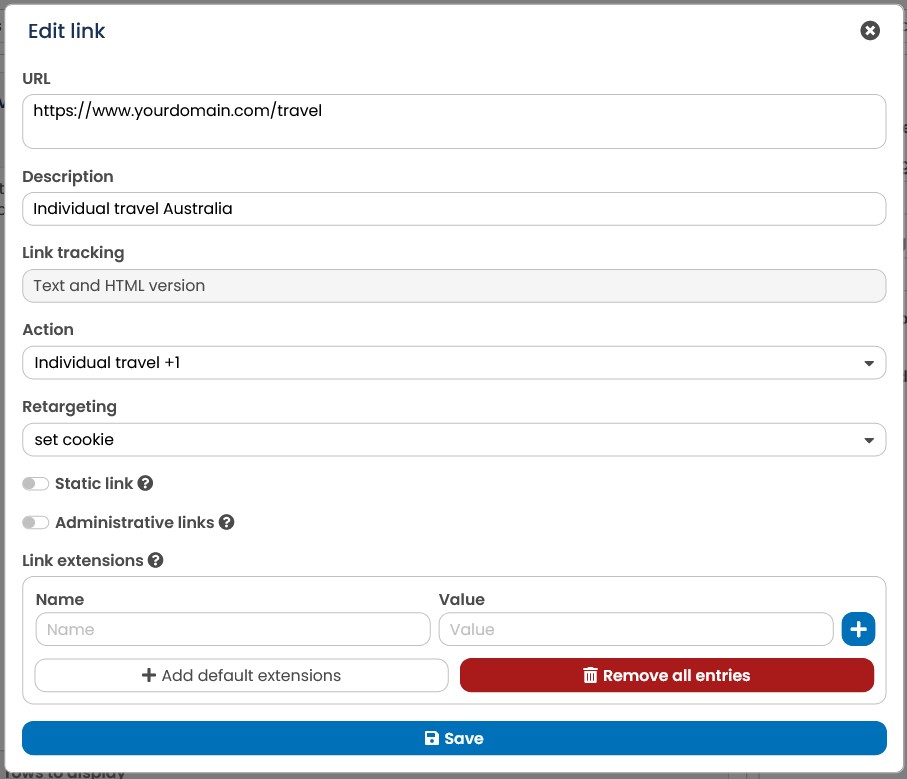
Fig. 11.16: Now connect the link with the appropriate trigger and confirm with Save.
- For the second link you proceed in the same way. This time, however, choose Package Tour +1 as the trigger, thus preparing the measurable links for the interest to be recorded. For more details about links in the mail text, see chapter Using trackable links.
As soon as a recipient clicks on one of the two links in their email program, the corresponding profile field is incremented by one and at the same time the link opens in the browser. Without further effort, the recipients themselves now modify their profile in the recipient database.
With the data obtained in this way, you can now form target groups, e.g. all recipients who have a value greater than 5 for Individual Travel. You can also automatically sort newsletter content in the order of most clicks. This means that if recipient A has clicked three times on package tours and five times on an individual tour offer, the module with the individual tours will be displayed first and for recipient B, who so far only reacted to package tour offers, this module will be displayed first. How this works is explained in chapter Sorting content by interest.