16.5 User
With the user administration you are able to create new users for your EMM-client, grant individual permissions and mailing list approvals to the users, reset the access data as well as remove users who have left the system. In addition to the basic permissions, you or the user himself can define configurations such as language, time zone or layout for his user access.
Parallel to individual rights, you can also assign the users to a user group that already has the appropriate rights approvals for the group. For example, it is possible to grant an employee exclusive access to the statistics functions in order to evaluate your mailing campaigns. Or you can assign an employee the role of Data Manager, for example, if he or she is specifically responsible for importing and exporting data.
The regular price already includes 7 user accounts. Technically, however, an unlimited number of users can be added. We therefore recommend that you give all employees their own access and avoid group users. This makes tracking in case of data breakdowns or errors much easier, increases data security and is also better delimitable from a data protection point of view, since all work steps are logged in the activity log.
16.5.1 Managing users
To manage the existing user, click User under Administration. The E-Marketing Manager now shows you a list of all created users. The table contains Username, Firstname, Lastname, Client (including ID) and E-mail of the user. In addition, the Created on column shows how long this user account has existed, and the Changed on column shows when the last change was made. The Last Login column can also be used as an indication of which accounts are still used and needed.
In the EMM, users whose password has expired are marked in the user overview. This allows the administrator of this client to identify and clean up outdated users more quickly or to reactivate the accounts by resetting the password. It is also possible to send the user his access data via email. To do this, click on the Send authentication data icon.
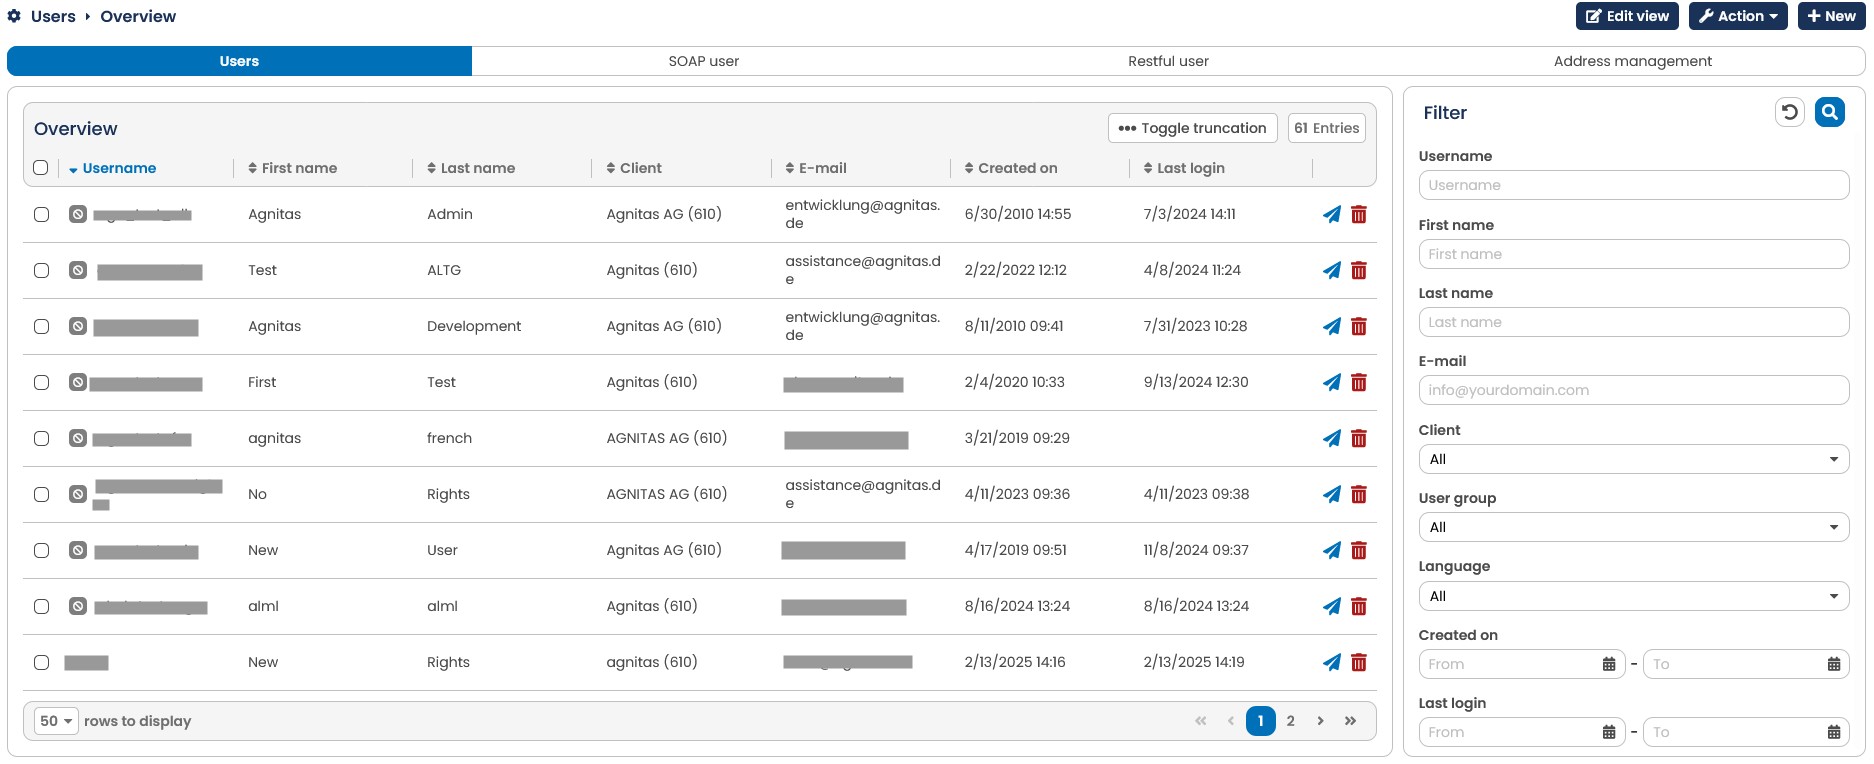
Fig. 15.9: The overview displaying all users for all clients.
If the list of users is very extensive, the filter function located on the right helps. In addition to first name, last name and e-mail, you can also use the Client, User Group and Language selection lists as filter parameters. The filter function is set up very tolerantly, because even single letters or letter sequences that occur within a first name, last name or email address are sufficient. After clicking on the Apply filter button, the E-Marketing Manager starts the search and displays the results again in list form.
To edit the settings for a created user, click on the corresponding entry. If you want to delete a user, click either on Delete in the user details view or on the recycle bin icon in the overview.
In addition to normal users, you will find two more tabs for managing your SOAP users and Restful users. Here you can see all users who have access rights via the respective interface for the E-Marketing Manager and edit them there. A forth tab shows Address management.

Fig. 15.10: Users for the SOAP and RESTful interface are managed in separate tabs
Note: Note: The use of SOAP or RESTful web services is a premium right, if you are interested in it please contact your account manager.
In the Address management tab, you can search for email addresses in different categories and thus manage recipients, users and technical contacts, for example, and change their addresses. After entering an email address in the Search field, you will be shown under Categories how often the address you are looking for appears in each category.
16.5.2 Creating user, changing password
To get access to the system, you need a user. A user has access to the database and the settings of the respective client. This allows different employees to access the functions of the E-Marketing Manager. You can assign detailed rights for users. For example, an employee can be restricted to the dispatch of mailings or to the maintenance of the recipient database.
Note: Any number of users per client can be defined the first 7 users are included in the standard price.
How to create a new user:
-
First click on New in the top right-hand corner of the user administration. The input dialog for creating a new user opens.
-
First, the core data of the new user has to be entered. This includes salutation, title, firstname *, lastname *, company * and if you are using a multi-client system, you can specify in the Client selection field for which client the user access is valid. The mandatory fields are marked with an asterisk. The data is used to clearly distinguish the user. They are also used by AGNITAS to inform the user via personalized e-mails about maintenance work and new features.
-
More important configurations are made in the General information area:
- The user name * is defined in the first place. The new user will need this name to log in. It must be unique. If the entered name has already been used once, an error message will appear.
Note: The use of the user name is checked over the whole system, not only for your
client. Generic user names such as admin are therefore not recommended - also for security reasons.
- The User Group drop-down menu defines which preconfigured set of rights the user is given. A user can also be assigned multiple user groups. This way the user has the rights of all selected groups. More about user groups can be found in chapter User groups.
Note: This set of rights can be extended by the system administrator in the next step for the current user.
-
Assign a valid password. A valid password requires a minimum length of 8 characters with at least one lower and one upper case letter, one digit and one special character. In the field Confirm password * you will be asked to repeat the password again. Note: The password can be sent directly to the user via mail in the overview by pressing a button.
-
If you activate the E-mail reminder to change password switch, a reminder email will be sent as soon as your password has expired. The reminder is intended to ensure that you give your user a new password before they are locked out of the system.
-
For E-Mail * you should use an address that the user can actually access. This address is not only used for system maintenance information, but also for sending access data and other notifications. Note: If the user has forgotten his password, the user must enter his username and the e-mail address stored in the user's account. The user should therefore note down the e-mail address somewhere, if he has access to several addresses.
-
The optional statistics e-mail address will only be delivered if the user activates an automatic report during dispatch.
-
Although the Phone number is optional, it is an indispensable piece of information, especially for callbacks or queries from our support staff, and significantly speeds up response times.
Next, edit the User Settings:
-
Use the Language drop-down menu to define the language in which the system's user interface is displayed to the user. The available languages are English, French, German, Spanish, Portuguese, Dutch and Italian.
-
Time zone allows you to set the time zone in which the user is located. This is especially useful for clients with users working across multiple time zones.
-
The selection menu Theme allows to choose between the bright standard view of the system interface and the Dark Mode. You will also find the High-Contrast Light and High-Contrast Dark options here, which have stronger color contrasts for greater accessibility.
Note: If you or the user change the layout, the change will not be visible until the next login.
-
Under Layout, select either Standard or the Left handed option. With the latter, the user interface of the EMM is adapted so that all content appears mirrored.
-
With the Mailing settings view option, you can specify how the Settings tab should be displayed in your mailings. You can either display a Complete view of all settings, i.e., all entries side by side, or you can select the Tab view with preview. In the latter view, only one settings category is displayed in detail at a time; you can access the other entries by expanding the respective tabs. A preview of your mailing is displayed to the right. You can change your selection at any time in your user's editing view.
-
With the selection menu Statistics Summary you can determine whether key figures for a mailing should be loaded immediately or whether they should only be determined with a click with the setting Load only after click on tab.
Background: If the database of your mailing is very large, it may take some time to collect the key figures. And if you didn't want to go to the summary but to another statistic of your mailing, you will be slowed down unnecessarily.
- Under Access Limiting Target Group you can see if the user has been assigned to an internal client. The inner-client capability is a premium right (learn more in chapter Internal clients on access limiting target group basis (Premium)).If you are interested, please contact your account manager.
-
When you have entered all data for the new user, click on the Create button in the upper right corner. After the new user has been created and saved, you will see more items.
-
You can Manage approval after clicking Action. If you click on the button, a dialog opens where you can define for which mailing lists the user can view, create, edit, send and delete mailings. By default all mailing lists of the client are activated. You can also deselect them all and assign the permission individually. Accept your selection with Save. For more information see chapter Approval.
-
After creating a user, the User Rights tab is displayed. In this tab all rights of the selected user group are already activated. You can read more about the individual assignment of rights in chapter Assigning user rights.
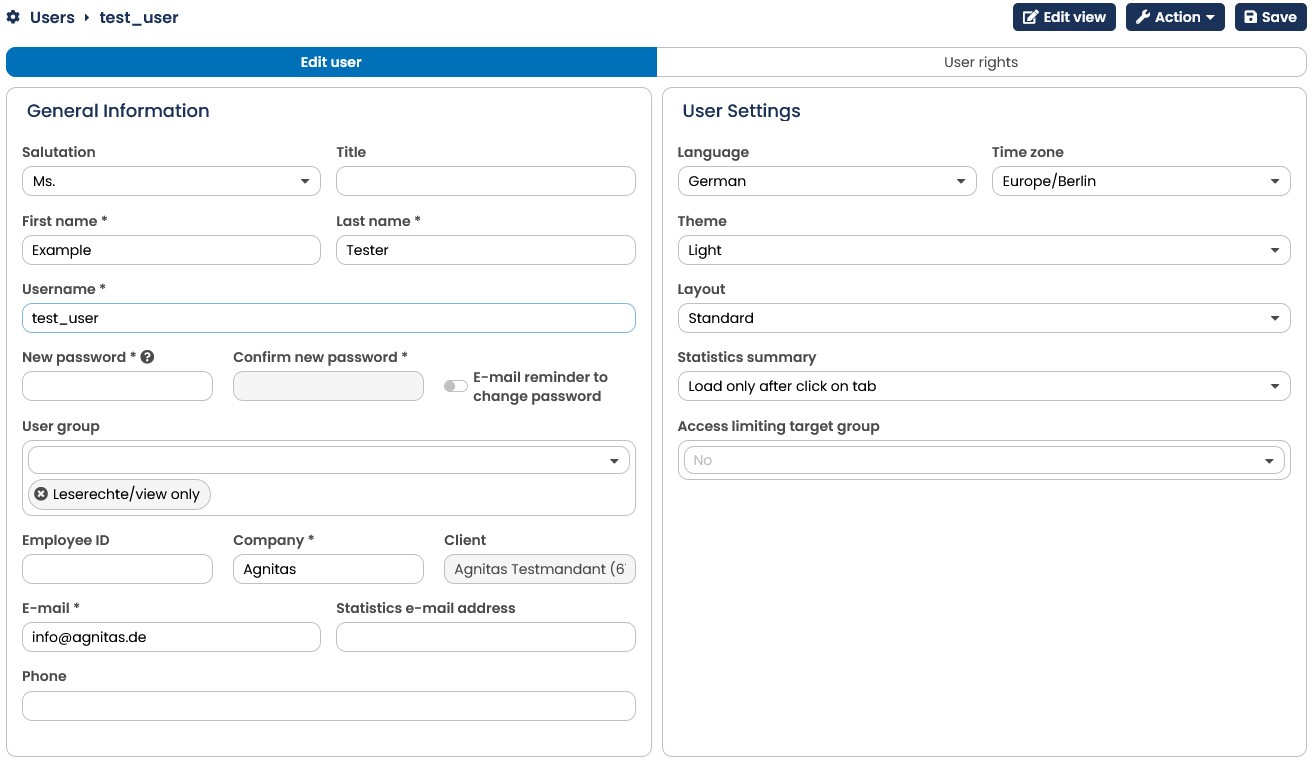
Fig. 15.11: Creating a new user for the client account.
Please note: If it's only about renewing the password or customizing the system, such as the language, the user can also simply click on his username below the logout button in the left navigation. This way, however, the view differs slightly. The Manage approval button for mailing lists and the User rights tab are not offered here. Instead, the user will see a login log below the user settings and the tab Approval, which allows the user to grant login permissions for his access. For more information, please refer to chapter Approval for login permissions.
16.5.3 Assigning user rights
If you want to grant individual access rights to a created user that exceed the standard rights of the user group, then call up the corresponding user under Administration in the submenu item User. Using the User Rights tab, you can now grant the user additional individual rights.
Please note: You cannot remove the standard rights of a user group this way, they are greyed out. If a user group has too many rights, you have to select a group with less standard rights for this user. (More about existing user groups or creating new groups can be found in chapter User Groups).
Click on the User Rights tab: the system displays a list of user rights that are functionally grouped in boxes. As the list of all user rights is very large, you can select an individual category on the left. The associated rights are then displayed in the middle. With the filter on the right, you can also specifically display the rights that the user already has or does not have for various reasons. Especially the New selection is helpful if you use your own user groups that are not automatically extended with new rights. Select the desired option in the type field and confirm your selection with Apply filter.
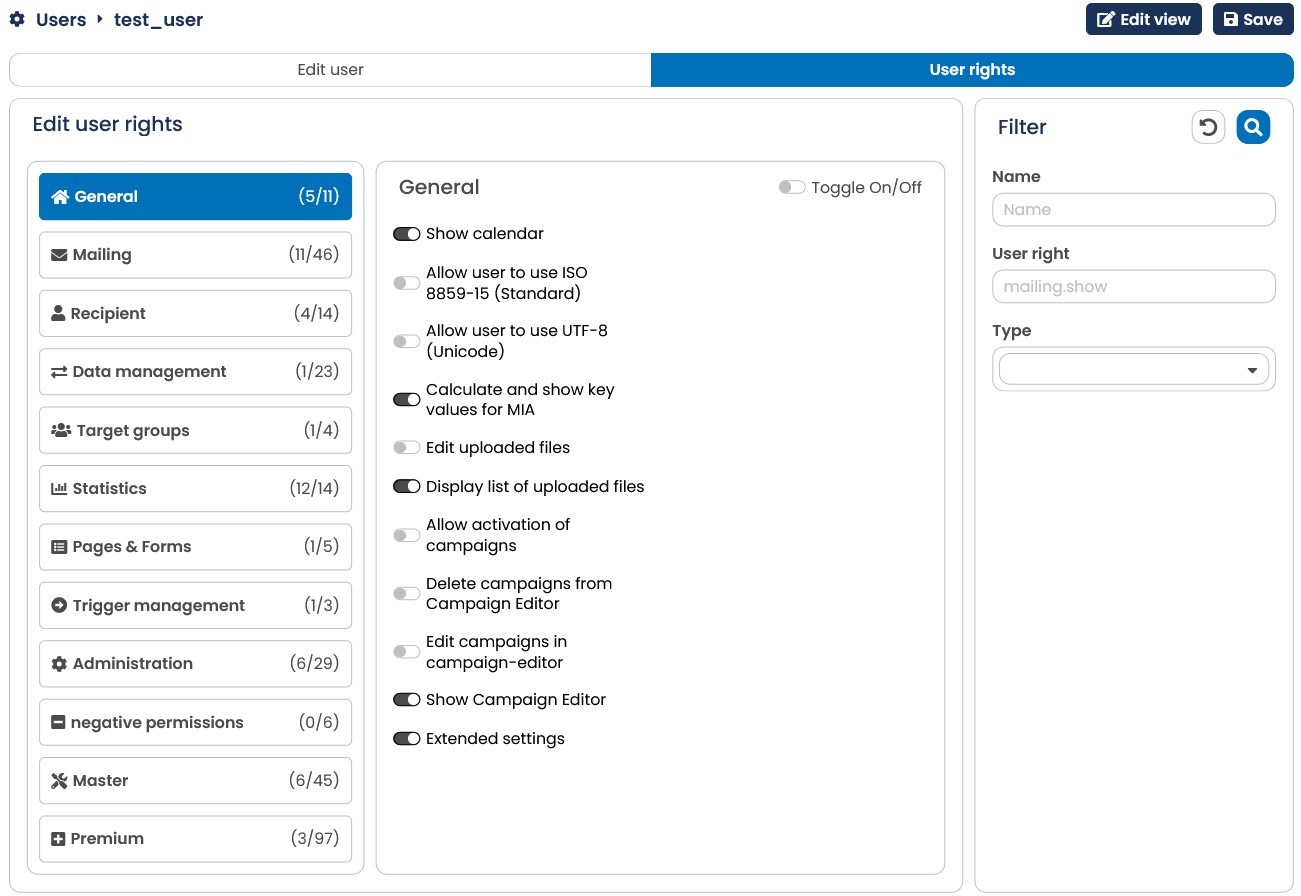
Fig. 15.12: The user right administration let's you assign very specific rights for different areas.
To edit the user rights, select the desired box. Now all individual rights are listed. The rights can be displayed differently:
-
A grayed out, activated slider: The user has been granted the right via the user group.
-
A black, deactivated slider: The user does not have the right and you cannot assign it. The reasons for this are explained in the following.
-
A blue, activated slider: The user has received the right individually. You can also deactivate it again if necessary.
-
A gray, deactivated slider: The user currently does not have this right. However, you can assign it individually.
In addition to the single assignment, you can also use the Toggle on/off slider, which is located in the right corner of each box, to manage the user rights of this box collectively. In this case, all rights that are displayed (and can be edited individually) are marked accordingly.
The grayed out or black sliders are controlled by the user group. Since these cannot be removed individually, another group may have to be selected for the user.
There are several possibilities why a deactivated slider cannot be edited:
-
The right is part of a premium feature that was not booked for your client.
-
It is a special right that can only be activated via the master after consultation with AGNITAS, because it requires e.g. further database settings or should only be used after prior instruction.
-
a) You are in the rights management of your own user: The grayed out right is not part of your assigned user group and was not granted to you individually.
b) You are editing the user profile of another person: Another reason is that you can only "inherit" the rights that your own user has. This ensures that users with restricted access rights cannot upgrade each other's profiles.
Please note: Please do not deactivate rights for your own user as a test, as you will not be able to give the right back to yourself afterwards. If you have removed a user right and then need it again, please contact your account admin or the AGNITAS support team.
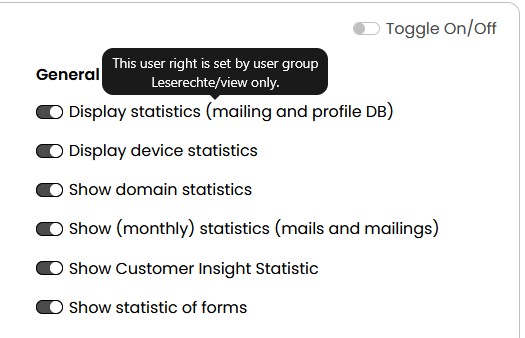
Fig. 15.13: Rights defined by the user group cannot be deselected this way and are grayed out.
The group of negative rights has a special role within the user rights. In contrast to the other rights, these take away some of the functionality in the EMM. For example, the WYSIWYG-Editor can be limited in its range of functions or the selection VIP-Recipient is hidden in drop-down menus.
When you are satisfied with the selection, click the Save button. You can adjust the access rights again at any time.
Please note: The new rights configuration will only become active when you log in again.
Please note: It is possible to restrict access to certain mailings, templates, campaigns, statistics and of course recipients via certain target group filters.
Example: A user should only be able to see recipients who have the setting German in the profile field Language. In addition, this user can also only send mailings and campaigns to recipients.
These special target groups are a premium feature (inner-client capability) and can only be created by AGNITAS to avoid errors. If you are interested, just contact us.
Another way to restrict user access rights for mailings, templates, campaigns, statistics, reports and recipients is to enable individual mailing lists. Users can see and edit only corresponding entries of mailing lists shared with them. Mailing list sharing is also part of the inner-client capability.
16.5.4 Edit approval permissions for mailing lists
On the Edit User tab, click Action to use the Manage Approval button to set access rights to all existing mailing lists for that user. This function is only available to administrators. By default, all mailing lists are enabled. You can Toggle all off and distribute the shares individually. If the user has no share for a mailing list, then all mailings that have been sent to this mailing list or that are marked will be hidden. This affects various areas - starting with the dashboard, the mailing overview and the statistics area. Even when creating a new mailing, he cannot select this mailing list. Of course, the user cannot filter recipients who are active on this mailing list. Also in the recipient profile the user can neither see that this mailing list exists nor whether the recipient is logged on to it.
Tip: Within a mailing list there is also a button Manage Approval. This way you can see all users who have access to the respective mailing list. Here you can also manage the shares, again only by an administrator.
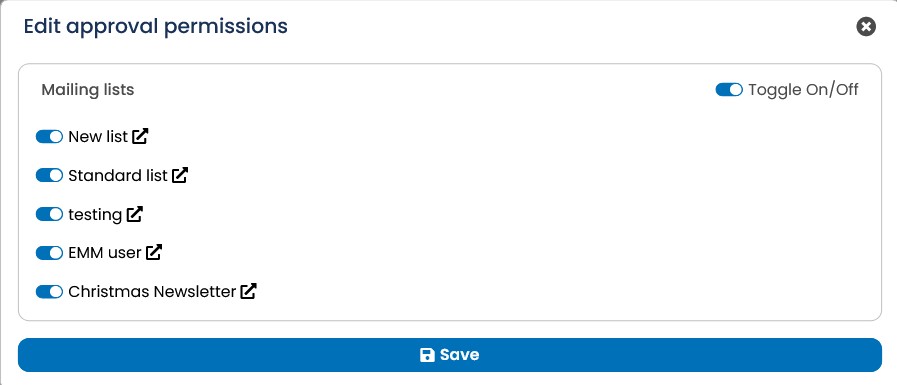
Fig. 15.14: you can create individual mailing list approvals with the button Manage approval.
16.5.5 Approval for login permissions
In order for AGNITAS to be able to offer you support, the relevant employees need authorization to log into your client, since personal data is managed in your system. You can easily grant the authorization by clicking on your user name on the left below the logout button. First the Edit User tab is displayed. Now switch to the tab Approval.
Here you can now select the Department of AGNITAS for whom the permission is to apply. If you don't want to restrict the permission further, you can also select the option All departments. Below this you define the validity of the authorization. Here you can specify whether the authorization is valid without a time limit or only up to a certain day using the Granted until option. Confirm your selection by clicking on Grant login permission.
After you have added the login permission, it appears in the table below the selection fields. Here you can also see when the authorization was created, how long it is valid and for which department it was granted. If you want to revoke a login authorization before it expires, simply click on the trashcan icon in the last column. Employees in the approved departments can now log in to your client with a supervisor user who has exactly the same authorizations and therefore sees the same content as your user. However, you do not have to worry about misuse of this authorization. You can always track all the steps taken by a supervisor via the activity log under Administration.
Please note: You can only grant login authorization for your own user, it is not possible to grant corresponding permissions for colleagues and other users here. For this reason, the tab Permission is only offered to you if you click on your user name in the navigation. If you access your own user via Administration and Users, the User Rights tab will be displayed instead of the Share tab, since administrators also have access here.
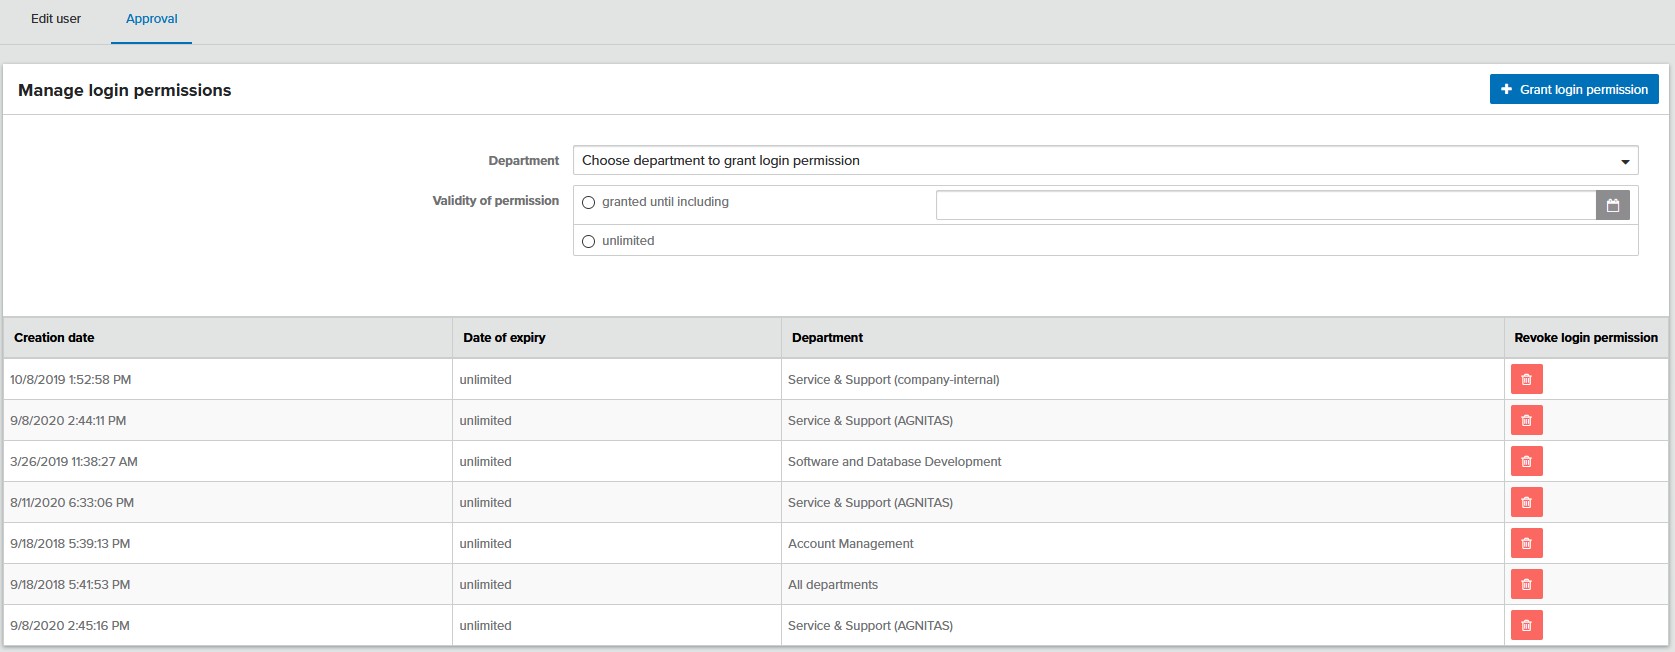
Fig. 15.15: With login permissions, you control who gets access to your system for support.