8.6 Auto Export (Premium)
On the navigation pane, you will find the Auto Export option under Data management. This feature allows previously defined export processes to be scheduled. You can create a new, automated export process by clicking on the New button.
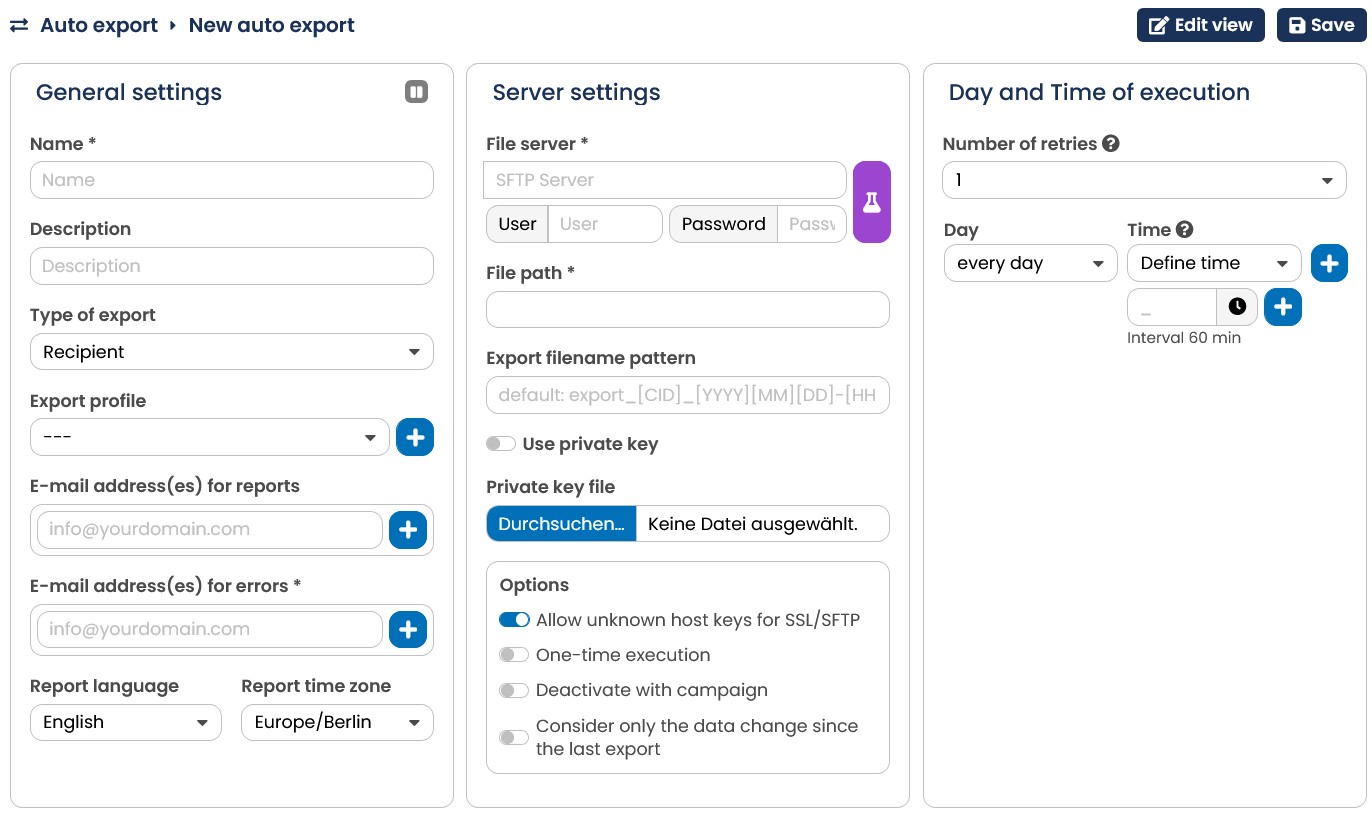
Fig. 7.18: Settings for new auto import
Once the Name and Description are set, choose the type of export. You have the following choices:
| Export type | Description |
|---|---|
| Recipient | exports receiver data using an export profile |
| Reference table | exports reference table contents using a CSV profile |
| Mailing Recipient | exports the recipients (including response data) for individual mailings or each mailing sent (type requires the automation package) |
| Reactions | exports all reactions of receivers on the previous day |
| Reactions and recipient status | exports all reactions of receivers on the previous day as well as their status |
| Blocklist | exports data of all blocklisted recipients |
With auto exports, recipient reactions can sometimes also be exported. These are described in the CSV as follows:
| Status-Code | Reaction |
|---|---|
| 1 | Linkclick |
| 2 | Opening |
| 3 | Unsubscribing |
| 4 | Successful delivery |
| 5 | Softbounce |
| 6 | Hardbounce |
| 7 | Blocklist |
Depending on the export type, the following selection fields are offered:
Recipien t |
|
|
|---|---|---|
| Referen cetable |
|
|
|
|
|
MailingRecipien t |
|
|
| Reaction s |
|
|
|
|
|
|
|
|
| Blocklist |
|
|
| Addition al fields |
|
|
| Delay of the report |
|
Then tell the E-Marketing Manager where the export file is to be stored. The File server input field consists of several components:
Protocol: You can switch between ftp:// and sftp:// via a selection field. Server: The server name can consist of three parameters:
| Parameter | Type | Syntax remark |
|---|---|---|
| Servername | required | |
| Port | optional | Separated by a colon; the SFTP port is assigned the value 22 by default and must only be specified if there is a deviation |
| Host Key Fingerprint | optional | Separated by semicolon; the SSH hostkey to improve security against man-inmiddle attacks must not contain colons |
Specify the server name in the following syntax: servername:port;hostKeyFingerprint
Example:
exchange.domain.de:22;SHA256:xbTPge6ctpoIrYcxn9f5Vd3rbcxZn1L2XoQLlLfRJsA
(fictitious fingerprint)
Note: When entering the server name, do not enter the protocol "sftp://"; "ftp://" anymore, otherwise it will appear twice in the server name.
User: The username is optional unless a password is specified.
Password: Entering a password is optional.
At the end of the line, you can use the Test button to check whether the EMM can establish the connection to the server. A message window will immediately tell you whether the test was successful or not.
For the file path, enter the complete service directory including the filename, for example:
\EXPORT\recipients
In the Export file name Pattern field, you can enter wildcards for the dates. So that no existing files are overwritten, but always a new file is created. The input is optional. If you do not enter a file name here your file will automatically be called:
export_[CID]_[YYYY][MM][DD]-[HH]:[MI].csv
You will automatically receive an e-mail report after executing the auto export via e-mail address(es) for reports and additional e-mail address(es) for errors (mandatory), provided that you have entered one or more e-mail addresses (separated by commas) for the report or for errors.
Report Language: Here you can specify in which language your file should be exported. This affects, for example, date specifications.
Report Time Zone: Specify the time zone to apply to the export. The E-Marketing Manager will then transfer time information to be exported to the specified time zone.
If you activate the slider at Use private key, you still have to select your private key file afterwards. The private key is used for communication between the E-Marketing Manager and the SFTP server.
It is strongly recommended to tick the option Allow unkown hostkeys for SSL/SFTP. If you don’t, we will need the issuer’s certificate (CA certificate) beforehand. Otherwise the process cannot be performed. If you want to execute a one-time export, place a tick next to One-time execution. If you wish to deactivate the Auto Export when a campaign is deactivated, tick the box Deactivate with campaign. You can also Consider only the data change since the last export. This means that only recipient data that has changed since the last export is exported.
Now determine the Day and Time of execution. Multiple selection is also possible here.You can execute the export on certain weekdays at specified times - the set server time (Europe/Berlin) applies. The Add button allows you to define further executions. Alternatively, you can also select the every day option. For an additional charge, you can not only export once a day, but also hourly (smallest interval is every hour). If you are interested, please contact your account manager. Once you have made your selection, confirm it by clicking on Save.
The Action button will now appear next to the Save button. Via the selection menu Action you can activate or deactivate the auto export. You can also copy and delete the auto export here. After clicking Activate, the auto export is executed at the set time, while
Deactivate stops the auto export. Clicking on Export recipients makes E-Marketing Manager execute the export immediately and once only. A premium right is required for this.
In the Overview tab, E-Marketing Manager shows you a list of all created auto exports including the given description, the file server and the status, which can be set to be either active or inactive. By clicking on a list entry you can edit the corresponding profile as described above. If you no longer need an auto export, you can either delete it in the Overview tab by clicking on the trash symbol or also delete it in the detailed settings by means of the Delete button.
You can also restrict a period in the profile - both are then linked with and during export, i.e. the smaller period applies in case of doubt!
The delta is generated since the last export, not since the last successful export. The basis for this is always the setting of the export profile - if it is specified there that a delta export is to take place on the basis of a Change_Date column, the since last export function also determines your delta on the basis of this column.
Please note: The auto export is part of a premium package. Please contact our customer support if you are interested.
Please note: If an export could not be executed because, for example, the target server was unavailable or no memory was available, you can specify how often the E-Marketing Manager should try to restart the export. By default, a retry is performed after 15 minutes. All subsequent attempts will also be made at 15 minute intervals each.
Important: During the export, files are marked with the .tmp extension. After completion of the export, this addition is automatically removed.