4 Server Preparations
Before you are able to install the EMM software on the servers you have to prepare the servers first. One part of the preparations is the configuration of the firewalls on the various server types. This diagram shows the inter-server communication channels of the server/services of EMM and which ports have to be opened for incoming traffic on each server:
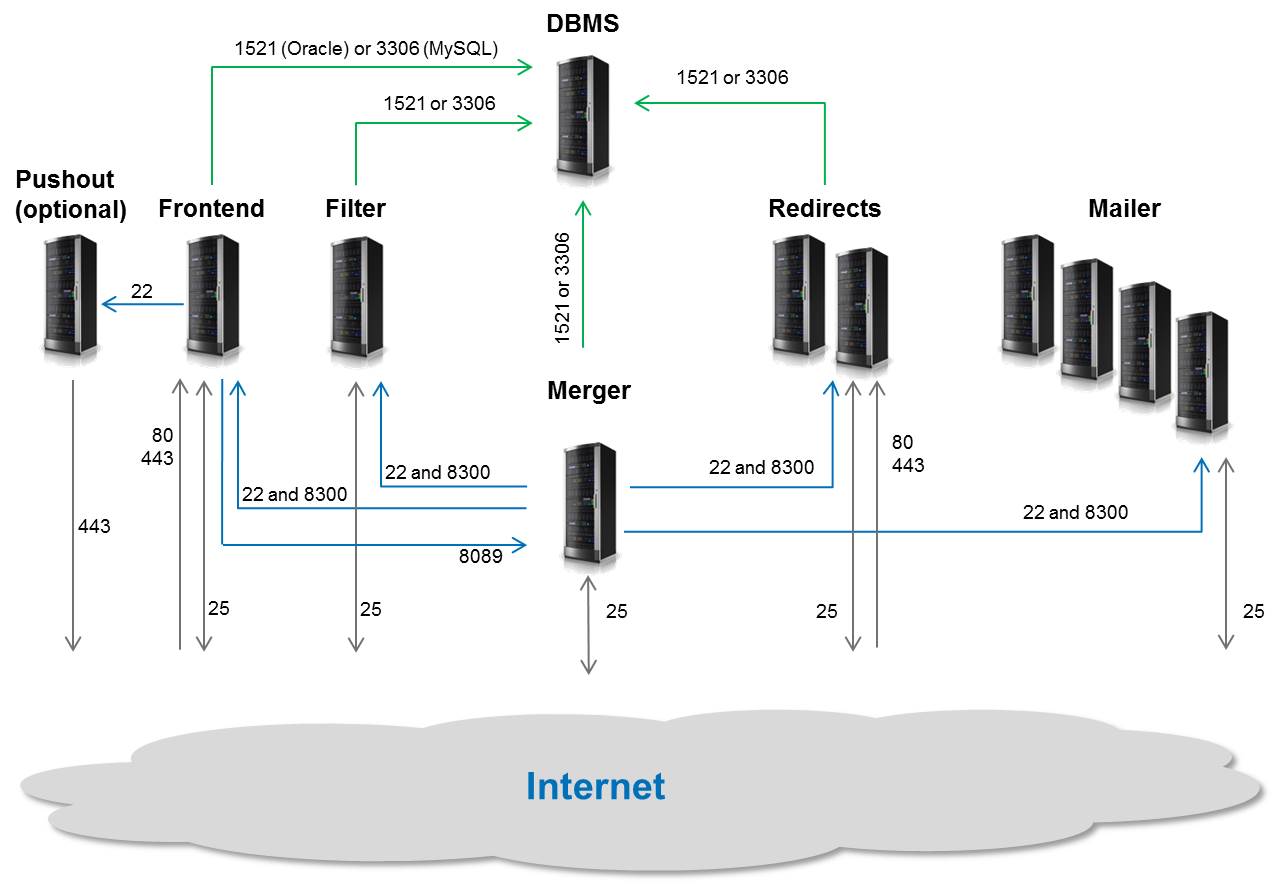
The number of servers for each service in this image is just an example.
Detailed instructions on how to configure the firewalls is provided below in the server-specific sections.
4.1 (Almost) All Servers
On each server create a group agnitas which holds the various EMM service users, create the users as noted in table 1 and install the public keys for all admin persons needing access to these users.
Global configuration files not part of the operating system are saved in /opt/agnitas.com/etc.
When setting up DNS entries please make sure that each server which has to be reachable from the Internet, holds a valid A record and a PTR record which points back to the hostname of the server (see /etc/hosts) for reverse lookups. This is especially important for all servers with a mailer service, because most external mailservers that receive emails from your EMM installation will do a reverse DNS lookup in order to check if the FQDN of your servers and the PTR records of your server's IP addresses match. If not, this is an indication of a spambot network and quite often your emails will be rejected.
If you plan to use an SPF entry for the domain which is used for the sending address of your mass mails, add all sending servers to this SPF record (not only the mailservers, since server with frontend or redirect services may send out emails as well).
4.1.1 Deployment of Python 3
Quite often the Python version provided by your operating system is too old or incomplete. Therefore, you should install Python and all required modules by yourself.
Another hint: If you upgrade your Linux distribution to a later version (like migrating from AlmaLinux 8 to AlmaLinux 9), please check the Python version provided by the new distribution. If in doubt, de-install Python and re-install like described below.
Please be aware that the MariaDB database driver of Python 3.11 does not support MariaDB before version 10.6.10. Therefore, please upgrade MariaDB if you use an older version.
RHEL:
First, install some required development packages:
dnf install gcc gcc-c++
dnf install libgcrypt-devel libxml2-devel openssl-devel bzip2-devel glibc-langpack-en.x86_64
dnf install gdbm-devel libffi-devel ncurses-devel
dnf install readline-devel sqlite-devel zlib-devel xz-devel
Package glibc-langpack-en.x86_64 is needed because of bug “LC_ALL: cannot change locale (en_US.UTF-8)”.
Package gdbm-devel is no longer included in the standard repository for RHEL 9. The CRB repository needs to be enabled for this. On AlmaLinux 9, this can be done with
Install Python 3.11 and the default version of Python 3 with package manager and development packages:
SLES option 1 (valid for SLES 15 SP4 to SP6):
At first, install some required development packages:
zypper install -y gawk gcc gcc-c++ gdbm-devel libbz2-devel libdb-4_8-devel libffi-devel libxml2-devel libnsl-devel libopenssl-devel libuuid-devel make ncurses-devel readline-devel sqlite3-devel tar wget xz-devel zlib-devel
List the available extensions with
Search for a suitable extension with a name like Python 3 Module 15 SP4 x86_64. The entry also lists how to activate this extension, in this case:
Now you can install all Python 3.11 packages that are required by EMM:
4.1.2 Deployment of additional Python 3 modules
The following line in configuration file system.cfg in directory /opt/agnitas.com/etc makes sure that any Python modules required by EMM are automatically installed.
If the server does not have access to the Internet continuously, install or update Python's package manager PIP:
and install the Python modules required by EMM Inhouse manually:
python3.11 -m pip install py3dns
python3.11 -m pip install 'paramiko>=3.2.0'
python3.11 -m pip install pyspf
python3.11 -m pip install dnspython
python3.11 -m pip install dkimpy
python3.11 -m pip install cryptography
python3.11 -m pip install requests
python3.11 -m pip install httpie
python3.11 -m pip install setproctitle
python3.11 -m pip install inotify
python3.11 -m pip install aiodns
python3.11 -m pip install aiohttp
python3.11 -m pip install aiohttp-xmlrpc
python3.11 -m pip install aiosmtplib
python3.11 -m pip install msgpack
python3.11 -m pip install websockets
python3.11 -m pip install asyncinotify
python3.11 -m pip install asyncssh
4.1.3 Database Driver for Python 3
RHEL + MariaDB:
Note: The MariaDB packages available in the default OS repositories are often outdated and not compatible with Python 3.11. In particular, the MariaDB Python module may fail to connect due to missing or incompatible client libraries.
It is therefore strongly recommended to install MariaDB as described in chapter MariaDB, using the official MariaDB repository. But before doing so, make sure to remove any existing MariaDB packages installed from the distribution repositories. For example:
Afterward, proceed with the installation instructions from chapter MariaDB to ensure compatibility with the MariaDB Python module and Python 3.11.
SLES + MariaDB:
Note: If you have installed MariaDB not from the MariaDB repository as described in chapter MariaDB, but from a repository, you have to install the libs that provide the API for third party software, so that the Python module mariadb is able to accesss MariaDB. Execute
MariaDB:
Please note that with RHEL 8 you must first set Python version 3.11 as the default, since the system’s preinstalled Python version is not sufficient. Use the following command to configure the default version:
Enter the number of the desired option (for example, 1) to select Python 3.11 as default version.
If you amended system.cfg as described in the first paragraph of section Deployment of additional Python 3 modules, you can skip the rest of this section.
To enable the Python scripts of EMM to access a MariaDB database, you need to install the MariaDB database driver module for Python on all servers which do not run only the mailer service:
Oracle:
If you use EMM with an Oracle database, before you install the database driver for Python, you have to install an Oracle client on all servers which do not only run the mailer service. Do not install Oracle’s full client, but use the Oracle Instant Client. The Oracle Instant Client is much smaller, provides less libraries that cause conflicts with libraries of the same name but different versions in EMM (i.e. EMM does not work correctly), and it is readily available on the Internet.
Please make sure to install the proper version of Oracle Instant Client, because the version for Oracle DBMS 11g will no longer work correctly with Oracle DBMS 19c!
To install the Oracle Instant Client, download the “Basic Light package (ZIP)” and the “SQL*Plus Package ZIP” from https://www.oracle.com/database/technologies/instant-client/linux-x86-64-downloads.html.
Copy the files to directory /opt/agnitas.com/software and unpack with
unzip instantclient-basic-linux.x64-19.5.0.0.0dbru.zip
unzip instantclient-sqlplus-linux.x64-19.5.0.0.0dbru.zip
Create a symlink for the current version with
Set LD_LIBRARY_PATH with
and create file tnsnames.ora in directory /opt/agnitas.com/etc so that parameter SID specifies the SID of the EMM database (default: emm). If you want to use an TLS encrypted database connection, make sure to configure files tnsnames.ora and sqlnet.ora for TLS authentication. (If you need help, please contact the AGNITAS support team.)
If you amended system.cfg as described in the first paragraph of section Deployment of additional Python 3 modules, you can skip the next paragraph.
Otherwise, install the Oracle database driver with
4.1.4 Database Connection Configuration
For all servers except for the database server and the mail servers create file dbcfg in directory /opt/agnitas.com/etc/ to store the database access credentials.
Create the content based on the individual client information. Example:
Oracle:
emm: user=agnitas, password=<password>, sid=<name>, jdbc-connect=jdbc:oracle:thin:@<ip-address>:<port>:<sid>, jdbc-driver=oracle.jdbc.driver.OracleDriver, dbms = oracle, tablespaces=true
Replace <name> with the SID of the client (default: emm)
If you want to use an TLS encrypted database connection, use
emm: user=agnitas, password=<password>, sid=<name>, jdbc-connect=jdbc:oracle:oci@<sid>, jdbc-driver=oracle.jdbc.driver.OracleDriver, dbms = oracle, tablespaces=true
MariaDB:
emm: user=agnitas, password=<password>, name=emm, host=mariadb, jdbc-connect=jdbc:mariadb://<dbhost>/emm?zeroDateTimeBehavior=convertToNull&useUnicode=true&characterEncoding=UTF-8, jdbc-driver=org.mariadb.jdbc.Driver, dbms = mariadb
If you want to use an TLS encrypted database connection, add
at the end of parameter jdbc-connect and add key-value pairs
and
at the end. Complete example:
emm: user=agnitas, password=<password>, name=emm, host=<dbhost>, jdbc-connect=jdbc:mariadb://<dbhost>/emm?zeroDateTimeBehavior=convertToNull&useUnicode=true&characterEncoding=UTF-8&useSSL=true&trustServerCertificate=true, jdbc-driver=org.mariadb.jdbc.Driver, dbms = mariadb, secure = true, py-connect={'ssl': True}
Please make sure, that every comma separating a key-value pair is followed by a blank. Only this format makes sure that you can use a comma within a password or other values.
If any of these DBMS’ is running on the same server as EMM, use IP address localhost instead of value 127.0.0.1 as value for parameter dbhost. This solution is more reliable, because it ensures that the client library does not use an Internet socket but uses a Linux domain socket to connect with the database.
Finally, make sure that file dbcfg can be read by every service on the server:
groupadd dbcfg
usermod -aG dbcfg <user>
chgrp dbcfg /opt/agnitas.com/etc/dbcfg
chmod 640 /opt/agnitas.com/etc/dbcfg
On each server execute the usermod statement for each user of the service who needs access to the database (console, rdir, merger and/or mailloop), as soon as you have created the user as described in section Backend Deployment and Frontend Deployment. On single-server installations you need access for all listed users except for rdir.
4.1.5 Postfix Deployment
Since you want to use Postfix as SMTP server (MTA), you have to stop and remove Sendmail first in case it is installed, and you have to install the required packages for Postfix. This has to happen on all servers!
RHEL:
SLES:
RHEL + SLES:
Further dependencies will be resolved and installed automatically by the repository management software.
After that, switch the default SMTP server to Postfix with
and create a symlink so that EMM can find the Postfix mail log file:
After installation of Postfix, you have to change its configuration to unleash all features. To do this, change to the Postfix main configuration directory:
Add some configuration parameters to Postfix' main configuration file main.cf:
inet_interfaces = all
inet_protocols = all
mailbox_command = /bin/procmail
mailbox_size_limit = 0
message_size_limit = 0
maximal_queue_lifetime = 1d
bounce_queue_lifetime = 1d
smtp_tls_security_level = may
smtp_tls_protocols = !SSLv2, !SSLv3
smtp_tls_ciphers = high
smtp_tls_mandatory_ciphers = $smtp_tls_ciphers
hash_queue_depth = 2
enable_long_queue_ids = yes
smtpd_use_tls = yes
smtpd_tls_loglevel = 2
smtpd_tls_security_level = may
smtpd_tls_received_header = yes
smtpd_tls_session_cache_timeout = 3600s
smtpd_tls_eecdh_grade = strong
smtpd_tls_cert_file = <path_to_CERT_file>
smtpd_tls_key_file = <path_to_KEY_file>
smtpd_tls_CAfile = <path_to_CERT_chain>
smtpd_tls_CApath = <path_to_CERT_directory>
smtpd_tls_protocols = !SSLv2, !SSLv3, !TLSv1, !TLSv1.1
smtpd_tls_ciphers = high
Take care to replace the four placeholders with the real directory paths to the specified files to make sure that Postfix is able to receive TLS encrypted mails.
If lines with parameters of the same name already exist in file main.cf (like inet_interfaces, inet_protocols or smtpd_tls_security_level), comment them with character # at the beginning to avoid any warning messages or overwrite them with the new values in case you do not want to keep the original values as backup.
Additionally, you have to set parameter myhostname in file main.cf to the FQDN of the mail server like mail1.domain.com. Otherwise, mails would be sent with sender domain localhost.loacldomain instead.
Additional Changes for SLES:
To prevent SLES' Yast from overwriting your manual configuration changes and to accept emails from remote, you have to change two parameters in file mail in directory /etc/sysconfig/:
RHEL + SLES:
To activate your manual changes to the configuration of Postfix, restart Postfix with
To make sure that Postfix is started at each server reboot, add the service to run level 3 and 5:
You might want to test this settings with a server reboot to be on the safe side.
Additional Postfix Deployment for Server with Mailloop Service:
The server running the mailloop service requires some additional modifications. Add these lines to configuration file main.cf:
relay_domains = hash:/home/mailloop/var/run/relay.domains
transport_maps = hash:/home/mailloop/var/run/transport.maps
smtpd_milters = unix:/home/mailloop/var/run/bav.sock
If lines with parameters of the same name already exist in file main.cf, comment them with character # at the beginning to avoid any warning messages or overwrite them with the new values in case you do not want to keep the original values as backup.
The two files relay.domains and transport.maps as well as Linux socket bav.sock are automatically created at first startup time of the mailloop service. File relay.domains specifies your mailloop service domain names, so that responses like auto-replies and bounces sent to an email address with this domain name are accepted by Postfix for relaying. File transport.maps defines for all available mailloop service domain names the service used for processing.
Finally, the configuration parameters for service mailloop are defined in configuration file master.cf. Add these two lines:
mailloop unix - n n - - pipe
  flags=RX user=mailloop argv=/usr/bin/procmail /home/mailloop/lib/bav.rc
Please do not omit the two space characters before keyword flags to indicate the parser that the line is continued!
Last not least, activate the TLS manager in file master.cf by uncommenting (i.e. removing the leading #) line
to permit sending of TLS encrypted emails.
To activate all changes, restart Postfix with
In case you start Postfix separately from EMM and Postfix complains that file relay.domains is missing, you can ignore this warning because EMM takes care to create this file at startup time in case it is missing.
4.1.6 Java Deployment
All EMM servers and redirect servers need Java 21 for their frontend services. The merger server and all mail servers need Java 21 for backend server processes. The servers require the installation of an OpenJDK 21. You can install Java with EST (EMM Support Tool) or manually by
RHEL:
SLES:
4.1.7 Tomcat Deployment
All EMM servers and redirect servers need web application engine Tomcat 11 for their frontend services. You can install Tomcat with EST (EMM Support Tool) or manually by downloading the latest binary distribution from http://tomcat.apache.org. The core package is sufficient.
The examples here use Tomcat 11.0.10 – you should adapt them to the latest version of Tomcat as needed.
- Move the file to the software directory:
mv apache-tomcat-11.0.10.tar.gz /opt/agnitas.com/software - Change to this directory:
cd /opt/agnitas.com/software - unpack the Tomcat file:
tar -xvzf apache-tomcat-11.0.10.tar.gz - Create a symbolic link tomcat:
ln -s apache-tomcat-11.0.10 tomcat
If you want to make sure that Tomcat works, enter the following commands:
- Set environment variable JAVA_HOME:
export JAVA\_HOME=”/opt/agnitas.com/software/java” - Change to Tomcat directory:
cd tomcat - Start Tomcat:
bin/startup.sh - Check for Tomcat install screen:
http://localhost:8080/ (URL for browser or using wget) - Stop Tomcat:
bin/shutdown.sh
For every server running Tomcat a special set of configuration files is provided. For details please read section Runtime Configuration below.
The server key files (*.key, *.pem) and server certificate files (*.crt, cacerts) for a SSL configuration (to allow HTTPS connections) must be provided from your side as these files are server and client specific.
4.1.8 HTTPS for Tomcat
While it is technically possible to access EMM with the HTTP protocol, this is certainly not recommended for production environments. One could even argue that is illegal in EU countries where the GDPR is in force. To use EMM with secure HTTPS connections, for Tomcat you should use the NIO Connector.
The EST (EMM Support Tool) provides template file server.xml.template in directory /home/<user of service>/conf as basis for your individual server.xml file. Configuration of the NIO Connector is done by changing the connector type and its properties for Tomcat in tag Connector of Tomcat's server configuration file server.xml.
You may use option Configure TLS certificate (https) of EST's Security menu to coveniently configure file server.xml (see section EST (EMM Support Tool) for details) or you can do it manually like this:
<Connector
  port="8443"
  protocol="org.apache.coyote.http11.Http11NioProtocol"
  scheme="https"
  secure="true"
  SSLEnabled="true"
  disableUploadTimeout="true"
  acceptCount="100"
  connectionTimeout="20000"
  maxThreads="1000"
  enableLookups="false"
  useBodyEncodingForURI="true"
  sslImplementationName="org.apache.tomcat.util.net.jsse.JSSEImplementation"
  server="<server_name>">
  <UpgradeProtocol className="org.apache.coyote.http2.Http2Protocol" />
  <SSLHostConfig
    disableCompression="true"
    honorCipherOrder="true"
    protocols="+TLSv1.3,+TLSv1.2"
    ciphers="ECDHE-ECDSA-AES256-GCM-SHA384 ECDHE-RSA-AES256-GCM-SHA384 ECDHE-ECDSA-CHACHA20-POLY1305 ECDHE-RSA-CHACHA20-POLY1305 ECDHE-ECDSA-AES128-GCM-SHA256 ECDHE-RSA-AES128-GCM-SHA256 ECDHE-ECDSA-AES256-SHA384 ECDHE-RSA-AES256-SHA384 ECDHE-ECDSA-AES128-SHA256 ECDHE-RSA-AES128-SHA256"
    cipherSuites="TLS_AES_256_GCM_SHA384,TLS_CHACHA20_POLY1305_SHA256,TLS_AES_128_GCM_SHA256">
    <Certificate
      certificateChainFile="<tls-ca-keychain-bundle.file>"
      certificateFile="<tls-certificate.file>"
      certificateKeyFile="<tls-private-key.file>" />
  </SSLHostConfig>
</Connector>
Replace placeholder <server_name> with the FQDN of your server. Replace <tls-ca-keychain-bundle.file> with the path and name of your cacert file. Replace <tls-certificate.file> with the path and name of your crt file. And replace <tls-private-key.file> with the path and name of your key file.
The modified server.xml file belongs into Tomcat's configuration directory /home/<user of service>/conf (see section Runtime Configuration below).
Whether you make these changes for TLS support with the help of EST or manually, do not forget to activate a port forwarding from port 443 to 8443 in your firewall as explained in section EMM Server (Frontend) below, because Tomcat uses port 8443 for HTTPS traffic by default.
4.1.9 Kernel Parameter nofile
All EMM servers and redirect servers need a minimum value of 16384 for kernel parameter nofile, which defines the maximum number of open files per process. To check the current value of nofile, enter
at the command line. You may change (or freshly insert) this value in file limits.conf in directory /etc/security/:
The soft type defines a limit which can be changed by processes, while the hard type limit can not be changed. To make sure that the changed values of this kernel parameter become effective, reboot the server.
4.1.10 Miscellaneous
For all servers needing access to the server running the merger service (i.e. servers with users console, mailout, mailloop or rdir) enter the internal IP address of the merger server, its FQDN and alias nfsserver in /etc/hosts like this:
This step is also necessary for the merger server itself.
On the server running the merger service, at first create new user merger as user root:
With SLES you have to remove the auto-generated sub directory bin in the directory of user merger because it will be later replaced with a symlink:
Create a public/private key pair for user merger without a passphrase:
Answer all requests with the Enter key and do not create a passphrase!
Put the new public key on all servers with users console, mailout, mailloop and rdir for every user created for EMM. Test explicitly, if the merger server can access all servers with these users so that you can accept the initial SSH connection and no further request confirmations are shown.
On all servers with mailer services (i.e. servers with user mailout, EMM server and redirect servers) EMM requires read access to the mail log file at /var/log/maillog (RHEL) or /var/log/mail (SLES) and logrotate has to be aware of this fact, too.
RHEL:
Open file /etc/logrotate.d/syslog and add the following line after the line sharedscripts:
and run
to set the permissions of the current maillog.
SLES:
Open file /etc/logrotate.d/syslog and change line
to
and run
to set the permissions of the current maillog.
Finally, create this symlink so that EMM can find SLES' maillog:
4.1.11 SLES Firewall
SLES works with SuseFirewall2 by default. However, with this firewall the port redirection for the loopback interface would not work. Therefore, you have to disable it and replace it with iptables on all servers running EMM services:
As initial setup, create on all servers a file iptables in directory /etc/sysconfig/ with the following content:
# iptables Configuration File
*nat
:PREROUTING ACCEPT [0:0]
:INPUT ACCEPT [0:0]
:OUTPUT ACCEPT [0:0]
:POSTROUTING ACCEPT [0:0]
COMMIT

*mangle
:PREROUTING ACCEPT [0:0]
:INPUT ACCEPT [0:0]
:FORWARD ACCEPT [0:0]
:OUTPUT ACCEPT [0:0]
:POSTROUTING ACCEPT [0:0]
COMMIT

*raw
:PREROUTING ACCEPT 0:0]
:OUTPUT ACCEPT [0:0]
COMMIT

*filter
:INPUT DROP [0:0]
:FORWARD DROP [0:0]
:OUTPUT ACCEPT [0:0]
-A INPUT -m state --state RELATED,ESTABLISHED -j ACCEPT
-A INPUT -p icmp -j ACCEPT
-A INPUT -i lo -j ACCEPT
-A INPUT -p tcp -m tcp --dport 22 -j ACCEPT
-A INPUT -j REJECT --reject-with icmp-host-prohibited
-A FORWARD -j REJECT --reject-with icmp-host-prohibited
-A OUTPUT -o lo -j ACCEPT
COMMIT
and assign the required permissions to this file with
Next, create an iptables start script iptables.sh in directory /opt/agnitas.com/software/ with this content:
and configure its auto start as soon as the network is available with adding the following line at the end of configuration file ifcfg-eth0 in directory /etc/sysconfig/network/:
4.2 Database Server
The database server is the hub of EMM. If your IT environment uses a firewall protecting the DBMS server running the EMM database, make sure that connections between the database server and any EMM server are not dropped by the firewall.
If the firewall drops connections, this will lead to timeouts and finally to delays for transferring data between EMM services and EMM database. For instance, these delays could affect the sending time of mailings or the accessibility of webservices. Please see section Handling a Firewall between EMM Server and DBMS Server below for further details.
4.2.1 Oracle Database Server
After installation of Oracle DBMS open port 1521 in the firewall (iptables):
-A INPUT -p tcp -s <ip of enterprise manager> --dport <port used by enterprise manager> -j ACCEPT
-A INPUT -p tcp -s <int. address of EMM server> --dport 1521 -j ACCEPT
-A INPUT -p tcp -s <int. address of redirect server> --dport 1521 -j ACCEPT
-A INPUT -p tcp -s <int. address of merger server> --dport 1521 -j ACCEPT
-A INPUT -p tcp -s <int. address of filter server> --dport 1521 -j ACCEPT
If you want to use EMM's text search functionality to search the names, description or content of mailings, make sure to install or activate module Oracle Text (CTXSYS) for the Oracle DBMS and choose the default language for this module. Please be aware, that any change requires a restart of EMM.
4.2.2 MariaDB Database Server
Set the MariaDB root password right after installation with
and save it in your local password store or on your server in a secret file like .mysqlpw in directory /root/ with read and write permission only for user root:
Open MariaDB port 3306 for servers in firewall in the filter section of iptables:
-A INPUT -p tcp -s <int. address of EMM server> --dport 3306 -j ACCEPT
-A INPUT -p tcp -s <int. address of redirect server> --dport 3306 -j ACCEPT
-A INPUT -p tcp -s <int. address of merger server> --dport 3306 -j ACCEPT
-A INPUT -p tcp -s <int. address of filter server> --dport 3306 -j ACCEPT
Make sure that the database can be accessed via parameters stored in file /opt/agnitas.com/etc/dbcfg of each EMM server.
4.2.3 Configuration Settings for MariaDB Database Server
To avoid problems operating EMM with MariaDB, you must not use its default configuration, but you have to set or change the following properties in section [mysqld] of MariaDB's configuration file my.cnf (usually found in directory /etc/):
MariaDBs offers several modes of operation. Please make sure these three modes (and only these three modes) are set:
- If the strict mode is not selected, if EMM tries to import a string into a database field which is too short to hold the complete string, MariaDB would simply cut off the string at the end to make it fit - without any warning! This would harm the integrity of your data.
- The ban of substitutions makes sure that MariaDB uses EMM's choice of database engine InnoDB in any case.
This enforces usage of lower case for table names on Linux systems (where the case of a letter makes a difference).
This property is set to 28800 by default. This means that MariaDB automatically cuts the connection to an EMM service after 8 hours of inactivity. This leads to an initial connection error when EMM attempts to contact the MariaDB database next time. If your EMM installation does not access its MariaDB database all the time, you should increase this value to at least one day (86400) or even to a whole week (604800).
This prevents MariaDB from canceling a database operation after a mere 50 seconds (the default value of MariaDB), which could lead to inconsistent data in the EMM database.
This avoids possible conflicts between EMM code and MariaDB caused by different settings for character set and collations in the database.
Please be aware that the default value of this parameter may only be 1 or 2 MByte. In this case, you can not load a single data packet (a file for example) bigger than 1 or 2 MByte into the database. This affects the upload of files with the EMM upload feature or the upload of attachments for emails. Since the transfer of data to the database has some overhead, the value for max_allowed_packet should be a little bit higher than the value for attachment.maxSize in file emm.properties. (You can check the current value inMariaDB with SELECT @@max_allowed_packet;). This value also limits the maximum size of SQL statements. In EMM this is important for those SQL statements that retrieve statistical data for display in the workflow manager and dashboard calendar. In (the very unlikely) case that the GUI service does not show these numbers and you find a corresponding error message in Tomcat's log catalina.out, double the value for parameter max_allowed_packet until it works.
If you want to set property autocommit, then set it to active. However, this is not strictly necessary, because MariaDB enables autocommit by default.
Since the MariaDB instance runs on its own server, you might have to change further parameters like commenting out skip-networking or setting bind-address to the IP address of your database server.
Please do not forget to restart MariaDB after changing the configuration file. For more advice on how to configure the MariaDB database, check out section MariaDB Database Tuning.
4.3 Merger Server
On the server running the merger service, open port 25 for SMTP feedback to direct sending of admin and test mails and open incoming access to the EMM server in the filter section of iptables:
-A INPUT -m state --state NEW -m tcp -p tcp --dport 25 -j ACCEPT
-A INPUT -p tcp -s <int. address of EMM server> --dport 8089 -j ACCEPT
-A INPUT -p tcp -s <ext. address of EMM server> --dport 8089 -j ACCEPT
The services of the EMM server use XML-RPC via port 8089 to initiate the mail generation by the merger service.
The merger server uses port 8300 to communicate with other servers (like checking if a certain mail server is ready to accept another package of mails for delivery).
4.4 Mail Server
On all servers running mailer services, open port 25 for SMTP feedback to sent mails and open incoming access for the merger server in the filter section of iptables:
-A INPUT -m state --state NEW -m tcp -p tcp --dport 25 -j ACCEPT
-A INPUT -p tcp -s <int. address of merger> --dport 22 -j ACCEPT
-A INPUT -p tcp -s <int. address of merger> --dport 8300 -j ACCEPT
4.5 Filter Server
On the server running the mailloop service, open port 25 for mail relaying and open incoming access for the merger server in the filter section of iptables:
-A INPUT -m state --state NEW -m tcp -p tcp --dport 25 -j ACCEPT
-A INPUT -p tcp -s <int. address of merger> --dport 22 -j ACCEPT
-A INPUT -p tcp -s <int. address of merger> --dport 8300 -j ACCEPT
The mailloop service running on the filter server enables EMM to process bounces (and autoresponder mails) which can be sent back to the sender address hours or even days after EMM dispatched the mailing. We call these late bounces “asynchronous bounces”.
You need to define a dedicated mailloop service domain name which is different from the filter server hostname (set in /etc/sysconfig/network/). While you have to set up the A record for the filter server hostname, you have to set an MX (Mail Exchange) record for the mailloop service domain name, which points to the filter server hostname for correct mail routing.
For each new bounce filter created in the EMM GUI, EMM creates a new filter address, by default based on the mailloop service domain name. The EMM user should define a mail forwarding for the address(es) used as sender address in its mailings, to direct all incoming response to the filter address(es) for further processing by the mailloop service (see “Alternative A” below).
In our example below the subdomain of the filter server hostname is filter and the mailloop service subdomain name will be mailloop. The (abbreviated) DNS entry for domain.com should look like this:
Replace placeholder <ip address> with the IP address of the filter server, where the mailloop service is running on.
The first line assigns the IP address to the regular hostname, and the second line defines the MX record for the mailloop service domain name, meaning that host filter accepts emails sent to host mailloop.
Validate your setup by using a tool like dig or host, for example
4.5.1 Bounce Filtering Alternatives
When you send emails and want to take advantage of the bounce management for asynchronous bounces, there are three possibilities to set up your bounce management filtering. This chapter explains the different options you have.
The sender address mentioned in the options below is the email address used as the sender address in your mailing or newsletter, i.e. the "From:" address (and it is also used as the "envelope from" address, if not explicitly configured otherwise).
The filter address is the email address hosted on the filter server, and it is configured in the GUI of EMM (feature "bounce filter"). The default filter address is created as "reply_<unique number>" in the local part and with the domain name of the mailloop service. In the example below the domain name is "mailloop.domain.com", i.e. the standard filter address created at first would be reply_1@mailloop.domain.com.
The popular option (alternative A):
Use whatever sender address you like, example: news@agnitas.com. Create a filter address by setting up a bounce filter in EMM (see user manual). This filter will auto-generate a filter address like reply_1@mailloop.domain.com.
Implement a forward mechanism in the email account of the sender address to forward incoming mail, which was sent back to the sender address, to the filter address of EMM. If you use news@agnitas.com as sender address, set the forwarding on the server that handles emails for domain agnitas.com with
The flow of automated responses to your mailings (like autoresponder mails and bounce notifications) starts at the email address of the recipient, goes back from there to your sender address and is forwarded from the sender address to the filter address.
The advantage of this model is that you can choose any domain for the sender address you want, but you have to implement an external forward mechanism.
The advanced option (alternative B):
Use a sender address with the domain name of the mailloop service (for example news@mailloop.domain.com). Since no real email addresses exist for this sender domain name, normally it would not be possible to reply to an email with this sender address. To forward responses to a valid email address you have to define a bounce filter:
In the GUI configuration for the bounce filter set field Filter address manually to your individual sender address (in this example news@mailloop.domain.com) and this address is then bound to this bounce configuration. Due to performance reasons it may take a few minutes until a newly created entry is known by the system.
The flow of automated responses to your mailings (like autoresponder mails and bounce notifications) now goes directly from the email address of the recipient to your sender address, which is equal to the filter address of the bounce filter.
The advantage of this alternative is, that no external forward mechanism is needed, but your sender address has to use the domain name of your mailloop service. Also, you may not use policy "strict" for DMARC, since the FQDN of your mailloop service will differ from the FQDN of your mail server.
The sophisticated option (alternative C):
There is a third alternative for your filter configuration which allows you to set up a filter address of your own choice without having to implement an external forward mechanism. In this case you create a bounce filter with an individual filter address of your choice, like reply@yourdomain.com. Make sure that in the DNS record of the domain used in your filter address, the MX record points to the filter server like
Now you can use this filter address in a similar way as in alternative B, but with a different domain name (in this example: yourdomain.com). If you use SPF, make sure that the SPF record of this domain used in your filter address includes the domain of all servers running a mailer service.
In this case the flow of automated responses to your mailings (like autoresponder mails and bounce notifications) goes directly from the email address of the recipient to your sender address, which is equal to the filter address of the bounce filter.
The advantage of this alternative is, that no external forward mechanism is needed like in alternative A and that the domain of the sender address and the filter address can differ opposed to alternative B.
Caveat: Alternatives B or C will not accept some reserved local parts as part of the filter address. These reserved local parts are currently
- reply_<number>
- aml_<number>
- fbl
4.6 EMM Server (Frontend)
On the server running the GUI service, configure a prerouting forwarding rule from port 80 (http) to port 8080 (Tomcat/http) and from port 443 (https) to port 8443 (Tomcat/https) in section *nat of iptables (before section *filter), so that EMM can access itsself via port 80 and the user does not have to enter port number 8443 to access the web frontend:
*nat
:PREROUTING ACCEPT [0:0]
:POSTROUTING ACCEPT [0:0]
:OUTPUT ACCEPT [0:0]
-A PREROUTING -i eth+ -p tcp --dport 80 -j REDIRECT --to-port 8080
-A PREROUTING -i eth+ -p tcp --dport 443 -j REDIRECT --to-port 8443
-A OUTPUT -o lo -p tcp --dport 80 -j REDIRECT --to-port 8080
-A OUTPUT -o lo -p tcp --dport 443 -j REDIRECT --to-port 8443
COMMIT
Open ports 80, 8080, 443 and 8443 for incoming traffic and open access to the merger server in the section *filter of iptables:
*filter
-A INPUT -m state --state NEW -m tcp -p tcp --dport 80 -j ACCEPT
-A INPUT -m state --state NEW -m tcp -p tcp --dport 8080 -j ACCEPT
-A INPUT -m state --state NEW -m tcp -p tcp --dport 443 -j ACCEPT
-A INPUT -m state --state NEW -m tcp -p tcp --dport 8443 -j ACCEPT
-A INPUT -p tcp -s <ext. address of merger> --dport 22 -j ACCEPT
-A INPUT -p tcp -s <int. address of merger> --dport 22 -j ACCEPT
-A INPUT -p tcp -s <int. address of merger> --dport 8300 -j ACCEPT
4.6.1 Fonts
The GUI service and the statistics service use the fonts installed on the server running those EMM services to generate diagramms and charts with text. These diagrams and charts are displayed in the EMM GUI or used for visual reports in PDF files.
To achieve best visual rendering results, it helps to use the latest RHEL, because in general it provides better default packages for fonts. But you may install additional fonts to make sure they are used instead of some less suitable default fonts. The minimum should be the URW fonts. Install the font packages on all servers running a GUI service or a statistics service.
RHEL:
SLES:
RHEL+SLES:
You may install even more fonts by downloading TTF files directly and saving them in directory usr/share/fonts/. Some sources for free TTF fonts:
4.6.2 Handling a Firewall between EMM Server and DBMS Server
If the server running the GUI service or webservices does not have direct access to the EMM database but the DBMS server is protected by a firewall, make sure that the firewall does not drop unused connections after some time, because it considers a connection to be stale or obsolete. Connections may become old, because EMM uses connection pools and re-uses database connections for performance reasons.
If your firewall cuts connections to the DBMS server, you should modify the configuration of the JDBC connection pool on your EMM server to keep the connections of the pool fresh all the time. This can be done via changing the settings of resource jdbc/emm_db in file context.xml.template of directory /home/console/conf/. Changes become only effective after a restart of the EMM services on this server with
What follows is an example of the settings you may use, suitable for Tomcat. The numbers depend on the timeout settings of your firewall, of course:
    maxIdle="5"
    minIdle="0"
    maxWaitMillis="10000"
    testOnBorrow="true"
    testOnReturn="false"
    testWhileIdle="true"
    validationQuery="SELECT 1"
    timeBetweenEvictionRunsMillis="30000"
    minEvictableIdleTimeMillis="30000"
    removeAbandoned="true"
    removeAbandonedTimeout="60"
    validationInterval="30000"
    maxAge="60000"
A low value for maxAge like 60000 (60 seconds) makes sure that existing connections returned to the pool are closed after a lifetime of one minute, and your firewall has no possibility to cancel them while they are still in use.
4.7 Redirect Server
On the servers running a redirect service, configure a prerouting forwarding rule from port 80 (http) to port 8080 (Tomcat/http) and from port 443 (https) to port 8443 (Tomcat/https) in section *nat of iptables (before section *filter), so that redirect links do not have to contain port number 8080 or 8443 to reach the redirect server:
*nat
:PREROUTING ACCEPT [0:0]
:POSTROUTING ACCEPT [0:0]
:OUTPUT ACCEPT [0:0]
-A PREROUTING -i eth+ -p tcp --dport 80 -j REDIRECT --to-port 8080
-A PREROUTING -i eth+ -p tcp --dport 443 -j REDIRECT --to-port 8443
-A OUTPUT -o lo -p tcp --dport 80 -j REDIRECT --to-port 8080
-A OUTPUT -o lo -p tcp --dport 443 -j REDIRECT --to-port 8443
COMMIT
Begionning with RHEL 7 prerouting rule eth+ might not work any longer. Therefore, find out the NIC name with ifconfig. If the NIC name is "eno", followed by a number, replace eth+ in the example above with eno+. Else, if the NIC name is "ens" followed by a number, replace eth+ with ens+.
Open ports 80, 8080, 443 and 8443 for incoming traffic and open access for the merger server in the filter section of iptables:
*filter
-A INPUT -m state --state NEW -m tcp -p tcp --dport 80 -j ACCEPT
-A INPUT -m state --state NEW -m tcp -p tcp --dport 8080 -j ACCEPT
-A INPUT -m state --state NEW -m tcp -p tcp --dport 443 -j ACCEPT
-A INPUT -m state --state NEW -m tcp -p tcp --dport 8443 -j ACCEPT
-A INPUT -p tcp -s <ext. address of merger> --dport 22 -j ACCEPT
-A INPUT -p tcp -s <int. address of merger> --dport 22 -j ACCEPT
-A INPUT -p tcp -s <int. address of merger> --dport 8300 -j ACCEPT
To protect the redirect service from certain DOS attacks (SYN floods), add or change the following settings in file sysctl.conf in directory /etc/ of the redirect server:
net.ipv4.tcp_synack_retries = 2
net.ipv4.tcp_syncookies = 1
net.ipv4.tcp_max_syn_backlog = 1024
net.ipv4.tcp_syn_retries = 2
Do not forget to reboot the redirect server afterwards to activate these changes.