8.3 Auto Import (Premium)
A CSV file with recipient data that is stored on a server can be automatically imported into E-Marketing Manager. To do so, you must set up an Auto Import. In the navigation bar below Data management, select the Auto import section.
The Overview shows you all existing auto imports. The table contains the following columns:
-
Auto import: indicates the name
-
Description: here you should store meaningful information for other users
-
Type: indicates whether the data is imported into recipient profiles or into reference tables
-
File server: server on which the file for the import is located
-
Status: shows whether the Auto Import is currently running or inactive
-
Last start: indicates when the last execution took place
-
Success: shows with symbols whether the import ran through or was canceled

Fig. 7.13: The overview shows all existing Auto Imports and their status.
To create a new Auto Import, click on the New button in the upper right corner of the window. First, enter a Name and Description.
You now have several setting possibilities:
-
Status indicates the activity status of the auto-import. You can activate or deactivate it in the Action button in the header.
-
Import destination: Specify whether you want to import the data into the recipient database or into a reference table. If you use the PLUS offer for content, mailing content is also available as an import target. The Mailing selection menu then appears, where you select the mailing to be updated. The content source to be imported is stored in the mailing itself.
Note: If you are interested, contact your account manager.
-
Import profile: Choose the desired import profile which you must create beforehand (Creating a new import profile)
-
File server: The File server input field consists of several components:
Protocol: You can switch between ftp:// and sftp:// via a selection field. Server: The server name can consist of three parameters:
| Parameter | Type | Syntax remark |
|---|---|---|
| Servername | required | |
| Port | optional | Separated by a colon; the SFTP port is assigned the value 22 by default and must only be specified if there is a deviation |
| Host Key Fingerprint | optional | Separated by semicolon; the SSH hostkey to improve security against man-inmiddle attacks must not contain colons |
Specify the server name in the following syntax: servername:port;hostKeyFingerprint
Example:
exchange.domain.de:22;SHA256:xbTPge6ctpoIrYcxn9f5Vd3rbcxZn1L2XoQLlLfRJsA
(fictitious fingerprint)
Note: When entering the server name, do not enter the protocol "sftp://"; "ftp://" anymore, otherwise it will appear twice in the server name.
User: The username is optional unless a password is specified.
Password: Entering a password is optional.
At the end of the line, you can use the Test button to check whether the EMM can establish the connection to the server. A message window will immediately tell you whether the test was successful or not.
- File path: Enter the complete service directory including the file name with dash, for example:
/home/user/file.csv
Please note: You also have the option to import a zip-file. · Use private key: Tick the check box in order to use a private key · Private key file: Select the respect key file here.
- Options:
Allow unkown hostkeys for SSL/SFTP: It is strongly recommended enable this setting. If you do not check it, we need the issuer certificate (CA) for your SFTP server in advance, without it the process cannot continue.
One-time execution: The import is performed only once at the specified time. Start import, even after error in last import: If you activate this option, the auto-import will be executed again at the next time, even if the last run was aborted due to an error. Otherwise, the auto-import is disabled and must be reenabled manually.
Deactivate with campaign: Enable this option if you want to disable your autoimport in parallel with a campaign.
Allow import of multiple files (supports wildcards ? and *): If you want to import multiple files, check this box.
Import only new files: Check this box if you want to avoid retrieving an already imported file again.
Allow empty files: Activate this option if it can happen that your file does not contain any data. Otherwise, you will receive an error message by e-mail if an empty file was delivered.
Report on already imported files: Check this box if you want to be notified about a file that has already been imported, even though "Import only new files" has been activated.
Now set the day and time when the import should start. You can choose between a fixed interval (weekly, fortnightly, monthly, weekdays) or a specific Day & Time. This allows you to run the import on specific weekdays at specified times – the set server time (Europe/Berlin) applies. You can define additional runs using the Add button. Alternatively, you can also select the every day option. For an additional charge, you can run the import not only once a day, but also every hour (minimum interval 60 minutes). If you are interested, please contact your account manager. If the import did not work, it can be performed again. Use the Number of retries option to define how many times EMM should attempt to perform an import before terminating the attempt as unsuccessful.
Then define which mailing lists the import applies to. Multiple selections are allowed here.
Once you have made your selection, apply the settings by clicking Save.
New buttons will now appear next to the Save button. After clicking Activate, the Auto Import is executed at the set time, while Deactivate stops the Auto Import. Clicking on
Import data causes E-Marketing Manager to execute the export once and immediately. After every import, the user given in the import profile receives a summary via e-mail.
You can also use the file name to control when an auto-import takes place. To do this, you must first specify the structure of the file name in the import profile, e.g.: import_[YYYY]
[MM][DD]_[HH].csv
In this case, the EMM checks at the set interval whether a file is available that matches the current time or date. If a suitable file is available, the import is executed. If no file meets these criteria, the EMM checks at the next possible time whether a file is available for import.
In this way, you can also pre-produce content and store it on the file server, which may only be used from a certain point in time.
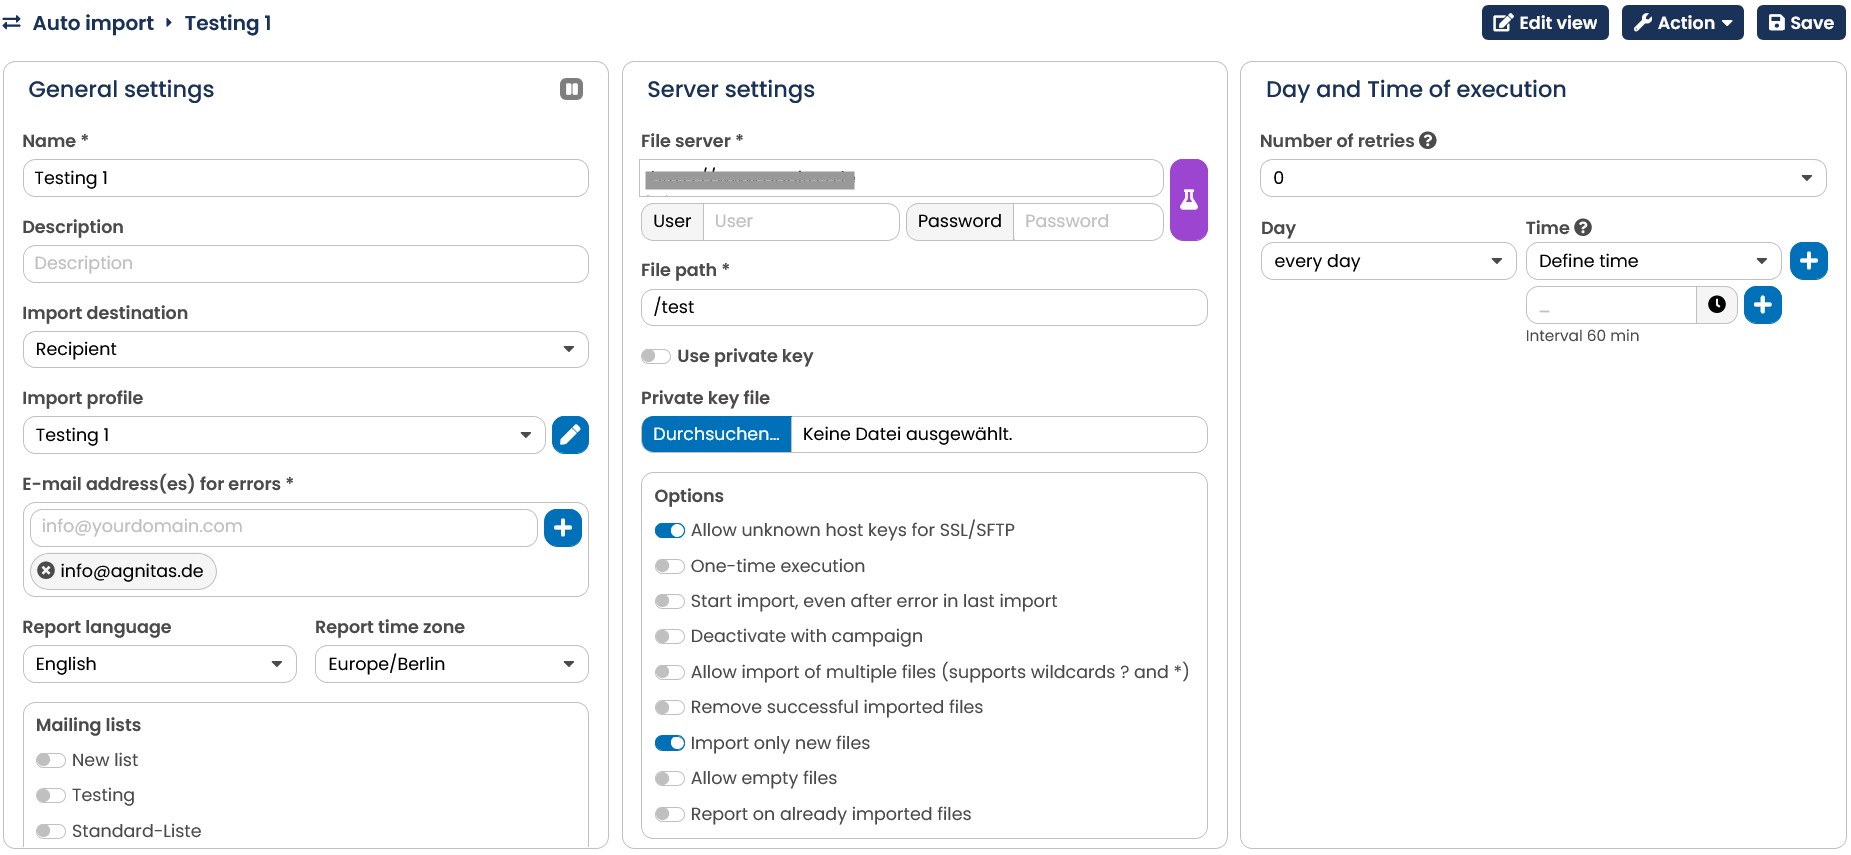
Fig. 7.14: Auto-Import imports data automatically based on a set interval.
In the Overview tab, E-Marketing Manager shows you a list of all created Auto Imports including the given description, file server (syntax contains protocol://username:password@server:port;hostKeyFingerprint), the status, which can be set to be either active or inactive, the last execution date and whether the import was successful. If an import failed, you can find the cause using the exclamation mark. By clicking on a list entry you can edit the corresponding profile as described above. If you no longer need an Auto Import, you can either delete it in the Overview tab by clicking on the trash symbol or also delete it in the tab Action and then press the Delete button.
Please also note: Auto Import is a premium feature. If you would like to use it, please contact your Key Account Manager.
Important: If you do not have the permission for reference tables, then Auto Imports and Exports for them will not be displayed in the overview.