11.10 Example form: Unsubscribe
For practical reasons, it is easiest to process an unsubscribe action by using a personalized link which calls up a form. This link can be included at the end of each mailing, for instance, giving the subscriber the possibility of unsubscribing at any time from the mailing list. In our example, the process uses two forms.
-
The first form is a security check asking the subscriber for confirmation. Clicking on the Unsubscribe button calls up a second form in E-Marketing Manager. This form could also be combined with a questionnaire researching the reasons for unsubscribing. To do this, the relevant fields in the recipients database must be defined. The example in chapter Example form: Amend a profile explains how to insert data from an HTML form into a customer record.
-
The second form calls up a trigger unsubscribing the recipient from that particular mailing list. It also displays a success message confirming the deletion. That recipient’s profile data will remain for verification purposes for the required period in the database, but can no longer be called up by the recipient.
11.10.1 Creating unsubscribe action
This trigger only has one task, namely to unsubscribe the recipient. The trigger should have the Only for forms option activated. This will make trigger management easier once you have a lot of triggers to manage.
-
Create a new trigger with the Name Unsubscribe. Under Usage, specify Only for forms. You can enter additional notes on the trigger in the Description field.
-
Next, in the Type selection list, choose Unsubscribe and confirm your selection with Add.
-
Click Save to complete the definition of the trigger.
11.10.2 Creating unsubscribe forms
The first form displays an HTML form that presents two buttons for canceling and logging off. This confirmation prompt allows a recipient to back out if he or she inadvertently clicked the unsubscribe link in a mailing.
-
Create a new form, which you call unsubscribe. In the Description field, you can specify that it is the first form from a two-part unsubscribe process.
-
An Introductory trigger is not required for unsubscribing.
-
Enter the HTML code for the form below in the Success form input field. Of course, you can design the HTML form as you wish.
-
A Final trigger is also not necessary.
-
In our example, a short text note in the Error form is sufficient to indicate that the unsubscription has failed. In practice, it is better to place a more detailed text here, including a link to the support page of your website or a telephone number or e-mail address as an alternative unsubscription method.
-
With the Save button you complete the definition of the form. You then change the status to active.
The HTML code for the form is quite short:
\<form action="form.action" method="post">
\<input type="hidden" name="agnCTOKEN" value="xxxxxx">
\<input type="hidden" name="agnFN" value="unsubscribeconfirm">
\<input type="hidden" name="agnUID" value="\$!agnUID">
Would you really like to unsubscribe?\<br> \<input type="reset" value="Cancel"
onclick="self.location.href='https://www.yourdomain.com'">
\<input type="submit" value="Unsubscribe">
\</form>
The hidden fields in lines two to four are mandatory. They ensure that the important parameters agnCTOKEN and AGNITAS-User ID (agnUID) are passed on to the following form (agnFN). For value, insert your individual CTOKEN and, if you use a different name for the second form, the name of the subsequent form. You can find the CTOKEN e.g. in the URLs of existing forms. The agnUID is automatically replaced by the form call.
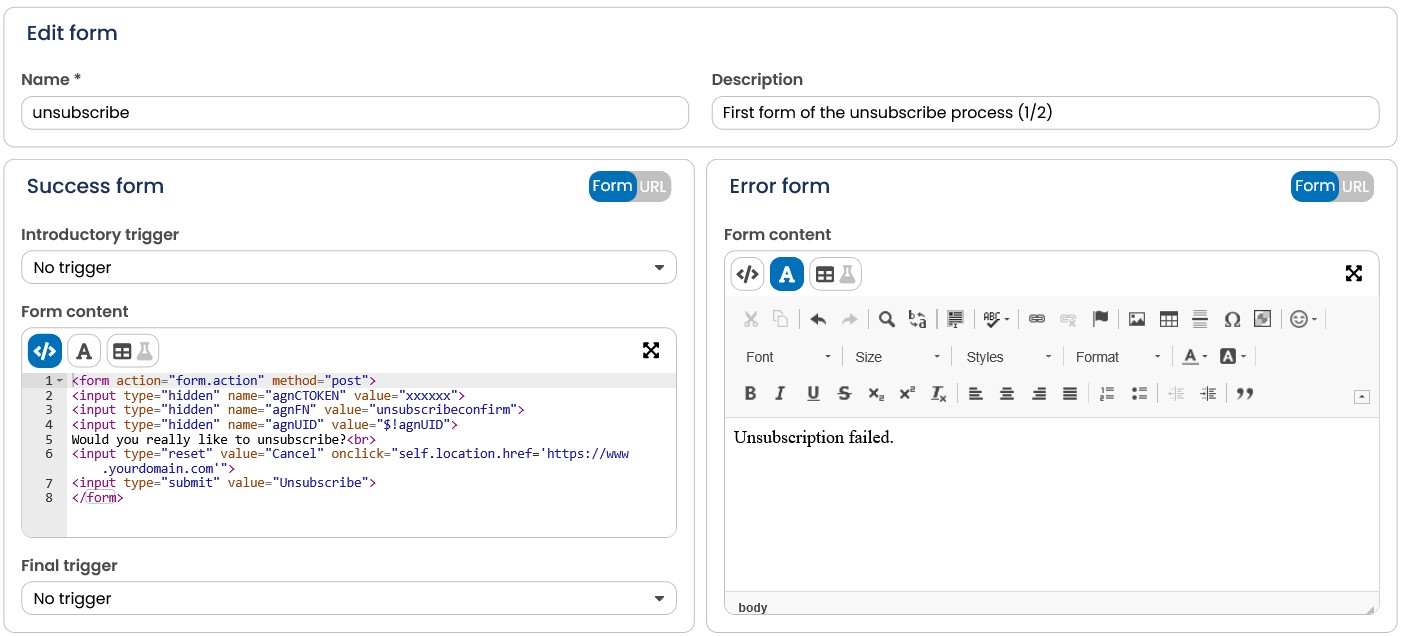
Fig. 10.25: The first unsubscribe form asks the recipient if he or she really wants to unsubscribe before finally removing the recipient from the mailing list.
The two buttons for canceling (type="reset") and unsubscribing (type="submit") correspond to the HTML standard. Only when the submit button is clicked, the browser calls the script form.action and forwards to the second form. If you click the Cancel button, the logout process is not executed and you can submit a link target of your website.
- Create another form with the name unsubscribeconfirm.
Attention: This name must be exactly the same as the form name you specified as value in the HTML code of the first form at agnFN.
-
Under Description you can indicate that this is the second of two forms.
-
Select the previously defined Unsubscribe as the Introductory trigger. For Success form, enter a short confirmation that the unsubscription was successful. Of course, you can format this as you wish with HTML and CSS or with the WYSIWYG editor. Alternatively, you can also redirect to a confirmation page within your website by selecting Success URL and inserting the link there.
-
A Final trigger is not needed.
-
Likewise, the Error form should also contain a note about the failure of the trigger.
-
Use the Save button to finish the form definition.
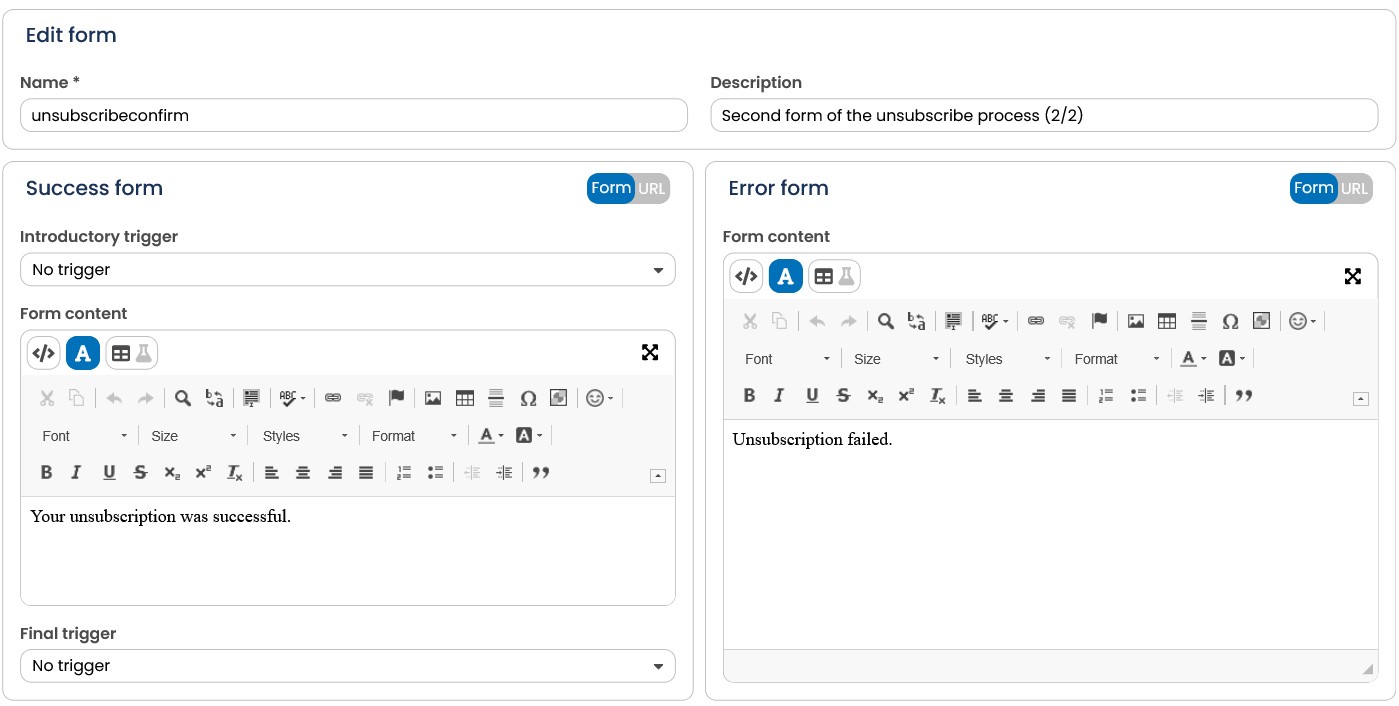
Fig. 10.26: The second unsubscription form performs the unsubscription and confirms to the recipient that the unsubscription was successful.
11.10.3 Calling up the unsubscribe form
In order for the system to establish a connection to the recipient who wants to log off, the
AGNITAS user ID (agnUID) must be transmitted with the call. Therefore, the form Unsubscribe can only be accessed from a newsletter, otherwise the error form is always displayed. Copy the URL that is displayed below the form name. Besides the CTOKEN and the form name, the link already contains a parameter for the agnUID. You can include this link directly in the mailing just like any other link.
In this example, the form call could look like this:
agnCTOKEN=xxxxxx&agnFN=unsubscribe&agnUID=##AGNUID##
The placeholder for the agnUID is only matched and replaced with a real recipient profile in the mailing. The agnUID is generated encrypted from the recipient data and can be explicitly assigned to a data record.
So to test the form Unsubscribe, you have to embed the link in any mailing. Then click on this link in the preview for a test recipient. Now you should be able to see the security question in the browser whether you really want to unsubscribe. If your test was successful, you can simply leave the link in the mailing.
Instead of a long URL, you can also use the agnTag for forms. This would look like this in our example:
\<a href=“[agnFORM name="unsubscribe"/]”>unsubscribe from newsletter\</a>
Tip: You can record form calls in the mailing as administrative clicks, then you can see at a glance in the statistics how many clicks have been made on your actual content. You can find out more in chapter Editing links.
Attention: Once you have unsubscribed from the mailing list, the unsubscribe link will no longer work. This is because although the recipient is still in the database, the system no longer displays it for security reasons and the agnUID is no longer valid. And this in turn is contained in the personalized link for unsubscribing. However, you can still access the recipient in the database via the administrator interface of the E-Marketing Manager.