11.4 Content form design
When it comes to the visual design of your forms, you have all the options available to you with websites. You define the design with CSS and HTML and are completely flexible here. In order for the forms to be able to transfer data to the database or read data from it, certain values must be set and database columns (profile fields) linked.
The following sections explain how to do this.
11.4.1 Form basics
There are basically no limits to the structure of the content. But a few things are good to know:
- Open the form part in HTML with the following expression:
\<form action="form.action" method="post" class="form" role="form">
- If you want to save data in a recipient profile, you must tell the E-Marketing Manager in the background which CompanyID your client is. So that this cannot be read in plain text, there is a so-called CTOKEN for this, which is an encrypted value for the
ComanyID. You can find the CTOKEN e.g. in the URLs of existing forms. In the form you can store this with the following expression - instead of xxxxxx you insert your
CTOKEN:
\<input type="hidden" name="agnCTOKEN" value="xxxxxx">
- If you want to call up another EMM form directly after submitting the form, use the following expression and replace the placeholder form_name with the name of the desired form in agnFN:
\<input type="hidden" name="agnFN" value="form_name">
- If it is a registration form, you have to give the E-Marketing Manager more information. Firstly, for which mailing list (agnMAILINGLIST) the recipient is to be subscribed, which mail format (mailtype) he/she is to receive and which status (agnSUBSCRIBE) he/she is to receive. You can find the ID of your mailing list in the overview of mailing lists and insert it instead of xxxxx. The mail format is usually HTML (= 1) and the recipient status should be set to active (= 1) after confirmation:
\<input type="hidden" name="agnSUBSCRIBE" value="1">
\<input type="hidden" name="agnMAILINGLIST" value="xxxxx">
\<input type="hidden" name="mailtype" value="1">
- You can embed other fields that are to be filled in the background in the same way by entering the field name in the database under name and storing the desired contents for value. Example:
\<input type="hidden" name="language" value="English">
- Form fields that are to be filled by the caller itself could look like this:
\<div class="form-group" style="margin-right: 10px;">
\<label for="first name">First name:\</label>
\<input type="text" class="form-control" id="first name" placeholder="First name" name="FIRSTNAME" value=""> \</div>
It is important that the name parameter uses the field name from the EMM database, in this example FIRSTNAME. In this way, the input field of the form is assigned to the corresponding field in the recipient database.
- Date fields must be divided into three individual input fields for day, month, and year. The field names are always according to the following scheme:
FIELDNAME_DAY_DATE, FIELDNAME_MONTH_DATE, FIELDNAME_YEAR_DATE.
Example of a date field birthday:
Day: \<input type="text" name="birthday_DAY_DATE" />\<br/>
Month: \<input type="text" name="birthday_MONTH_DATE" />\<br/>
Year: \<input type="text" name="birthday_YEAR_DATE" />
11.4.2 Drop-down list instead of entry field
Some data is saved in the profile database as a reference number, for instance gender or mail format. It is impossible to ask a subscriber to enter the relevant numerical data on registration. This would not only cause many errors, but will also prompt some people to enter invalid data on purpose. It is much more elegant to offer subscribers a drop-down list for parameter selection - with speaking entries. To do this, the tags \<select> and \<option> are used to define a drop-down list in the HTML form. The following example is suitable for gender selection.
\<select name="GENDER" size="1">
\<option value="2" selected>no entry\</option>
\<option value="0">Mr\</option>
\<option value="1">Mrs\</option>
\</select>
In the first line, the \<select> tag with the name="GENDER" attribute determines that the drop-down list concerns the EMM database field for gender. This is a required field since without a gender, E-Marketing Manager cannot process entries correctly.
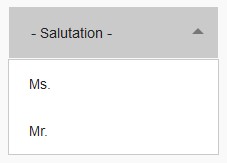
Fig. 10.5: In this way a selection list for the gender can be created.
The following lines starting with \<option> define the possible selections in the drop-down list. There is one \<option> tag per selection. Each \<option> tag is attributed a value="" which will be used by E-Marketing Manager to determine which entry to make in the profile database. In our example, we used 0 for male, 1 for female and 2 for no entry.
But what happens if the subscriber does not make a selection? You will define a default entry for this situation. In our example, when evaluating the form the default value will be No entry. This is why the selected attribute is shown against that selection’s \<option> tag. This also means that the entry is the default form entry and visible at form call-up.
When defining other selections, for instance the mail format or entries for fields you defined yourself, you must adapt the following data:
-
The field name in the name attribute.
-
The values (value="") and text for all drop-down list selections (\<option> ...\</option>). There is no limit to the number of selections you may insert.
11.4.3 Displaying existing data
Empty fields in the E-Marketing Manager should not always be filled with a new content, as is the case when a new recipient is registered. There are also numerous use cases in which the data of an existing recipient profile should be loaded and displayed in the form, for example, if a recipient wants to make data corrections or additions.
Three points must be met before you can call up the data from an existing recipient profile:
-
The form must be called up with an existing User ID, otherwise the E-Marketing Manager does not know which data it should display.
-
The form requires an introductory trigger that retrieves the profile data.
-
The profile field to be displayed is extended with the script command \$customerData.
In the case of a simple input field, such as the first name, the call looks like this:
First name: \<input type="text" name="FIRSTNAME" value="\$!customerData.FIRSTNAME">
When outputting an existing profile, the correct point must also be marked in a selection list.
To do this, you must insert the attribute selected in the HTML code in the corresponding \<option> tag. The same applies to a checkbox, where the attribute checked creates a check mark. You use script commands to insert the attributes in the correct place, depending on the recipient profile. The example for displaying the mail format in a selection list looks like this:
Mail-Format: \<select name="MAILTYPE" size="1">
\<option value="0" #if( \$customerData.MAILTYPE == "0" ) selected #end >
Text
\</option>
\<option value="1" #if( \$customerData.MAILTYPE == "1" ) selected #end >
HTML
\</option>
\<option value="2" #if( \$customerData.MAILTYPE == "2" ) selected #end >
Offline-HTML
\</option>
\</select>\<br>
The list option selected in the browser window must have the selected attribute against its value. First, the #if query checks whether or not the value stored in the database is plausible for the list option concerned. The \$customerData.MAILTYPE code calls up the value stored in the profile. MAILTYPE is the name of the field where E-Marketing Manager stores the mail type (text, HTML or Offline-HTML) selected by the recipient. If the value selected and the value found are identical, the script command inserts the text from the ‘if’ query immediately before #end into the HTML code. For instance,
\<option value="1" #if( \$customerData.MAILTYPE == "1" ) selected #end >
will return
\<option value="1" selected >
This only happens, of course, if a 1 is entered in the recipient profile. With a 2 or a 0, it then looks like this:
\<option value="2">
Only the \<option> tag whose value corresponds to the entry in the recipient profile will therefore be selected.
11.4.4 Integrating images in forms
Just as in the case of mailings, you can also integrate images in forms using the HTML tag \<img src="[Image-URL]"> - the procedure is exactly the same as that for mailings (see also the section Using images elements). The HTML command tag references an image file that, for example, may be stored on your server and has an Image-URL such as https://www.yourdomain.com/uploads/logo.jpg. You can also save the image on the EMM server and then use the image path from the Mediapool or the Images tab.
You can verify that you have entered the Image-URL correctly in the form by switching to the WYSIWYG-mode or by navigating to the form URL that is displayed below the form name after you initially save the form. If you wish to use an image that you have already uploaded to the Images area, simply copy the Image-URL from the colum Link and paste this to the corresponding location in the form.
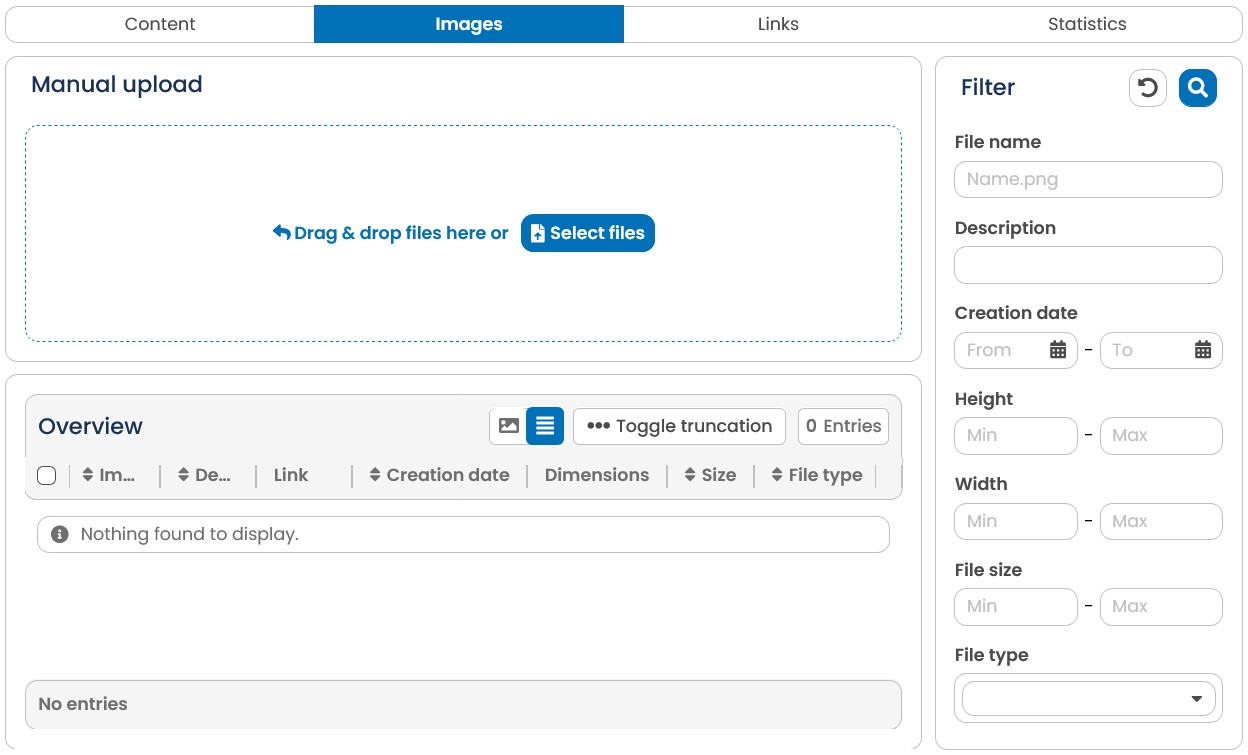
Fig. 10.6: Image components can be easily integrated in forms using an HTML tag. With the aid of the image register, you can upload image material directly to the E-Marketing Manager-server.
If you want to save the images on the E-Marketing Manager server that you wish to use in a form, you will first need to upload the corresponding files. There are two ways to do this. You can upload single or multiple images by either dragging and dropping them into the blue box labeled Drag & drop files here or by clicking on the Select files button. After clicking on the Upload file button, the E-Marketing Manager will transfer the image file(s) to the E-Marketing Manager server.
If you plan to include a large number of images in your form, you do not have to upload them individually; the E-Marketing Manager is able to handle the simultaneous uploading of more than one image. Simply click on the ZIP Folder tab in the Images register and inform E-Marketing Manager where the files are archived. The upload will start as soon as you click on Upload file. Additionally, you can also upload .ico-files to customize the favicon of the form.
You can remove obsolete images at any time using the trash can icon. In addition, the EMarketing Manager also offers you the option of saving individual images for archiving or further processing outside the E-Marketing Manager via the download symbol at the end of the line.
11.4.5 Integrating measurable links in forms
Your forms can be evaluated via trackable links in the same way as mailings (See chapter Using trackable links). If a user clicks on a link contained in the form, he calls an URL that points to the E-Marketing Manager server. The server registers the mouse click and assigns it to the special recipient. Equally, form and trigger calls that cannot be associated with an individual recipient are also registered. These include, for example, link clicks from a registration form. You can therefore easily determine which subjects dealt with in the form received particular interest.
You enter a trackable link in the field Success form. E-Marketing Manager always recognizes automatically whether your form contains a link. Before sending the form, determine which of the links contained in the form you would like to measure and which you do not want to measure. To do so, proceed as follows:
-
Click on the Links tab. Thereupon under the URL column an overview of those links appears that are present in the success form.
-
To edit a specific link, click on the entry.
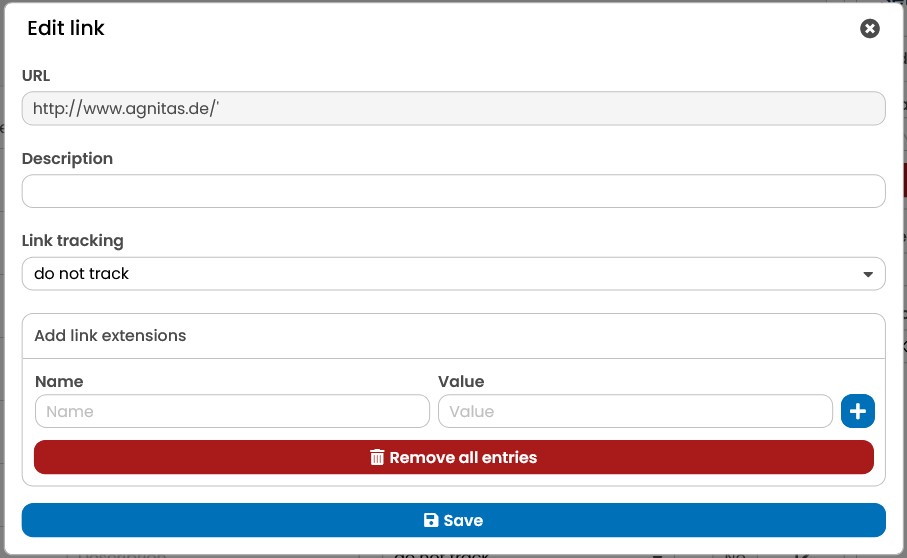
Fig. 10.7: You can configure your settings per link.
- The input dialog for trackable links indicates the selected link at the top. Under that you will find an input field for a Description. Here you can input a short text briefly describing the meaning of the link. This text remains invisible for the visitors of the form.
In the statistical analysis of the clicks however, E-Marketing Manager shows the description. This considerably eases evaluation with long URLs.
-
The option Link tracking determines if the link is transformed into a trackable link. The parameters track and do not track are self-explanatory.
-
You can transfer additional parameters to a URL contained in the form, for example for web or shop tracking. To do so, enter the desired extensions with a name and value in the Add link extensions section. You can add a new list entry by clicking on the Plus . If you want to delete one of the parameters, remove the corresponding line by clicking on the trash symbol or use the button Remove all entries for all extensions.
-
In conclusion you transfer the changed link setting to the system with the Save button and you will be forwarded to the overview again.
Entries made in the Settings section on the right side of the overview page for trackable links, are automatically transferred to all links. The Extend links field additionally shows if the link is extended and its number of parameters.
In the Default link tracking field, determine whether the links contained in the form should be tracked. If this setting do not track is used, E-Marketing Manager accepts the links unchanged for the form, i.e. exactly as they have been entered. The result is that the recipient can see where the link leads to but clicks on it cannot be registered. The track setting is exactly the opposite: The links are modified to point to the E-Marketing Manager server and can therefore be registered. In this case the visitor sees a redirect link and not the original target address of the link.
Standard link tracking applies to all links contained in the form. You can, however, change this setting at any time for specific links.
With the symbol at the very end of the line you can navigate directly to the displayed link, which opens in a new browser tab.
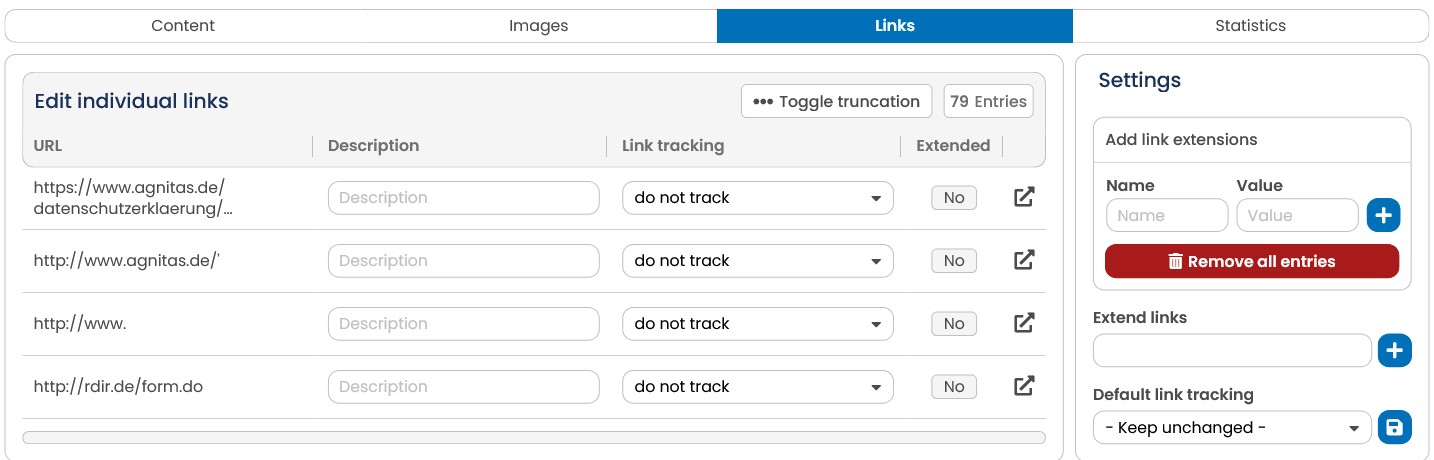
Fig. 10.8: The system permits you to incorporate trackable links into forms and undertake their evaluation individually.
11.4.6 Form generator
With the Form generator you can create forms despite having very little HTML knowledge. Standard information that must be included in the background is automatically prefilled and this should not be removed so that the data can be assigned to the correct client. New elements are simply inserted into the content area by clicking on the appropriate type in the right sidebar. If you want to submit information in the background, use the Hidden field type for this purpose. All other types are visible. Then you can edit the
settings, e.g. label, display, mandatory field, etc., by clicking on the pencil icon, as well as create the link to a profile field. You can sort the fields in order by dragging and dropping. Of course, you can copy or remove fields using the controls on the right.
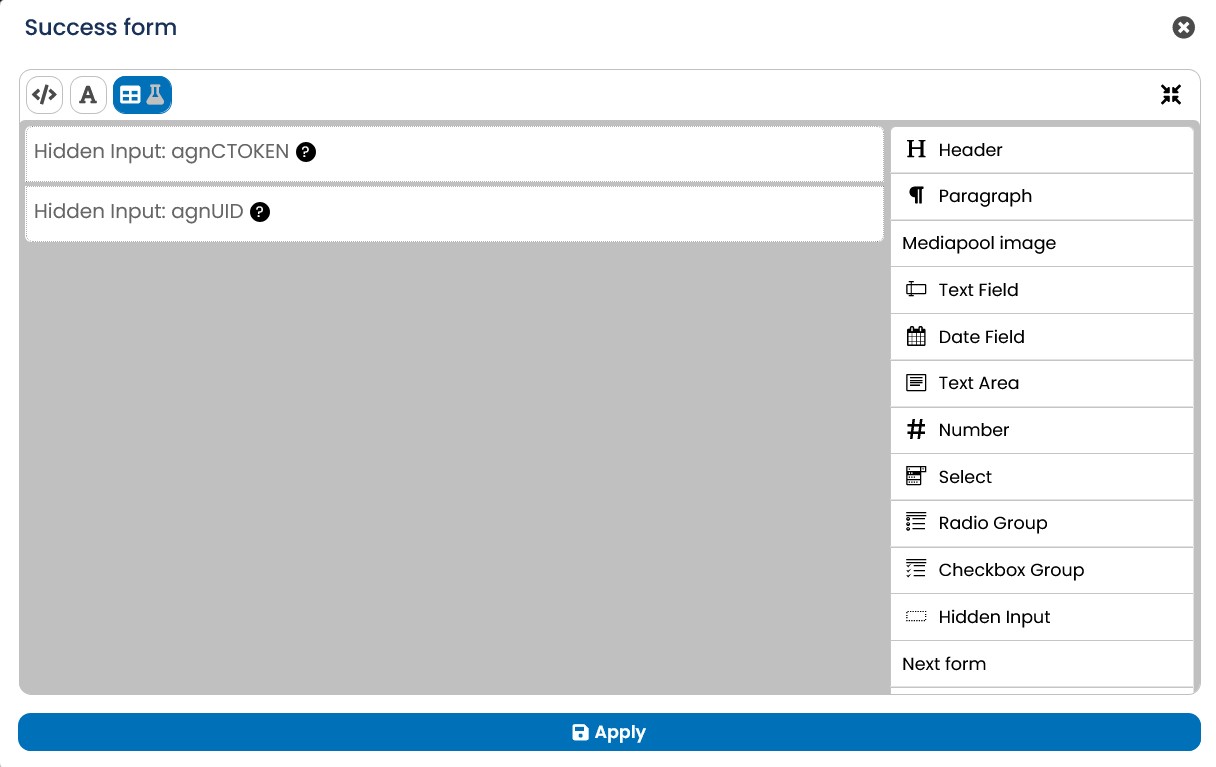
Fig. 10.9: Form generator