12.6 Automatic mailing - An example
The following example explains how the recipient – by clicking on a link – triggers a followup mailing. This basically works in a similar way to closed-loop marketing, with several special features. In our example, the recipient should be able to request additional information about cars by email by clicking on a link.
-
Create the follow-up mailing the recipient should receive after clicking on a link.
-
Define the trigger triggering the sending of the email and modifying the recipient profile.
-
Finally, create the basic mailing containing the trackable link for requesting further news.
At first, steps seem to be exactly the wrong way round. The basic mailing, after all, reaches the recipient first. As far as the E-Marketing Manager is concerned, however, this sequence does make sense. In order to be able to define trackable links for the basic mailing, the triggers they are to call up must have been defined first. And in order to be able to define a mailing, the E-Marketing Manager must know which additional (or follow-up) mailing it is to send with it.
12.6.1 Creating a follow-up mailing
First, you will create the mailing that only customers who click on the required link will receive. Therefore you need a so-called action-based mailing. Proceed as follows:
-
Create a new mailing as usual. Assign a unique Name, e.g. Followup Individual Trip. It is recommended to describe the use case as exactly as possible, e.g. dispatch is initiated by clicking on the link to individual travel offers. In the General settings section you will find the Mailing type drop-down list: Here you can set up Actionbased mailing. Click on the Save button and continue with the content creation. All functions are available as for normal mailings (see Chapter Mailings - Sending out newsletters).
-
Now click on the Send Mailing tab. The contents area displays several links you can use to test your mailing. As soon as you are satisfied with your amendments, click on
Activate. This causes the action-based mailing to “go live” and be used by a trigger.

Fig. 11.17: With the link Activate you release the action-based mailing for dispatch.
Please note: When clicking on a mailing which has already been activated to see its details, you will notice that certain data may no longer be changed. They are the dropdown lists Mailing list, Target group and Mailing type as well as the content itself. These disabled elements are greyed out by E-Marketing Manager. An action-based mailing must be deactivated first before you can make any further changes. Open the Send mailing tab and click on the Deactivate link. You may now make any changes you want. Don’t forget to activate the mailing again once you have finished. This is done in the Send mailing tab.
12.6.2 Defining actions
The trigger from the Closed-loop marketing example now has two tasks to fulfill: On the one hand, it should record the click in the recipient profile and on the other hand, it should initiate the sending of the follow-up mailing. The following work steps are required for this:
-
Click on the menu item Trigger management in the navigation and call up the trigger Individual trip +1 in the overview. The best thing to do now is to add to both the Name and Description that an email is being sent here. The usage is still Only for links.
-
In the Steps section, select Send action-based mailing as type and click on Plus.
-
The E-Marketing Manager now displays further selection lists at the second step of the trigger. In the Mailing selection list, select the desired action-based mailing, here Followup individual trip with the tips from the personal travel assistant. In order to give the recipient the opportunity to read through the clicked offer, the follow-up should be sent the next day. To do this, select the 1 Day option in the Delay selection list. If you want, you can also enter the email address of the travel assistant in the BCC recipient field, so that the blind copy will let the travel assistant know when someone is automatically written to in their name.
Please note: Only action-based mailings that are already activated for sending will appear in the Mailing selection list (see previous chapter Creating a follow-up mailing).
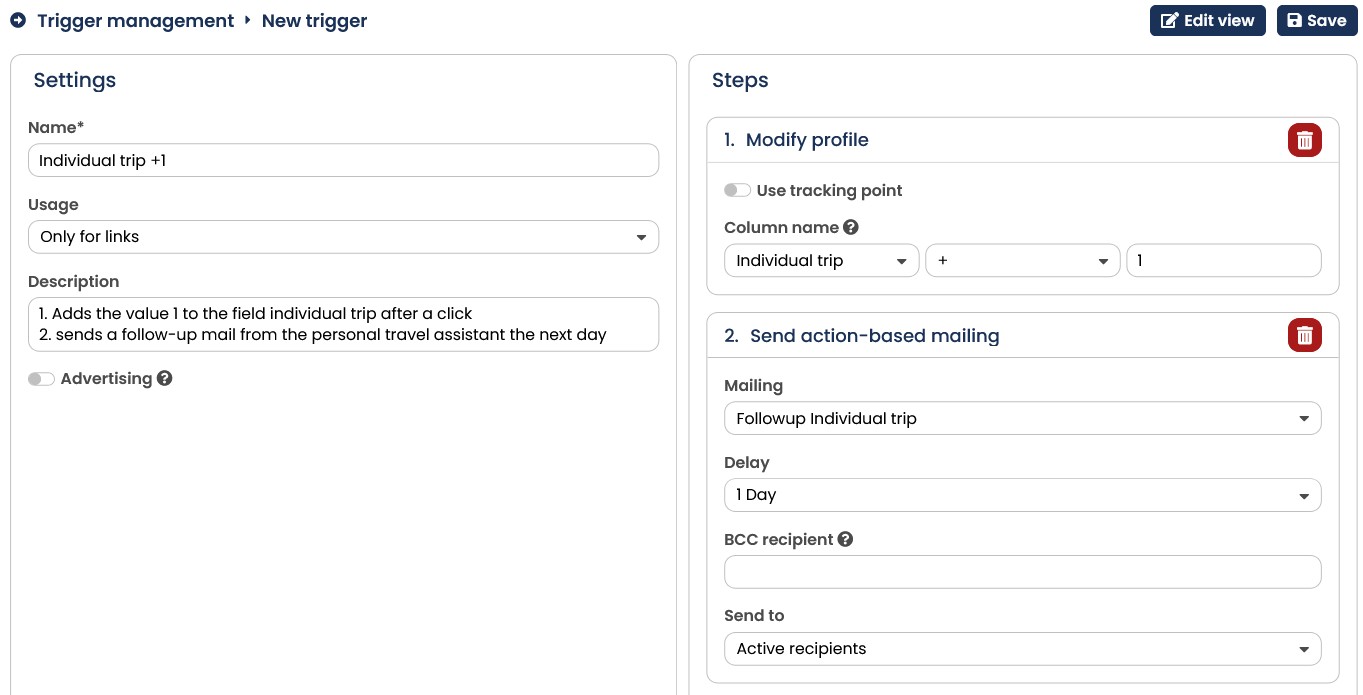
Fig. 11.18: The trigger sends a follow-up mail to the recipient - one day after he clicked.
- Finally, save the entries with the Save button. The trigger is now complete.
12.6.3 Creating a basic mailing
As a last step, you will now create the basic mailing. This is a normal mailing containing at least one trackable link calling up the pre-defined trigger. Proceed as follows:
-
Create a normal mailing as described in chapter Mailings - Sending out newsletters and click on the Links tab. The E-Marketing Manager displays a list of all the links contained in the mailing.
-
Now click on the link to the individual travel offer. You can enter a text in the
Description field, the description will appear later in the statistics and is easier to enter than long links. It is important that the link is marked as trackable. Choose the appropriate setting for your mailing, e.g. Text and HTML version. In the selection list Action you now select the trigger Individual trip +1 and Followup.
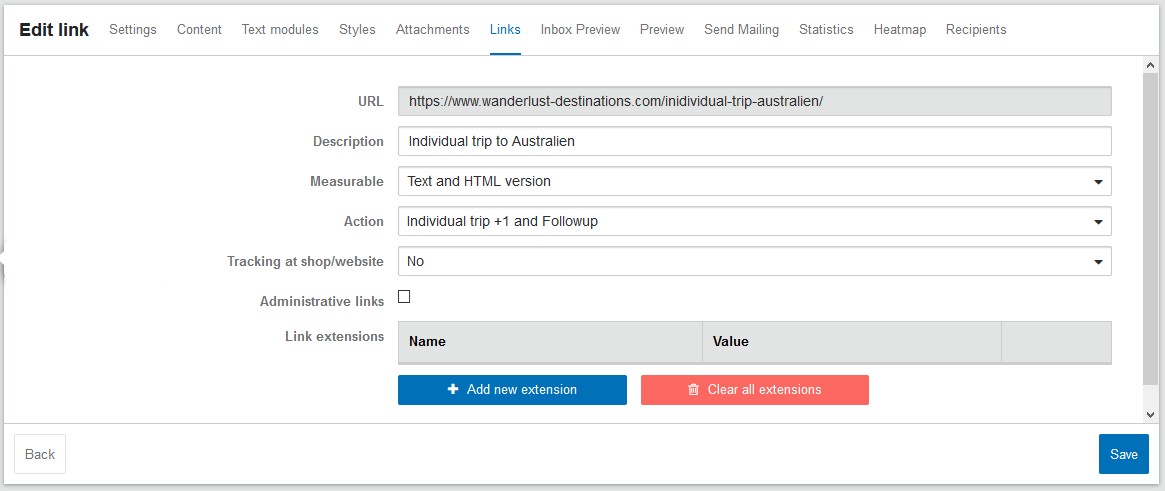
Fig. 11.19: Now associate the link with the new action that sends the follow-up e-mail.
- Finally, save the changes with the Save button. Now the mailing is finished and you can prepare it for sending as described in chapter Testing and sending a mailing.
As soon as a recipient clicks on the individual travel offer in his e-mail program, the corresponding profile field is increased by one, the link opens in the browser and on the following day he receives a suitable follow-up e-mail from his personal travel assistant without further action. In this way, the recipients themselves enrich their profile and receive the best possible service from you.