8.2 Profile administration
If you regularly want to import files with a constant structure, you can configure an import profile and then use it again and again. This procedure saves time during the import and reduces error possibilities to a minimum. You can use the import profiles both for manual imports using the standard import method and for auto-imports (Premium). The import profiles managed here always refer to the recipient profile.
The following chapters describe how to create a new import profile and how to manage the existing profiles.
8.2.1 Creating or editing an import profile
Why does E-Marketing Manager need an import profile? Import files often come from the same source and are designed consistently. So that you do not have to enter this parameter every time you import a file, E-Marketing Manager offers the possibility of storing these settings in an import profile. Once created, the import profile will save you a lot of time. When importing customer data, all you need to do is select the appropriate import profile - the E-Marketing Manager then handles the upload automatically.
An import profile contains all the information necessary to read a file. With this information, E-Marketing Manager assigns the colums of your file to the correct profile field such as name, email or birthday, and transfers the customer data to the E-Marketing Manager database.
If you want to edit an existing profile, you can open it in the profile administration by clicking on it.
To create a new import profile, in the navigation bar click on Data management and then Import profiles. Click New to create your new profile. In the dialog that follows, you determine the parameters of your import profile.
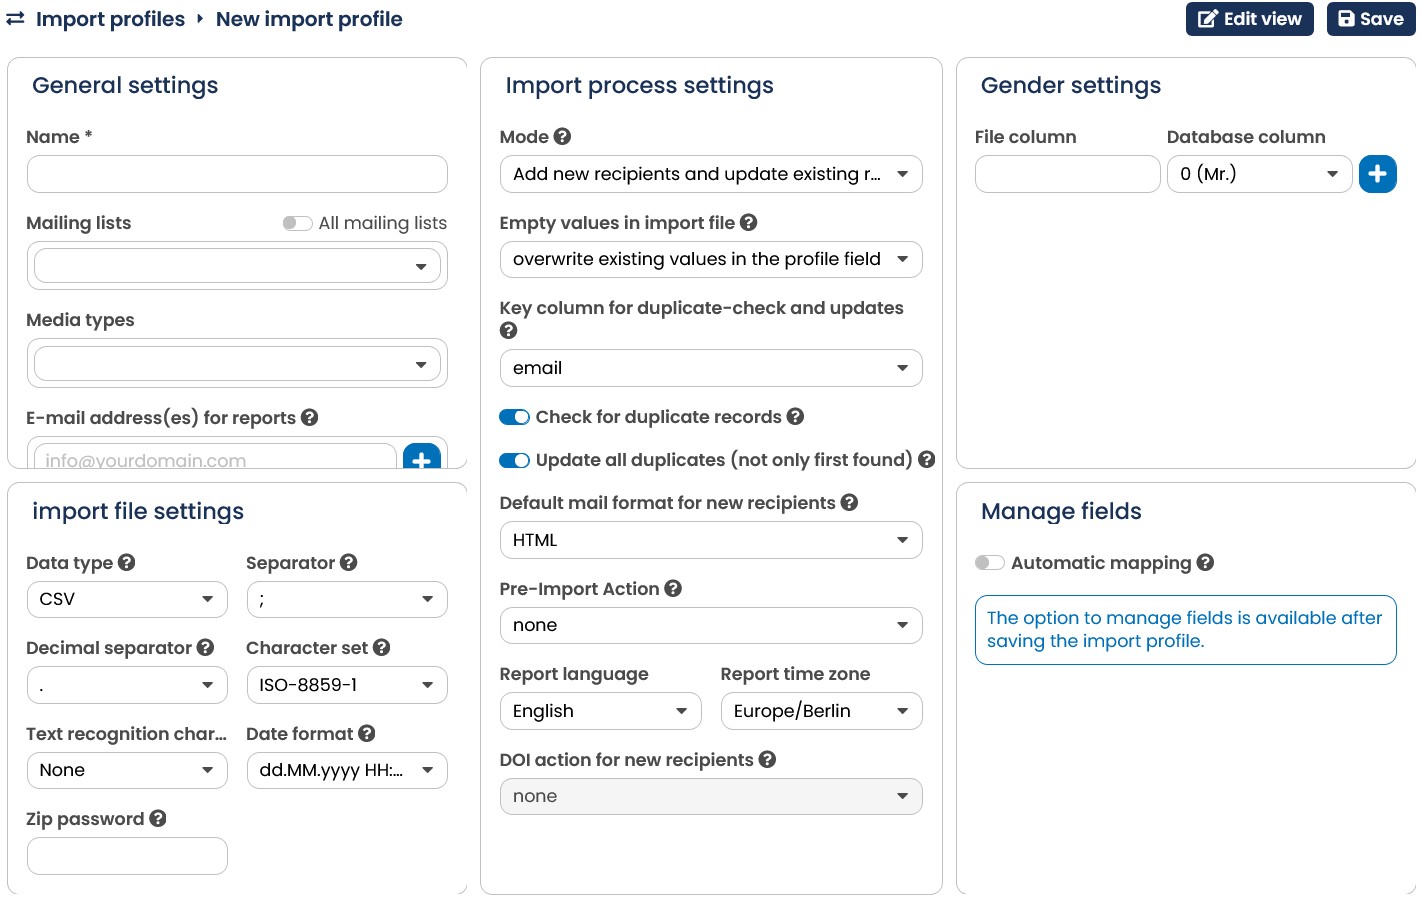
Fig. 7.7: An import profile defines in detail how E-Marketing Manager should handle the data when importing it into its database.
In the Name field enter a meaningful designation for the new import profile. The clearer the name, the easier it is for you and others to select the appropriate profile when importing files.
In the Pre-Import Action field, you can convert, aggregate, or transform the data as a preprocessing action. If you are interested, contact Support.
8.2.1.1 Determining the file settings
The file settings are made directly underneath the entry field for the names. You there tell E-Marketing Manager what Separator and Text recognition character the file uses and enter the Character set and the Date format. You can also upload zipped files. Setting a password is optional, depending on the zip-method, which was used to compress the file. If your file does not contain date fields or decimal separators, the import profile setting has no effect on the import.
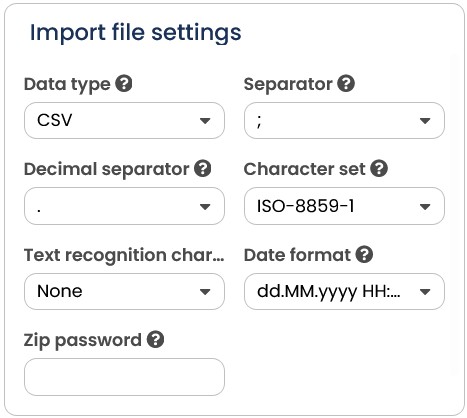
Fig. 7.8: The basic parameters of a file are set with these settings.
Separator: If you collect the recipient data in a spreadsheet program such as Excel and save it as a CSV file, the detail is normally separated by a semicolon. If you use other programs however, it is possible that another separator is used. In this case set the corresponding separator in this part of the menu. As alternatives, these characters are offered:
| Character | Meaning |
|---|---|
| ; | Semicolon |
| , | Comma |
| | | Bar (vertical stripe) |
| Tab | Tabulator |
| ^ | Circumflex |
Text recognition character: If the separator you have used is contained in your recipient data, it must be marked as such by use of a further character. For example, if commas are used as separators and the recipient data also contains commas, then the commas in the recipient data must be prepared for import by this character.
An example: Assume that the ADDRESS column of the CSV file contains the same town names but differing regional information such as New Town; Vine Street or New Town; Ashbury. If you are using the Excel spreadsheet program from Microsoft, semi-colons are added as separators when the CSV file is created. To ensure that the semi-colons in the town names are not seen as separators, Excel adds double inverted commas (“) as text recognition characters:
“New Town; Vine Street”; “New Town; Ashbury”
Therefore if you are using Excel for data import, we recommend that you choose double inverted comma (“) as text recognition characters. This prevents the semi-colons in the town names being entered into the database as separators.
Please note: This example relates to a CSV file generated by Microsoft Excel. If you are using other spreadsheet programs, we recommend that you consult the corresponding documentation to check what kind of separator your software uses.
| Character | Meaning |
|---|---|
| None | No text recognition character |
| " | Double inverted comma |
| ' | Single inverted comma |
Character set: The West European ISO 8859-1 character set is preset as standard and can always be used. Other character sets should only be chosen if these are used in the CSV file.
| Character set | Meaning |
|---|---|
| ISO 8559-1 | Western European character set |
| UTF-8 | Unicode character set |
| Chinese simplified (GB2312) | Character set for simplified Chinese characters |
| ISO 8859-15 | Single-Byte character set |
| ISO 8859-2 | Eastern European character set |
| ISO 2022-JP | Character set for simple Japanese characters |
Date format: In the standard setting, E-Marketing Manager uses the normal dd.MM.yyyy HH:mm date and time schedule. The date is given in Day.Month.Year and the time in Hours:Minutes. The following alternative ways of writing this are available:
| Date format | Written as |
|---|---|
| dd.MM.yyyy HH:mm | Day.Month.Year Hours:Minutes |
| dd.MM.yyyy | Day.Month.Year |
| yyyyMMdd | YearMonthDay |
| yyyyMMdd HH:mm | YearMonthDay Hours:Minutes |
| yyyy-MM-dd HH:mm:ss | Year-Month-Day Hours:Minutes:Seconds |
| dd.MM.yyyy HH:mm:ss | Day.Month.Year Hours:Minutes:Seconds |
| dd.MM.yy | Day.Month.Year |
| Decimal sperator | Meaning |
| . | Full stop |
| , | Comma |
Decimal separator: With this function the profile import can also import decimal values. By default the OpenEMM uses the . as decimal separator. Depending on the decimal separator used in your CSV data, numerical values can be interpreted differently.
8.2.1.2 Determining the process settings
The Mode selection list controls how E-Marketing Manager integrates the imported recipients into its database. You can choose from the following modes:
-
Add only new recipients
-
Add new recipients and update existing recipients
-
Only update existing recipients
-
Mark recipients as opt-out
-
Mark recipients as bounced
-
Add recipients to Blocklist
-
Mark recipients with the status "bounced" as active (if requested)
-
Temporary suspend recipients (if requested)
This opens up many possibilities for you to keep your recipient data up-to-date. It often happens that recipients do not register via your website but via your social media for example. Entering a single recipient is not much work; but when dozens of such e-mails are supposed to be entered, it's easier to collect these users in a list in a spreadsheet and then enter them all at once into E-Marketing Manager.
If you want to add new recipients only to a database but do not want to change the information on existing recipients, choose the entry Add only new recipients. This is for example useful when your import file contains information on new customers and existing ones whose data should not be changed. The option Add new recipients and update existing recipients goes a step further. E-Marketing Manager adds the new recipients to its database in exactly the same way as the first option, but in addition checks whether your file contains new or changed information on existing recipients. In this case the system updates the information on the recipient concerned. If you want to update your mailing list but do not want to add recipients, choose the option Only update existing recipients.
It is also possible to update the status of recipients who want to be removed from your mailing lists but who are unable to, or do not want to, do this themselves. The options Mark recipients as opt-out and Mark recipients as bounced are provided for this purpose. Opt-Out should be used for de-registration and bounced for recipients who cannot be reached. It is also possible that a recipient contacts you who not only wants to be deleted from the list, but simultaneously threatens legal steps should he receive further e-mails from you. In such cases, the option Add recipients to Blocklist is a certain way of excluding individual recipients completely from further transmissions and of protecting yourself against unpleasantness.You also have the option "Temporary suspend recipients". For cleanup purposes, you can temporarily deactivate selected address blocks before sending and then reactivate them.
The selection list Empty values in import file is also used for control of the import. Empty values are empty fields in your import file.
-
The standard setting is overwrite existing values in the profile field. If a record in your import file does not contain a value in a column, but there is a value in theEMM profile field, the file overwrites the values in the database. This loses the content of the corresponding fields when importing into the database.
-
The second option keep existing values in profile fields skips empty values in the import file during the import without affecting the E-Marketing Manager database. For example, this could be when you know for certain that changes have been made in the database that are not contained in the import file.
E-Marketing Manager checks whether two recipients are identical using a specific field. The one that is to be used is determined by the selection list Key-column for duplicatecheck and updates (see next chapter). As standard, the system uses the field email.
In the selection menu Media type you define for which channel you want to register or deregister the imported addresses. You can choose between e-mail, mail and SMS.
Note: For Xpress versions of EMM, the option to handle null values during import is not available, because this is a huge resource load for the system.
8.2.1.3 Handling with duplicates
When importing new recipients, it is possible that some are already in the E-Marketing Manager database. The database, however, should not contain a duplicate of a recipient, since that recipient would, for example, receive a newsletter twice. These ‘dead’ entries also falsify the evaluation of responses to marketing campaigns. The import system therefore checks for duplicate entries. As preset, the import function prevents duplicate email addresses. In individual cases it may make sense to use other recipient profile fields to check for duplicates. You can control how the system carries this out through several selection lists.
Key-column for duplicate-check and updates: It is important to understand which criteria the system uses to classify an address as a duplicate. When sending emails, it makes sense to use the e-mail address as a criterion. This is also the standard setting. It is possible that a recipient registers with multiple email addresses, but these kinds of double registration cannot be discovered automatically. This setting also applies to the updating of recipients profiles. The selection list contains all predefined and self-defined fields of the profile database. All selection criteria at a glance:
| Key column | Meaning |
|---|---|
| creation_date | The date on which the recipient was added to the database. |
| customer_id | E-Marketing Manager automatically assigns a customer id for each newly created recipient. This ID is unique in the system; a specific recipient can be uniquely identified via the CUSTOMER_ID. |
| Key column | Meaning |
| datasource_id | Code number of the data source from which the recipient data was imported. When importing CSV data using the import function, EMarketing Manager automatically assigns an ID (see chapter Import function for recipient data). |
| The email address of the recipient. | |
| firstname | The firstname of the recipient. |
| gender | The gender of the recipient. E-Marketing Manager uses numbers to mark the gender: 0 means male, 1 means female. The number 2 is used to designate all recipients who do not identify as either of the other two genders or did not specify their gender. |
| lastname | The lastname of the recipient. |
| mailtype | The type of mail that the recipient receives. In the CSV file, 0, txt or text represents text, 1 or html represents HTML and 2 represents offline HTML. |
| timestamp | The last date on which the data for the recipient was changed in the database. |
| title | The recipient’s title, for example Dr.. |
Note: You can select multiple key columns. The duplicate check will then be performed for all selected fields.
If you select a key column that does not have an index in the database, you will receive a warning that large import volumes (more than 100 rows in your CSV file) can take a very long time. In this case, you can contact our support team to have an index created.
Check for duplicate records: You use this selection list to decide how E-Marketing Manager checks for duplicates.
-
The Complete setting checks two things: Firstly, whether a new recipient has already been entered into the database. Secondly, whether an entry occurs more than once within the new recipient. How recognized duplicates are handled depends on your selection under Mode (Chapter Determining the process settings). Add only new recipients ignores existing recipients, i.e. these are not updated with the data from the CSV file. An additional update of existing recipients takes place if you have selected the import mode Add new recipients and update existing recipients.
-
The No check setting: All recipients are imported. There is no check for duplicates within the import file. Equally, no check is made as to whether a recipient already exists in the database. This can lead to a recipient with one e-mail address being contained several times in the database.
Please note: The setting No check in combination with the mode Update only existing recipients leads to the import of no data.
With the slider Update all duplicates (not only the first one) you make sure that not only the first found record is updated with the new data, but also all other detected duplicates.
8.2.1.4 Additional settings
Recipient's mailing type: With this setting, you determine what type of mailing the recipient wants the newsletter to be in. The following newsletter formats are available: Text, HTML, Offline-HTML.
Pre-Import action: You can let us "refine" the import data before the import. The preprocessed data will then be imported. The data can be converted, aggregated or transformed as a pre-processing action. In the dropdown menu, you can see all the preimport actions available for your client. If you are interested in a new pre-import action, please contact support@agnitas.de
E-mail address(es) for reports: If you want to be informed about errors that occurred during the import of recipient data, enter a valid e-mail address or multiple ones seperated by commas, in this field. Should a problem occur, E-Marketing Manager sends an e-mail which can contain the following three components:
-
A CSV file containing the found and corrected error.
-
A CSV file with the wrong lines that were not imported.
-
A report containing import statistics.
E-mail address(es) for errors: You can also enter one or more e-mail addresses here. A report will only be sent to these addresses in case of an error.
Use double opt-in process for new recipients: If this option is selected, all recipients included in your CSV file will receive a DOI email. This allows recipients to activate themselves for your mailing list.
To use this check box, you must create an action under Trigger Management with at least the following steps: 1. Add / Update Recipients and 2. Create Action Based Mailing. In step 2, you also need to select the desired medium. For more information, see Trigger management (Actions).
8.2.1.5 Gender settings
Gender settings: E-Marketing Manager uses numerical values to specify the gender of a recipient. 0 means male, 1 means female, 2 means unknown. In most cases, the gender in customer databases is given with Mr., Mrs. or Ms., or, in the case of entities such as companies, defined in completely different terms. You can take these particulars into account in the gender settings field.
The import interface has automatic gender detection for some common expressions and abbreviations. The following values are recognized:
For Mister: "herr", "herrn", "hr.", "hr", "mister", "mr", "mr.", "m", "männlich", "maennlich", "male", "monsieur", "mâle", "m."
For Miss: "frau", "fr.", "fr", "fräulein", "fraeulein", "frl.", "frl", "miss", "ms", "ms.", "misses",
"mrs", "mrs.", "w", "weiblich", "f", "female", "femme", "femelle", "mademoiselle", "madame", "mme", "melle"
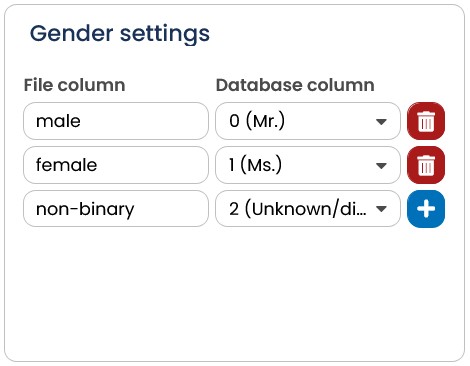
Fig. 7.9: In the import profile, you can choose which designations should be assigned to the gender.
In the File column field, enter the designation that you want to include in the import profile and assign it to the corresponding E-Marketing Manager value.
You can also preset a mailing list in the General Settings. This is particularly useful if an import profile is always or mostly used for an import to the same mailing list. This way, you save one step for future imports.
Once you have made all the settings for the import profile, click on the Save button. EMarketing Manager then checks the information you have entered and gives a response if there are errors. If, for example, you have not assigned a name to the import profile, or if the email address for the report is not written with the correct syntax, the system makes you aware of this with a corresponding message. If this is the case, change the information and click again on the Save button.
As soon as you have saved your import profile, you have even more possibilities to control the import of your files via the Manage fields window.
8.2.1.6 Manage columns
The Manage fields function gives you a powerful tool for handling the import of files more flexibly.
Please note: This tab will only be editable after you have clicked on Save in the New Import Profile tab.
E-Marketing Manager works internally with fixed defined names for database columns such as lastname, gender and email. However many import files use other designations, so a mix-up can occur upon import.
An example: The email address of an import file is located under the column header email address instead of the internally used email. Normally you would have to first modify the file for import by changing the column name. E-Marketing Manager does this considerably more easily, and once configured can even carry this out fully automatically. Staying with the example: Via the Manage fields function, you tell the system to assign the column entry email address to the database column email.
Note: Fields that are set to invisible or read only do not appear in the selection list. However, existing import profiles with these fields will still work, this also applies to autoimports.
The Manage fields function offers further practical features as well as field assignment: You can in addition determine whether certain fields must be mandatory present in an import file and optionally assign a standard value to empty fields. Only default values that match the respective field type can be entered as default values. Alphanumeric fields interpret any input as text (string), Date fields can accept fixed date/time values or a function, and Numeric fields can accept only numeric values.
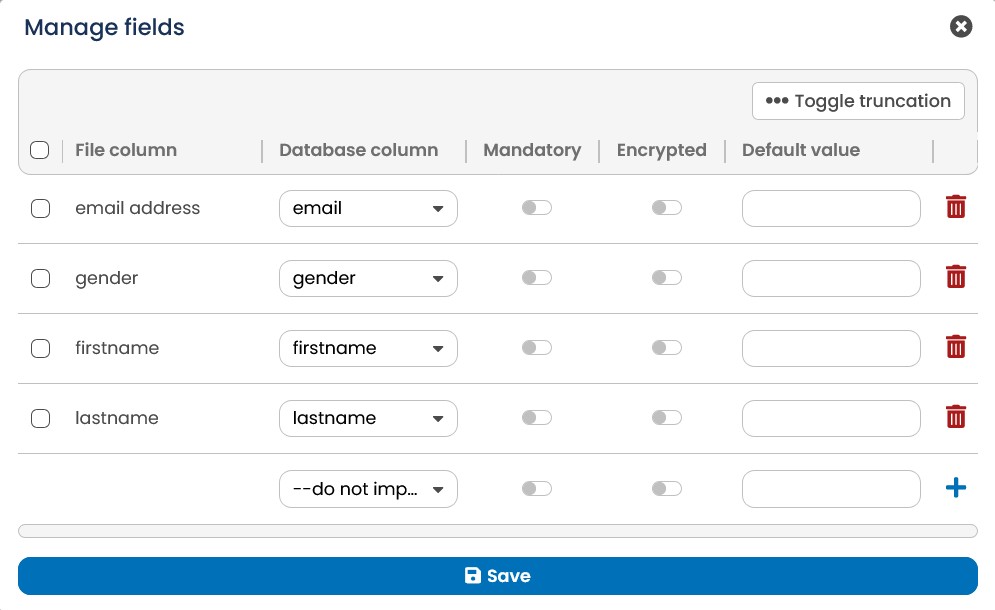
Fig. 7.10: In the Manage Fields tab you define a corresponding database column for each column of the import file.
In the New column input mask, enter the column name that you want to assign to a database column in E-Marketing Manager and confirm your entry with Add. This system now shows the column name under File column.
Tip: If you do not have the exact designation of the column names of your import file to hand, or want to avoid typing mistakes, E-Marketing Manager offers you a practical, and above all, time-saving alternative. Click on the Browse button, tell the system where your file is saved and then confirm this with Upload file. E-Marketing Manager subsequently reads out the column names of the import file and automatically adds them to the tab Manage fields. Alternatively you can use a file from the Upload section that you have already sent to E-Marketing Manager. To do so, place a tick next to Use uploaded file and choose the appropriate file in the selection menu. You can find out more on the subject of uploading files in the File Upload chapter.
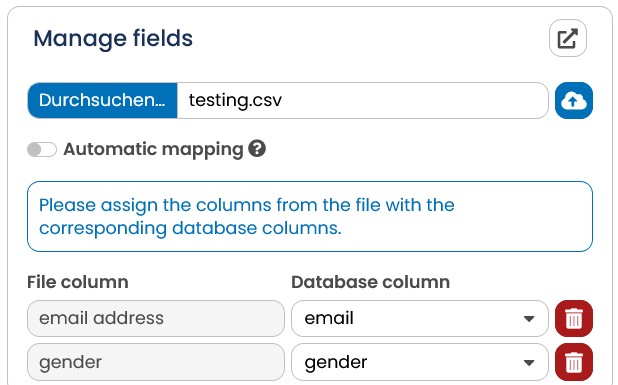
Fig. 7.11: The system automatically reads in the designations of the columns if you enter the path for the corresponding file.
In this way you can add the column names of different files to your import profile. If you want to change the file, inform the system where the next import file is located via Browse. This however does not permit duplicates: You can assign only one file field to the same database field.
E-Marketing Manager offers you the following options for each column name that you add to the import profile:
Database column: Here you determine to which database column the column name you have entered is to be assigned. If you want to exclude data sorted under the file-column names, use the standard choice --do not import column. Further options are:
Mandatory: With this setting you determine whether the file column must be present in the import file. Tick the desired table entry.
Encrypted: If you activate the Encrypted option, the data is not displayed in plain text in the recipient profile.
Default value: If a column in your import file should have no empty fields, you can assign these fields a standard value upon import. An example: The newsletter-format column is assigned the mailtype database column. If the recipient has not entered the desired format here, he will receive the newsletter in HTML format. The value 1 is therefore entered into the input mask Default value. If you have selected a self-defined field with a default value, this value is automatically displayed but you can overwrite or delete it.
In the Manage fields dialog field, to delete an element from the list, click on the delete symbol at the end of each line. Save lets the system note your settings without closing the input mask.
Please note: To import recipient data successfully, you must assign at least one column in the file to a column in the database. Moreover, the defined key column must be imported.
8.2.2 Managing a profile, deleting a profile
All import profiles can be conveniently managed by E-Marketing Manager. The corresponding menu to do this is called via the main navigation Data management and Import profiles.
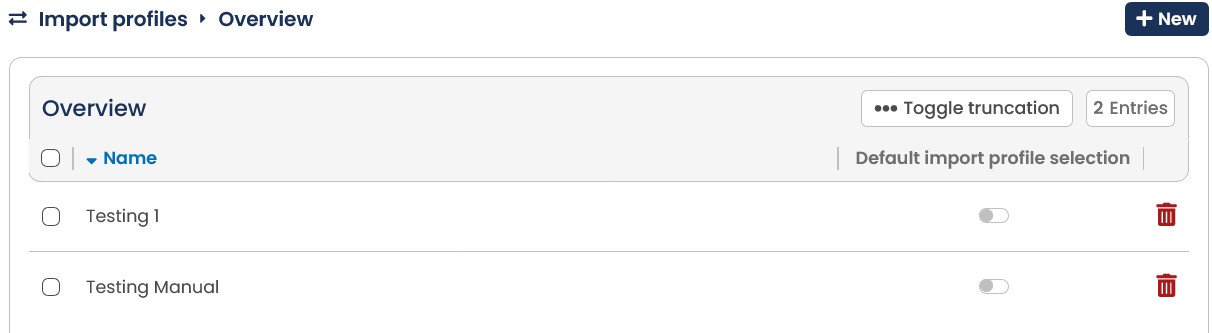
Fig. 7.12: The import profiles menu shows all available import profiles.
Several options are available for each import profile. The entries can be sorted in alphabetically ascending or descending order by clicking on the arrow symbol in the import profile column.
Clicking on the name of the profile opens it allowing further handling. E-Marketing Manager switches to the input mask of the import profile, where you can modify its settings as described in chapter Creating a new import profile.
If you want to use a certain profile as the standard profile, activate the appropriate slider in the Default import profile selection column and accept this setting with Save. This option saves you time when you use one profile more often than others: As soon as you define a profile as default, you do not need to explicitly select it before carrying out each import. The E-Marketing Manager uses the standard profile as a preset in the uppermost position in the drop-down menu Import profile.
You can remove a profile from the list by using the Delete symbol.